Quantcast
Channel: DexterPOSH's Blog
Viewing all 97 articles
Browse latest View live

PowerShell + SCCM 2012 : Get-DPContent (Get all the Packages stored on a DP)

$
0
0
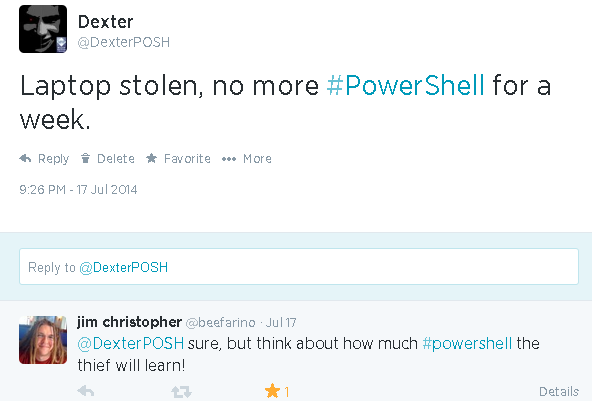
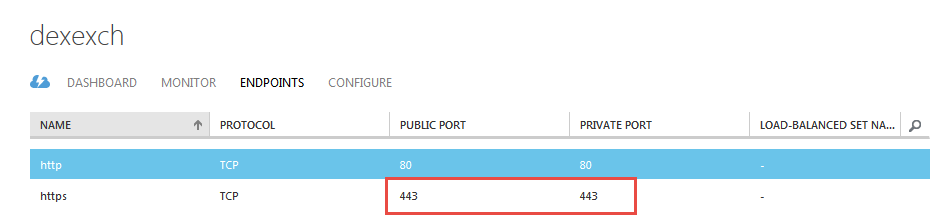
This week when came back from office , saw this tweet from Adam Bertram:


It got me curious how to Script this, I had written a Script in past to remove packages from the DP. So let's try out this scenario.

The class to query is the SMS_DistributionPoint class and the property to be used for filtering is ServerNALPath. My Lab has only one DP named "DexSCCM" so gonna use that in the filter. Note the WQL operator used here for filtering is LIKE not '='.


001
Get-CimInstance -ClassName SMS_DistributionPoint -Filter "ServerNALPAth LIKE '%DexSCCM%'" -ComputerName dexsccm -Namespace Root\SMS\Site_DEX


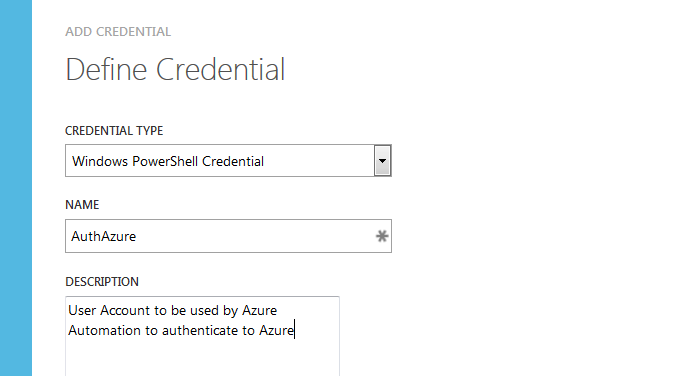
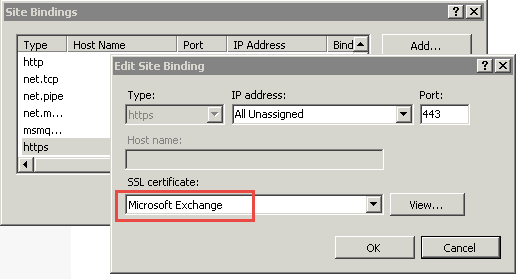
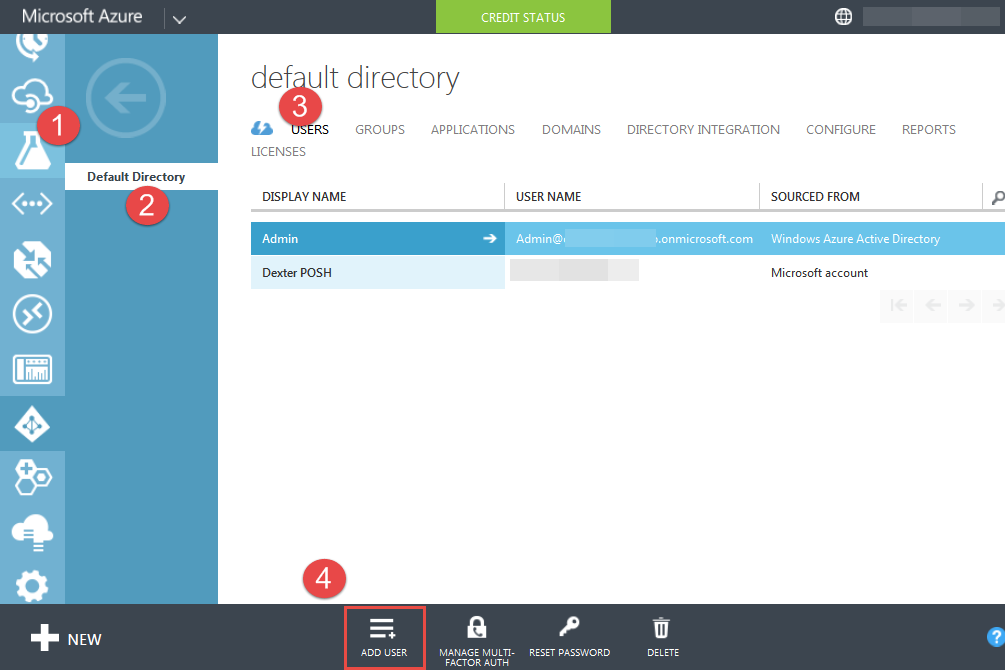
This will give you a bunch of objects back , below is one of the objects screenshot:


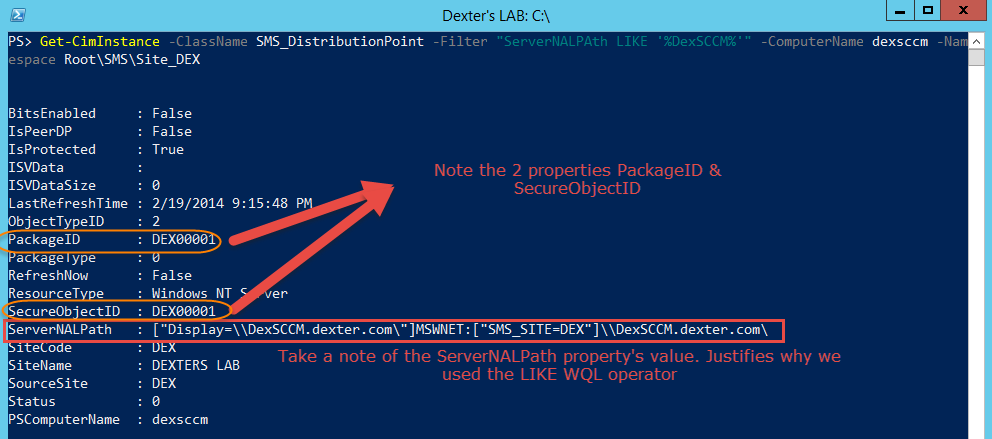
Note - Please take a moment to go to the MSDN documentation of the SMS_DistributionPoint WMI Class and pay attention to the ObjectTypeID, SecureObjectID and PackageID properties.

From the above Objects I can get the PackageID or SecureObjectID and get an instance of the appropriate Object based on ObjectTypeID. :)

For the above Screenshot the ObjectTypeID is 2 which as per MSDN documentation says it corresponds to a SMS_Package class so let me get the instance of SMS_Package having the PackageID "DEX00001"


PS> Get-CimInstance -ClassName SMS_Package -Filter 'PackageID="DEX00001"' -ComputerName dexsccm -Namespace Root\SMS\Site
_DEX


ActionInProgress : 0
AlternateContentProviders :
Description : This package is created during installation.
ExtendedData :
ExtendedDataSize : 0
ForcedDisconnectDelay : 5
ForcedDisconnectEnabled : False
ForcedDisconnectNumRetries : 2
Icon :
IconSize : 0
IgnoreAddressSchedule : False
ISVData :
ISVDataSize : 0
IsVersionCompatible : True
Language :
LastRefreshTime : 2/9/2014 2:23:00 PM
LocalizedCategoryInstanceNames : {}
Manufacturer : Microsoft Corporation
MIFFilename :
MIFName :
MIFPublisher :
MIFVersion :
Name : User State Migration Tool for Windows 8
NumOfPrograms : 0
PackageID : DEX00001
PackageSize : 48381
PackageType : 0
PkgFlags : 0
PkgSourceFlag : 2
PkgSourcePath : C:\Program Files (x86)\Windows Kits\8.1\Assessment and Deployment Kit\User State
Migration Tool
PreferredAddressType :
Priority : 2
RefreshPkgSourceFlag : False
RefreshSchedule :
SecuredScopeNames : {Default}
SedoObjectVersion : FF4B4436-5124-4875-ADB3-168BF444068C
ShareName :
ShareType : 1
SourceDate : 2/9/2014 2:06:15 PM
SourceSite : DEX
SourceVersion : 1
StoredPkgPath :
StoredPkgVersion : 1
Version : 6.3.9431.0
DefaultImageFlags : 2
IsPredefinedPackage : False
TransformAnalysisDate : 1/1/1980 5:30:00 AM
TransformReadiness : 0
PSComputerName : dexsccm


It works ! Got the Object back and following this approach can get the Objects stored on the DP.

But there is a small catch when the ObjectTypeID is 31 (SMS_Application) then we can't use the PackageID as a filter with the SMS_Application Class because it is a lazy property. If you don't believe me go ahead and try it (already did). So we have to use another property ModelName to filter.

To assist on this wrote a small Function called Get-DPContent (download it) which allows you to specify a DPName and the ObjectType (application, package, image etc) you want report of being stored in a DP. One can modify the Function to include all details for the Objects but I was just looking for the names of the packages, applications etc. Below is how you use it (once you have it dot sourced)


PS C:\> get-DPContent -DPname dexsccm  

DP ObjectType Package PackageID
-- ---------- ------- ---------
dexsccm Package User State Migration Tool for Windows 8 DEX00001
dexsccm Package Configuration Manager Client Package DEX00002


By default it only looks for Packages
One has to specify the ObjectType in order to look for Applications :


PS> Get-DPContent -DPname dexsccm -ObjectType Application -SCCMServer dexsccm

DP ObjectType Application Description
-- ---------- ----------- -----------
dexsccm Application 7-Zip For 64-bit machines only
dexsccm Application PowerShell Community Exten... PSCX 3.1
dexsccm Application Quest Active Roles Managme... Quest Snapin for AD Admins...
dexsccm Application PowerShell Set PageFile The Script will set the P...
dexsccm Application NotePad++ Alternative to Notepad


Hope this helps someone, trying to generate a list of Packages on a DP :)
This can be modified to work with SCCM 2007 too but seriously are you still running that :P
Cheers !

Resources:

Technet Gallery: Get list of Packages stored on a DP in ConfigMgr/ SCCM 2012
http://gallery.technet.microsoft.com/Get-list-of-Packages-35208e83/


SMS_Distribution WMI Class
http://msdn.microsoft.com/en-us/library/hh949735.aspx


PowerShell (Bangalore | Hyderabad ) UG - First Hangout

$
0
0
Recently we have started with the hangouts covering the basics of PowerShell.

The first hangout was aired successfully on 25th August 2014and is now available on the "PowerShell Bangalore User Group" YouTube channel, 

We talked a little bit on the background of Windows PowerShell and how it makes an ITPro's life awesome and why is it very important to get started with PowerShell.


The video can be found below:


We learned a few lessons on the feedback from community on how to improve these in future.

So hopefully we will improve in future :)
 

Cheers !

upcoming speaking engagements

$
0
0
Recently started working at AirWatch by VMWare and been busy learning the new Mobile technologies. 

Not been able to do much on the PowerShell and ConfigMgr side but I did few things in Azure with PowerShell (did build my LAB up there).

So will be speaking on this very topic at the Microsoft Community Day event on 23rd August . Below is the eventbrite link to register


Later in September will be speaking at the Microsoft Event on "Transforming the Datacenter" at Bangalore, India. Below is the link for that (limited seats):

https://msevents.microsoft.com/CUI/EventDetail.aspx?EventID=1032592541&culture=en-IN


Also planning a few hangouts for the PowerShell Bangalore User Group to help new people embrace the Shell. :)


PSBUG : Let's Automate together

$
0
0
I made this short video clip (powered by PowToon) to show the essence of our PowerShell Bangalore User Group.


I got the inspiration of doing these short video clips after seeing the session at August SQLBangalore UG Meet by Amit Banerjee (MSFT PFE)


Little about PSBUG

We are a bunch of cool PowerShell folks who help fellow ITPros onboard the PowerShell awesomeness club. If you are just starting out with PowerShell don't worry , we will help you out as a community :) .

If you are a PowerShell expert then come speak for us and spread the word.


The first name which comes to mind when speaking of PSBUG is of Ravikanth Sir (PowerShell MVP) , who has been a constant inspiration to us folks here. Ravi Sir has already written an awesome post about our story at PowerShell Magazine -> here 

Big shout out to all the cool PS-Bugs out there -->  Manoj (PowerShell MVP),Harshul, Pradeep, Manas, Vinith, Hemanth, Karthikeyan, Anirban and many more who show up on lazy weekends ;)


Hope we reach out to more guys out there and help them embrace the shell :)

P.S. - We have "Community day" coming up on 23rd August 2014, if you are around then do drop by.

PowerShell + Azure : Deploy a DC

$
0
0
Recently my laptop got stolen and that gave me a push to build my lab on Azure. I tweeted this and got an awesome reply by Jim Christopher[PowerShell MVP] :


Thanks to my friend Fenil Shah who lend me his laptop to try out Azure.
Cheers to having awesome friends :)


I thought it would be better if I put my notes as a post. These are entirely for my reference ;) 

The best posts around Azure + PowerShell are by Michael Washam which can be found on his blog here.

My Action plan is to configure a ServerCore Server 2012 R2 machine running Active Directory for this post from scratch, I don't have anything right now on my azure account.

Below are the steps:


  1. Sign Up for Azure (Free Trial is available)
  2. Install Azure PowerShell Module & Configure your subscription
  3. Create a Virtual Net for your LAB
  4. Deploy the VM
  5. Connecting to VM using PSRemoting
  6. Add a new Data Disk to VM
  7. Install ADDS and a new domain.
Steps 1-3 are one time activity, next time you want to spin a VM then no need to do these.

Sign Up for Azure

Go to https://azure.microsoft.com/en-us/ to sign up for a free trial of azure.
One has to supply their Credit Card / Debit Card information for verification which will deduct $1 (this is refunded back..don't worry you misers :D ).


Note - There is a credit limit of $200 in free trail and by default your subscription won't go above this limit, so be assured. 


Install Azure PowerShell Module & Configure your Subscription

There are very good articles below which describes this step:


Following the above two articles below is what I did:

001
002
003
004
005
006
007
008
009
# Get the Settings file
Get-AzurePublishSettingsFile

#Import the file
Import-AzurePublishSettingsFile -PublishSettingsFile "C:\Temp\Visual Studio Ultimate with MSDN-7-19-2014-credentials.publishsettings"

#Remove the Settings once imported
Remove-item "C:\Temp\Visual Studio Ultimate with MSDN-7-19-2014-credentials.publishsettings"


Once you have the settings file imported, you can remove it and then you can see that the Subscription information has been imported successfully using


001
002
003

#get the Subscription details
Get-AzureSubscription

After one has imported the Subscription information , one has to select the Subscription in order to use it , below is what I did [Note - I have only one subscription so I used (Get-AzureSubscription).SubscriptionName below ] .


001
Select-AzureSubscription -SubscriptionName (Get-AzureSubscription).SubscriptionName

Now to verify that this is the Subscription my Azure cmdlets will run against run the below and it should show your default Subscription details:


001
Get-AzureSubscription -Default

At this point we need to have a storage account before proceeding further as this is where your data (VM's VHD etc ) will be stored. I am going to create a storage account with the name "dexterposhstorage" (note all lowercase letters and numbers allowed).


001
002
003
004
005
006
#create the Storage Account
New-AzureStorageAccount -Location "Southeast Asia" -StorageAccountName "dexterposhstorage" -Label "DexLAB" -Description "Storage Account for my LABs" -Verbose

#Turn off the Geo Replication...am just using it for my lab
Set-AzureStorageAccount -StorageAccountName dexterposhstorage -GeoReplicationEnabled $false -Verbose

While doing this if you get an error like below:

New-AzureStorageAccount : Specified argument was out of the range of valid values.

Then probably the name you choose for the storage account is already taken or it doesn't adhere to the naming standards (only lowercase letters and numbers).

Once you have the storage account created, set it as the current storage account to be used for your default subscription (as you can create many storage account but only use one at a time )


001
002
003
#set your storage account
Set-AzureSubscription -SubscriptionName (Get-AzureSubscription -Default).SubscriptionName -CurrentStorageAccountName "deterposhstorage"

Note - The above steps are one time activity. Once you have followed the above steps then next time you have to just load the Azure PS Module and start automation.


3. Create a Virtual Net for your LAB


In order to run a full blown LAB in Azure with my own DNS, AD etc.  I have to use Virtual Networks. Right now the easiest way to do this is using the portal as there are no cmdlet to create a new VNET, there is a Set-AzureVNetConfig which requires us to create and manipulate an XML file to create VNETs, but I was looking to do this ASAP ( there are links in resources section if you want to automate this part too).

Below is the XML which I got after adding the VNET from the portal


Below is how the VNet looks like in the Azure Management Portal:


Note that in the subnet "AD" the first usable IP address is 192.168.0.4

If you want to do this using PowerShell too (which I will eventually then refer the resources at the end).


4. Deploy VM

If you are deploying a VM for first time then you have to create an affinity group (optional) , cloud service & Storage account (mandatory).

Now let's define few PowerShell variables for Affinity Group, Cloud Service, Storage Account , DNS Server IP Address and Name of our Domain Controller.

001
002
003
004
005
006

$AffinityGroup = "DexAffinityGroup"
$cloudService = "DexCloudService"
$StorageAccount = "dexterposhstorage"
$DNSIP = '192.168.0.4' #the first usable IP address in our Subnet "AD"
$VMName = 'DexDC' #Name of the VM running our Domain Controller

Now time to create a new Affinity Group, Storage Account and set the storage account to be used by my default subscription.

Also I have turned off Geo-replication as this is my test LAB (my preference).


001
002
003
004
005
006
007
008
009
010
#create a new Affinity Group for my Lab resources
New-AzureAffinityGroup -Name $AffinityGroup -Location "Southeast Asia" -Label DexLAB -Description "Affinity Group for my LAB" -Verbose


#create the Storage Account
New-AzureStorageAccount -AffinityGroup $AffinityGroup -StorageAccountName $StorageAccount -Label "DexLAB" -Description "Storage Account for my LABs" -Verbose

#Turn off the Geo Replication...am just using it for my lab
Set-AzureStorageAccount -StorageAccountName $StorageAccount -GeoReplicationEnabled $false -Verbose

In Azure when you deploy a VM it is associated with a cloud service (which is a logical container for Azure resources). So let's create a new one 


001
002
003
#Now create a new Cloud Service
New-AzureService -ServiceName $cloudService -AffinityGroup $AffinityGroup -Label DexLAB -Description "Cloud Service for my LAB" -Verbose

The house keeping activities needed to deploy VMs is done for my Azure Subsccription. Now I need to select a Image from the gallery and use it to deploy my VMs. The cmdlet to get the images is Get-AzureImage but out of all the images am looking only for the latest Server 2012 R2 image.

I use the below to get the image stored in the variable $image (see the use of -OutVariable)


[ADMIN] PS C:\> Get-AzureVMImage | where { $_.ImageFamily -eq “Windows Server 2012 R2 Datacenter” } | Sort-Object -Descending -
Property PublishedDate | Select-Object -First 1 -OutVariable image


ImageName : a699494373c04fc0bc8f2bb1389d6106__Windows-Server-2012-R2-201407.01-en.us-127GB.vhd
OS : Windows
MediaLink :
LogicalSizeInGB : 128
AffinityGroup :
Category : Public
Location : East Asia;Southeast Asia;North Europe;West Europe;Japan West;Central US;East US;East US 2;South
Central US;West US
Label : Windows Server 2012 R2 Datacenter, July 2014
Description : At the heart of the Microsoft Cloud OS vision, Windows Server 2012 R2 brings Microsoft's experience
delivering global-scale cloud services into your infrastructure. It offers enterprise-class
performance, flexibility for your applications and excellent economics for your datacenter and hybrid
cloud environment. This image includes Windows Server 2012 R2 Update.
Eula :
ImageFamily : Windows Server 2012 R2 Datacenter
PublishedDate : 7/21/2014 12:30:00 PM
IsPremium : False
IconUri : WindowsServer2012R2_45.png
SmallIconUri : WindowsServer2012R2_45.png
PrivacyUri :
RecommendedVMSize :
PublisherName : Microsoft Windows Server Group
OperationDescription : Get-AzureVMImage
OperationId : b556cf7a-a4e8-c744-8471-f0ea0e3473ca
OperationStatus : Succeeded


[ADMIN] PS C:\> $image.imagename
a699494373c04fc0bc8f2bb1389d6106__Windows-Server-2012-R2-201407.01-en.us-127GB.vhd


While deploying VMs in Azure one has to build configurations before finally creating it, so let's build the first one to specify the VM Instance size, image name (from above) etc and store the config in a variable named $NewVM.

Note the use of Tee-Object to store the Object in Variable. Now people might wonder why not use the -OutVariable as above then a small hint , go ahead and use it and check the type of the object being returned ;)


[ADMIN] PS C:\>  New-AzureVMConfig -Name $VMName -InstanceSize Small -ImageName $image.ImageName -DiskLabel "OS" -HostCaching R
eadOnly | Tee-Object -Variable NewVM


AvailabilitySetName :
ConfigurationSets : {}
DataVirtualHardDisks : {}
Label : DexDC
OSVirtualHardDisk : Microsoft.WindowsAzure.Commands.ServiceManagement.Model.PersistentVMModel.OSVirtualHardDis
k
RoleName : DexDC
RoleSize : Small
RoleType : PersistentVMRole
WinRMCertificate :
X509Certificates :
NoExportPrivateKey : False
NoRDPEndpoint : False
NoSSHEndpoint : False
DefaultWinRmCertificateThumbprint :
ProvisionGuestAgent : True
ResourceExtensionReferences :
DataVirtualHardDisksToBeDeleted :

Time to add another config to our VM which will specify the Admin User Name and Password for the VM:
001
002
$password = "P@ssw0rd321"
$username = "DexterPOSH"


[ADMIN] PS C:\> Add-AzureProvisioningConfig -Windows -Password $password -AdminUsername $username -DisableAutomaticUpdates -VM
$newVM


AvailabilitySetName :
ConfigurationSets : {DexDC, Microsoft.WindowsAzure.Commands.ServiceManagement.Model.PersistentVMModel.NetworkC
onfigurationSet}
DataVirtualHardDisks : {}
Label : DexDC
OSVirtualHardDisk : Microsoft.WindowsAzure.Commands.ServiceManagement.Model.PersistentVMModel.OSVirtualHardDis
k
RoleName : DexDC
RoleSize : Small
RoleType : PersistentVMRole
WinRMCertificate :
X509Certificates : {}
NoExportPrivateKey : False
NoRDPEndpoint : False
NoSSHEndpoint : False
DefaultWinRmCertificateThumbprint :
ProvisionGuestAgent : True
ResourceExtensionReferences : {BGInfo}
DataVirtualHardDisksToBeDeleted :

The first VM deployed in our LAB will be a Domain Controller and we need to make sure that it gets the same local IP Address, that's why we created a Subnet named "AD" in our Virtual Network and we will place our VM there (only machine in that subnet, ensuring that it gets the first usable IPaddress there).
In addition to this as an extra precaution , we can use the cmdlet Set-AzureStaticVNetIP to bind the IP address to our VM.


001
002
003
004
005
# set the AD Subnet for this machine
 Set-AzureSubnet -SubnetNames AD -VM $newVM

 #set the Static VNET IPAddress of 192.168.0.4 for our VM
 Set-AzureStaticVNetIP -IPAddress $DNSIP -VM $newVM


After all the configurations being created, we will finally create the new VM


001
New-AzureVM -ServiceName $cloudService -VMs $newVM -VNetName "DexVNET"  -AffinityGroup DexAffinityGroup

As an alternative one can use the New-AzureQuickVM (use this if you are using Azure Automation feature). There are few cases where New-AzureVM fails miserably.

Note - In addition one can specify the -WaitForBoot (New-AzureVM) to pause the Script execution until the VM is up and ready.


Connecting to Azure VM using PSRemoting


Once the VM is up and running it is time to add a new disk to it for storing the SysVol folder for the AD Domain Services. I wanted to do this using PowerShell too as the Server 2012 supports disk management tasks. But for this I need to configure my laptop to be able to talk to the WinRM endpoint sitting behind the cloud service (by default RDP and WinRM endpoints for each of the VMs are opened).

Again this has already been explained at the below link:

http://michaelwasham.com/windows-azure-powershell-reference-guide/introduction-remote-powershell-with-windows-azure/


Following the above link, below code does the work for me:
001
002
003
004
005
006
007
008
009
010
011
012
013
014
015
$WinRMCert = (Get-AzureVM -ServiceName $CloudService -Name $VMName | select -ExpandProperty vm).DefaultWinRMCertificateThumbprint
$AzureX509cert = Get-AzureCertificate -ServiceName $CloudService -Thumbprint $WinRMCert -ThumbprintAlgorithm sha1

$certTempFile = [IO.Path]::GetTempFileName()
$AzureX509cert.Data | Out-File $certTempFile

# Target The Cert That Needs To Be Imported
$CertToImport = New-Object System.Security.Cryptography.X509Certificates.X509Certificate2 $certTempFile

$store = New-Object System.Security.Cryptography.X509Certificates.X509Store "Root", "LocalMachine"
$store.Open([System.Security.Cryptography.X509Certificates.OpenFlags]::ReadWrite)
$store.Add($CertToImport)
$store.Close()

Remove-Item $certTempFile

After this I can remote in to my VM running up on Azure and perform all the tasks I want to, isn't it amazing ;)

Using the cmdlet Get-AzureWinRMUri, we get the connection URI.


001
002
003
#Now I can use the Get-AzureWinrmUri
    $WinRMURi = (Get-AzureWinRMUri -ServiceName $cloudService -Name $VMName).AbsoluteUri


also create credential object to be passed on when opening a PSSession.


001
002
003
004
005
006
007
008
#Convert our plain text password to secure string
$passwordsec = ConvertTo-SecureString -String $password -AsPlainText -Force
#create the Creds Object
$cred = new-object -typename System.Management.Automation.PSCredential -argumentlist $username,$passwordsec

#Open up a new PSSession to the Azure VM
$Session = New-PSSession -ConnectionUri $WinRMURi -Credential $cred

Hopefully if we did everything right we will have a PSSession open.


Add a new data disk to VM

Let's add the data disk now.

001
002
003
#add new data disk to store the NTDS and SysVol folders
Add-AzureDataDisk -CreateNew -DiskSizeInGB 20 -DiskLabel "NTDS" -LUN 0 -VM $DexDC  | Update-AzureVM

Please note that at the end we need to pipe the output of Add-AzureDataDisk to Update-AzureVM.

Now if you would have connected using RDP and opened the diskmgmt.msc then you could have added the new disk (GUI way).

But we are going to use PowerShell for that as the server we choose is Server 2012 R2 (which has the disk mgmt cmdlets shipped with it).


Below is the code, which will initialize , partition and format our new disk:
001
002
003
004
005
006
007
008
009
010
011

Invoke-Command -Session $session -ScriptBlock {
    Get-Disk |
    where partitionstyle -eq 'raw' |
    Initialize-Disk -PartitionStyle MBR -PassThru |
    New-Partition -AssignDriveLetter -UseMaximumSize |
    Format-Volume -FileSystem NTFS -NewFileSystemLabel "NTDS" -Confirm:$false

                             
}

You can verify the result by running the Get-Disk cmdlet in the remote PSSession.


Install ADDS and a new domain

Perfect now we have everything to promote this Azure VM as the first domain controller for our new forest.

We will put the NDTS & SysVol folder in our new data disk we added.


001
002
003
004
005
006
007
008
009
010
011

Invoke-Command -Session $Session -ArgumentList @($password-ScriptBlock {
        Param ($password)
        # Set AD install paths
        $drive = get-volume | where { $_.FileSystemLabel -eq “NTDS” }
        $NTDSpath = $drive.driveletter + ":\Windows\NTDS"
        $SYSVOLpath = $drive.driveletter + ":\Windows\SYSVOL"
        write-host "Installing the first DC in the domain"
        Install-WindowsFeature –Name AD-Domain-Services -includemanagementtools
        Install-ADDSForest -DatabasePath $NTDSpath -LogPath $NTDSpath -SysvolPath $SYSVOLpath -DomainName "dex.com" -InstallDns -Force -Confirm:$false -SafeModeAdministratorPassword $password
    }

Reboot your VM and you have your test domain up and ready in the cloud (for me it is dex.com).

One more thing once all is done, I switched my Domain Controller to the ServerCore ;)

Below is the snippet which does it for me.


001
002
003
#Convert to Server Core
Invoke-Command -Session $Session -script { Uninstall-WindowsFeature Server-Gui-Mgmt-Infra,Server-Gui-Shell -Restart}


That's it for today, probably one more post will follow which will focus on doing this entire setup using the Azure Automation (workflows).

I will be showing this at Microsoft Community Day on 23rd August, let's see if I can get that recorded.

Resources:

http://michaelwasham.com

http://blogs.technet.com/b/keithmayer/archive/2014/08/15/scripts-to-tools-auto-provisioning-azure-virtual-networks-with-powershell-and-xml.aspx

http://blogs.blackmarble.co.uk/blogs/rhepworth/post/2014/03/03/Creating-Azure-Virtual-Networks-using-Powershell-and-XML.aspx

http://blogs.technet.com/b/kevinremde/archive/2013/01/19/create-a-windows-azure-network-using-powershell-31-days-of-servers-in-the-cloud-part-19-of-31.aspx


http://blogs.technet.com/b/keithmayer/archive/2014/04/04/step-by-step-getting-started-with-windows-azure-automation.aspx


PowerShell + WPF + GUI : Hide (Use) background PowerShell Console

$
0
0
Few years back, I had started wrapping my PowerShell scripts with some sort of GUI built using Windows Forms (used Primal Forms CE mostly). Things went fine for a while but then I stumbled across awesome posts by MVPBoe Proxon using WPF with PowerShell to do the same. (check Resources section)

I had been procrastinating the idea of playing with WPF for a while but then had a great discussion with MVP Chendrayan(Chen) and got inspired to do it.

One can use Visual Studio (Express Edition - which is free) to design the UI and then consume the XAML in PowerShell script...Isn't that Cool ! See resources section for links on that.

Often when we write the Code to present a nice UI to the end user there is a PowerShell console running in the background. In this post I would like to share a trick to hide/show the background console window. This trick works with both Winforms and XAML.

Note - PowerGUI & Visual Studio Express are absolutely FREE !

For the demo of this post I have a GUIdemo.ps1 script with below contents :


001
002
003
004
005
006
007
008
009
010
011
012
013
014
015
016
017
018
019
020
021
022
023
024
025
[xml]$xaml= @"
<Window
    xmlns="http://schemas.microsoft.com/winfx/2006/xaml/presentation"
    xmlns:x="http://schemas.microsoft.com/winfx/2006/xaml"
    x:Name="HideWindow" Title="Initial Window" WindowStartupLocation = "CenterScreen"
    Width = "335" Height = "208" ShowInTaskbar = "True" Background = "lightgray">
    <Grid Height="159" Name="grid1" Width="314">
        <TextBox Height="46" HorizontalAlignment="Left" Margin="44,30,0,0" Name="textBox" VerticalAlignment="Top" Width="199" />
        <CheckBox Content="Show PS Windpw" Height="52" HorizontalAlignment="Left" Margin="34,95,0,0" Name="checkBox" VerticalAlignment="Top" Width="226" FontSize="15" />
    </Grid>
</Window>
"@

Add-Type -AssemblyName PresentationFramework
$reader=(New-Object System.Xml.XmlNodeReader $xaml)
$Window=[Windows.Markup.XamlReader]::Load( $reader )

#Tie the Controls
$CheckBox = $Window.FindName('checkBox')
$textbox = $Window.FindName('textBox')


$CheckBox.Add_Checked({$textbox.text = "Showing PS Window"Show-Console})
$CheckBox.Add_UnChecked({$textbox.text = "Hiding PS Window"Hide-Console})
$Window.ShowDialog()


Save the above contents in a file and right click on it select "Run with PowerShell".


This will open up a PowerShell console window and our simple UI , right now if you check the checkbox it writes to the textbox but later on we will be able to toggle the background PowerShell Window on and off.


One of the simplest ways to hide this window as I have shown in one of my earlier postis by using PowerGUI to wrap it as an exe 

Open the Script in PowerGUI Script Editor and then go to Tools > Compile Script


This will open up another window where you can select to not show the PowerShell console.


But this option will either permanently hide the window or show it. What if I wanted to give the end users an option to toggle the background PowerShell window on and off. You would ask what purpose would it serve ?

Well I have been using this technique for a while to see various verbose messages being generated by my backend PowerShell functions.


In addition to that we can use write-host to highlight few key things in the console (Write-Host is perfect candidate here cause we just want to show stuff on the host).

So let's add the code which will provide the functionality to toggle the background PowerShell console.

Re-used the code provided at PowerShell.cz to P/Invoke.

001
002
003
004
005
006
007
008
009
010
011
012
013
014
015
016
017
018
019
020
021

#Function Definitions
# Credits to - http://powershell.cz/2013/04/04/hide-and-show-console-window-from-gui/
Add-Type -Name Window -Namespace Console -MemberDefinition '
[DllImport("Kernel32.dll")]
public static extern IntPtr GetConsoleWindow();

[DllImport("user32.dll")]
public static extern bool ShowWindow(IntPtr hWnd, Int32 nCmdShow);
'


function Show-Console {
$consolePtr = [Console.Window]::GetConsoleWindow()
[Console.Window]::ShowWindow($consolePtr, 5)
}

function Hide-Console {
$consolePtr = [Console.Window]::GetConsoleWindow()
[Console.Window]::ShowWindow($consolePtr, 0)
}


Now time to bind the functions above to the checkbox control and use few Write-Host statements in the code to make my case.


001
002
003
004
005
006
007
008
009
010
011
012
013
014
015
016
017
018
019
020
021
022
023
024
025
026
027
028
029
030
031
032
033
034
035
036
037
038
039
040
041
042
043
044
045
046
047
048
049
050
051
[xml]$xaml= @"
<Window
    xmlns="http://schemas.microsoft.com/winfx/2006/xaml/presentation"
    xmlns:x="http://schemas.microsoft.com/winfx/2006/xaml"
    x:Name="HideWindow" Title="Initial Window" WindowStartupLocation = "CenterScreen"
    Width = "335" Height = "208" ShowInTaskbar = "True" Background = "lightgray">
    <Grid Height="159" Name="grid1" Width="314">
        <TextBox Height="46" HorizontalAlignment="Left" Margin="44,30,0,0" Name="textBox" VerticalAlignment="Top" Width="199" />
        <CheckBox Content="Show PS Windpw" Height="52" HorizontalAlignment="Left" Margin="34,95,0,0" Name="checkBox" VerticalAlignment="Top" Width="226" FontSize="15" />
    </Grid>
</Window>
"@

Add-Type -AssemblyName PresentationFramework
$reader=(New-Object System.Xml.XmlNodeReader $xaml)
$Window=[Windows.Markup.XamlReader]::Load( $reader )

Write-Host -ForegroundColor Cyan -Object "Welcome to the Hide/Show Console Demo"
Write-Host -ForegroundColor Green -Object "Demo by DexterPOSH"
#Tie the Controls
$CheckBox = $Window.FindName('checkBox')
$textbox = $Window.FindName('textBox')


#Function Definitions
# Credits to - http://powershell.cz/2013/04/04/hide-and-show-console-window-from-gui/
Add-Type -Name Window -Namespace Console -MemberDefinition '
[DllImport("Kernel32.dll")]
public static extern IntPtr GetConsoleWindow();

[DllImport("user32.dll")]
public static extern bool ShowWindow(IntPtr hWnd, Int32 nCmdShow);
'


function Show-Console {
$consolePtr = [Console.Window]::GetConsoleWindow()
[Console.Window]::ShowWindow($consolePtr, 5)
}

function Hide-Console {
$consolePtr = [Console.Window]::GetConsoleWindow()
[Console.Window]::ShowWindow($consolePtr, 0)
}

Hide-Console # hide the console at start
#Events
Write-host -ForegroundColor Red "Warning : There is an issue"
$CheckBox.Add_Checked({$textbox.text = "Showing PS Window"Show-Console})
$CheckBox.Add_UnChecked({$textbox.text = "Hiding PS Window"Hide-Console})
$Window.ShowDialog() | Out-Null


Now copy the above code in PowerGUI and wrap it as an exe. Once done open the exe . Below is an animated GIF showing it in action (at the end it's a bit blurry cause of low FPS capture in gifcam). 


PowerShell + SCCM - POSH Deploy v1

$
0
0
I wrote an article for the coveted PowerShell Magazine on how to automate query based deployments in ConfigMgr using PowerShell.

http://www.powershellmagazine.com/2014/07/22/automating-deployments-in-configuration-manager-with-powershell/

If you go through that article you will get a background of this post.


So continuing to that, I present "POSH Deploy v1" which can be used to automate Query Based deployments with Configuration Manager (tested it on CM 2012 only). I had a similar tool built in my previous project for SCCM 2007 but that one had a lot of hard coded values, tried to remove those.

The tool earlier used Winforms and this time I kicked myself to try out WPF with PowerShell. Thanks to StackOverflow and blog posts shared around these topics by awesome community people :)

Personally I feel WPF have made things a bit simpler for me (less code) and extending functionality is a breeze. Not an expert right now on WPF but am getting around it. If you have feedback then it is welcomed ;)

Below is the Technet Link to the Script:
http://gallery.technet.microsoft.com/POSH-Deploy-Tool-to-ffc25b36

P.S. - No need to say it but, Please test it thoroughly in Test environment before hitting your PROD ones.

So let's start with the tool UI, it's a very basic UI. The Action button is disabled at start.


Steps to follow :
1. Enter your ConfigMgr Server Name (one with SMS Namespace Provider installed).
2. Then hit "Test SMS Connection"
3. After a successful connection has been established to the ConfigMgr Server, Hit the "Syn Collections List" button. This will dump all your Device Collections list in the User's MyDocuments folder by the name Collection.csv. 

Note - The Collection.csv won't contain the collection names matching the pattern "All*". This was done so that accidentally someone does not play with the Collections like All Systems, All Mobile devices etc.

Once you have completed above steps. You will the collection list being populated. The Action button gets activated after successful test connection.


There are basically two actions which can be performed with this tool:

  • Add Name to Query
  • Remove Name from Query
I tried to explain few things in below video (at the end there was an error thrown for direct membership rule..modified the code and it handles it now):


Time to give a little background on the tool. The tool only works with 

Add Name to Query

If you select "Add Name to Query" checkbox the Action Button text changes to "ADD" and when you input few machine names, select few collections and hit the Action Button.
Behind the scenes a PowerShell function takes the computernames and the selected collections and looks for a QueryMembership Rule by the name "Automated_QueryRule" on the collection (if not found creates one) and then does text manipulation on the Query Expression of the QueryRule. The end result is the Computer Name gets added to the QueryRule.

The important point to note here is that the PowerShell function only touches the QueryMembershipRule with the name "Automated_QueryRule", so all rest of your Rules are safe :)


Remove Name from Query

To perform this action you basically follow the same steps as above.
Select Checkbox "Remove name from Query" (You have to un-select the another checkbox to select this one). Key in computernames , select collections and hit Action button.

The main key difference on how this action works is that it will iterate over each of Query Membership rule for a collection and remove the computer names from it.

NOTE !
A little note on the "Collection Integrity Check" button, sometimes the tool will just crash (fixing that) while a certain operation in progress. So in order to maintain the last good known Query Membership Rule from the PS_Deploy.csv this button can be used.

It will by default select last 3 entries in the CSV and check if the entry in CSV is in sync with the Query on the Collection. If not then it will create/ modify the Query. Use this with caution !! Haven't tested this much.

PowerShell + Azure Automation : Deploy a Windows 10 VM (Server Tech Preview) & domain join

$
0
0
Recently VM running Server Technical Preview were added Azure Gallery and I thought of deploying a VM running it joined to my test domain, But I wanted to do that using Azure Automation.

Azure Automation is a highly scalable workflow engine offering where we can have Runbooks (PowerShell workflows) to automate long running , error prone tasks.

I first saw this in action at one of the sessions by Ravi Sir [PowerShell MVP] at one of the PowerShell Bangalore User Group meet where he used Runbooks to demonstrate really cool stuff.

Note - Azure Automation is still in preview so you might have to sign up for it by navigating to https://account.windowsazure.com/PreviewFeatures

Divided the post into 3 steps:
1. Get the Ground work ready
2. Create the Assets
3. Create a RunBook to deploy the VM (and add it to the domain)


Get the Ground work ready


First of all create an Azure Automation account from the portal (no PowerShell cmdlet for that at the moment). Once done it should show up in the Azure portal like below :


So before we start doing anything else we need a mechanism in place to authenticate to Azure against my subscription. There are two ways to achieve that (links in Resource section) :

  1. Using Azure Active Directory
  2. Using Certificate Based Authentication

In my opinion using Azure AD for the authentication is better and easier to explain (am gonna use that for this post) . The below steps of using Azure AD for Authentication are borrowed from the Azure blog found here.

Now Let's head to our Azure Active Directory > Default Directory > Users > Add User.


Then after this you will see a wizard to add a User, Key in the UserName:
Click Next, Be careful and do not enable Multi-Factor auth.


On next screen , Click "Create Temporary password".  Make a note of Complete Username and temporary password. We will change it in next step.


Now logout of the browser or open another web browser and navigate to https://manage.windowsazure.com/ .

Now on the Sign-in page , you have to specify the username of the User you created above (that's why we had to make a note of the Username and Password).
After this you will be asked to enter password (key in the temporary password). Log-in and you will be asked to change your password, do that.


Create the Assets

Let's look at what we are trying to do here, We are going to author a PowerShell Workflow which will deploy a VM with Server Technical Preview on Azure and then add the machine to my domain :)

But before we get ahead of ourselves we have few important questions to answer here.

  1. How does my workflow authenticate to Azure to add a new VM to my Cloud service ?
  2. How to set Local Admin Username and Password for the VM deployed ? (We can hardcode these). 
  3. Once the VM is up how to add it to the domain using another set of Credentials ?


This is where the Assets kick in (no Cmdlets as of now ).


We will have to create 3 Credential assets (stores Username and Password) to tackle this problem at hand. Creating Assets is very straight ahead :

Navigate to Azure Automation > Your Automation Account > Assets > Click on "Add Setting" (at the bottom). After this you will be presented with a page like below :

Select "Add Credential"

Give a Name to the Asset, have kept the Asset name same as the Azure AD User name.


 In the next screen give the User name and Password of the User we added in the first step to Azure AD.


The first asset is created, Now I will similarly add 2 mores credentials asset named "DomainDexterPOSH" of a User in my Domain dex.com which has permissions to add a Machine to my domain and another set of credential called "LocalDexterPOSH" to set the local admin username and password for the New VM which our workflow will provision.


Create a RunBook to deploy the VM


Under the Automation account in Azure portal, I can create a new RunBook from Scratch (supports authoring workflows) or create a workflow locally and upload it using the Azure Automation cmdlets. The Azure Automation cmdlets are evolving at the moment , So for this post let's focus more on using the portal to author RunBooks.

Let's get familiarize with how a  runbook looks like in the Azure portal.
To create a new runbook in portal you can click "New" and give it a name (see below)


Your runbook name should be unique among your runbooks.
Once done you will see the Runbook sitting in your Azure Automation account.


Click on it and it lands you to the editing area for the Runbook. See the below screenshot :


Notice that the Workflow Name and the Runbook name has to be the same.

The Workflow editor is pretty cool, you can play with that. This is one way of authoring things up in the Web browser.

Now the Runbooks in Azure Automation are essentially PowerShell workflows and they have few differences from the workflows which we author locally (if you have done that ). The whole workflow is available at the below link: 
https://gist.github.com/DexterPOSH/e9dceb72a6f171bd3d97

Basically you copy the whole workflow and paste it in your runbook. 
Once you have your workflow authored and tested well, you can Publish it. This way you can use that Runbook inside another runbooks too.


Once the workflow is Published, you can run it by clicking on the "Start" button at the end (this only shows up after you publish it...If you want to run a workflow while authoring it then there is "Test" button see above pic):


Clicking on "Start" will prompt you to supply arguments to the parameters, like below:

After this you can view the Job


Note - The workflow is very specific to my test LAB on Azure and you will have to substitute values and tweak the workflow for your own environment.

Below is an attempt to explain what the workflow does.

the parameters our Runbook will take:


001
002
003
004
005
006
007
008
009
010
011
012
013
014
015
016
017
018
019
020
021
workflow New-TestVM
{
    param(
        [parameter(Mandatory)]
        [String]
        $AzureConnectionName,
    
        [parameter(Mandatory)]
        [String]
        $ServiceName,
     
        [parameter(Mandatory)]
        [String]
        $VMName,
                     
        [parameter()]
        [String]
        $InstanceSize = "Medium"
    
    )

So the Workflow named New-TestVM (Note here that the workflow name and the Runbook name should be the same) will take 4 parameters for specifying the below :


  1. Subscription Name ($AzureConnectionName)
  2. Cloud Service Name ($ServiceName)
  3. Name of the new VM to provision ($VMname)
  4. Instance size of the VM ($InstanceSize which by default is Medium)


The first step in a Runbook is to authenticate to Azure this is where we use the below code snippet :


001
002
003
004
005
006
007
008
009
010
011
012
013
014
015
016
017
018
019
020
021
022
$verbosepreference = 'continue'

    #Get the Credentials to authenticate agains Azure
    Write-Verbose -Message "Getting the Credentials"
    $Cred = Get-AutomationPSCredential -Name "AuthAzure"
    $LocalCred = Get-AutomationPSCredential -Name "LocalDexterPOSH"
    $DomainCred = Get-AutomationPSCredential -Name "DomainDexterPOSH"


    #Add the Account to the Workflow
    Write-Verbose -Message "Adding the AuthAzure Account to Authenticate"
    Add-AzureAccount -Credential $Cred

    #select the Subscription
    Write-Verbose -Message "Selecting the $AzureConnectionName Subscription"
    Select-AzureSubscription -SubscriptionName $AzureConnectionName

    #Set the Storage for the Subscrption
    Write-Verbose -Message "Setting the Storage Account for the Subscription"
    Set-AzureSubscription -SubscriptionName $AzureConnectionName -CurrentStorageAccountName "dexterposhstorage"

In the above code snippet we retrieve all of the Assets we created then we use one of them $cred to authenticate to Azure. After that we select the Subscription against which our workflow will run (& automate stuff). One more thing as we are going to create a new VM we will need to specify the storage account as well.


Now the below code snippet will :

  • Get the Image details using Get-AzureVMImage and store the ImageName property in a variable
  • Then we derive the Username and Password from the LocalCred which stores one of the Credential Asset
  • Finally we specify all the configurations to the cmdlet New-AzureQuickVM (e.g SubnetName, Username, Password, ImageName etc.). Note the user of -WaitForBoot switch will pass on the control to next activity once the VM is up and running.
  • After this let's do a checkpoint so that if something fails in our workflow past this point, it should be able to resume from here.


001
002
003
004
005
006
007
008
009
010
011
012
013
014
015
016
017
018
#Select the most recent Server 2012 R2 Image
    Write-Verbose -Message  "Getting the Image details"
    $imagename = Get-AzureVMImage |
                     where-object -filterscript { $_.ImageFamily -eq “Windows Server Technical Preview” } |
                     Sort-Object -Descending -Property PublishedDate |
                     Select-Object -First 1 |
                     select -ExpandProperty ImageName

    #use the above Image selected to build a new VM and wait for it to Boot
    $Username = $LocalCred.UserName
    $Password = $LocalCred.GetNetworkCredential().Password

    New-AzureQuickVM -Windows -ServiceName $ServiceName -Name $VMName -ImageName $imagename -Password $Password -AdminUsername $Username -SubnetNames "Rest_LAB" -InstanceSize $InstanceSize  -WaitForBoot
    Write-Verbose -Message "The VM is created and booted up now..Doing a checkpoint"

    #CheckPoint the workflow
    CheckPoint-WorkFlow
    Write-Verbose -Message "Reached CheckPoint"

This will take some time and after the machine is provisioned, we have another task at hand of adding the new VM to our domain. This can be achieved by opening a PSSession to the new VM and performing the action.

Below is the code which will open a PSSession to the machine using the LocalCred Asset and perform the domain join passing the DomainCred as argument to the Scriptblock:


001
002
003
004
005
006
007
008
009
010
011
012
013
014
015
016
017
018
019
020
021
022
023
024
025
026
027
028

    #Call the Function Connect-VM to import the Certificate and give back the WinRM uri
    $WinRMURi = Get-AzureWinRMUri -ServiceName $ServiceName -Name $VMName | Select-Object -ExpandProperty AbsoluteUri

    InlineScript
    {
        do
        {
            #open a PSSession to the VM
            $Session = New-PSSession -ConnectionUri $Using:WinRMURi -Credential $Using:LocalCred -Name $using:VMName -SessionOption (New-PSSessionOption -SkipCACheck ) -ErrorAction SilentlyContinue
            Write-Verbose -Message "Trying to open a PSSession to the VM $VMName "
        } While (! $Session)
   
        #Once the Session is opened, first step is to join the new VM to the domain
        if ($Session)
        {
            Write-Verbose -Message "Found a Session opened to VM $using:VMname. Now will try to add it to the domain"
                                
            Invoke-command -Session $Session -ArgumentList $Using:DomainCred -ScriptBlock {
                param($cred)
                Add-Computer -DomainName "dex.com" -DomainCredential $cred
                Restart-Computer -Force
            }
        }    
    }
#Workflow end


Resources:

Use Azure AD to authenticate to Azure
http://azure.microsoft.com/blog/2014/08/27/azure-automation-authenticating-to-azure-using-azure-active-directory/

PowerShell + Azure Automation : Unleash the Automation Cmdlets

$
0
0
In my previous post, I blogged about using Azure Automation to deploy a Windows 10  Server Technical Preview VM in my test domain running on Azure.

But if you noticed there were lot of things that we needed to do from the Azure portal. Being an advocate of doing all things from PowerShell I gave it another shot and below is what I found (notice the colors based on what I was able to do with PowerShell)  :

1. Get the Ground work ready (few bits possible)
2. Create the Assets  (not possible at the moment)
3. Create a RunBook to deploy the VM (and add it to the domain) (PowerShell Rocks !)


PowerShell + Get the Ground work ready

As already mentioned at the moment you can't create an Azure Automation account with PowerShell, but what you can do is add a new User to Azure Active directory :)

You will have to review Software Requirements and then install the Azure AD module 

Once the module named "Msonline" is installed you can very well go ahead and create a new user.

First step is connect to the AD by supplying the credentials.

Note that the User credentials you are supplying should be sourced from Azure AD (from what I understood ). So the first user has to be created in the portal manually.


Once that is done we can use the credentials of the User like below to authenticate :
001
002
$cred = Get-Credential -UserName "Admin@dexterposh.onmicrosoft.com" -Message "The Username is not the real one ;)"
Connect-MsolService -Credential $cred

The prompt will return which means you have successfully connected :)
Before adding a new User wanted to show what is the domain name for the User you create (this is needed to specify UPN for the User).

Run the cmdlet below to view the domain:

PS>Get-MsolDomain

Name Status Authentication
---- ------ --------------
dexterposh.onmicrosoft.com Verified Managed

Make a note of the name property.

Now let's spin up a new User :


PS>New-MsolUser -UserPrincipalName TestPSUser@dexterposh.onmicrosoft.com -DisplayName "TestPSUser" -FirstName "Test"  -LastName "PSUser"

Password UserPrincipalName DisplayName isLicensed
-------- ----------------- ----------- ----------
Yama6969 TestPSUser@dexterposh.... TestPSUser False


If you don't specify a password for the User account then you will get a temporary password account for the User back. 

After this the process of changing the password for the User and adding that user to manage the subscription is manual process.


Create the Assets  


From what I have explored so far this is not possible at the moment with PowerShell cmdlets or via REST APIs.

Once you have created the assets you should be good to go and from my observation it's more like of a one time activity. Once created you can play with assets inside runbooks.


PowerShell + Create a RunBook to deploy the VM


Once the Automation Account is set up (you have to do that from Azure Web portal ), then you can pretty much do everything done in the earlier post.

Let's start with creating a new Runbook named "testPS"

PS> $Automation = Get-AzureAutomationAccount
PS> New-AzureAutomationRunbook -Name testPS -Description 'RunBook created from PowerShell' -Tags Automation -AutomationAccountName $Automation.AutomationAccountName -Verbose


AccountId : 8f25145f-1f75-476e-a364-cfcd5d785843
Id : a6d49243-3862-4a03-93e0-76907b6d6d26
Name : testPS
CreationTime : 10/10/2014 3:56:16 PM
LastModifiedTime : 10/10/2014 3:56:22 PM
LastModifiedBy :
Description : RunBook created from PowerShell
IsApiOnly : False
IsGlobal : False
PublishedRunbookVersionId :
DraftRunbookVersionId : 4a15116d-5961-4950-b08c-9d172c777467
Tags : {Automation}
LogDebug : False
LogVerbose : False
LogProgress : False
ScheduleNames : {}


Now this is an empty runbook at the moment, I have to set the content of the runbook with the PowerShell workflow, am going to use the same workflow used in previous post but have to change the workflow name to testPS as the workflow name and runbook name should be the same.

Now below is a screenshot of the Workflow definition in my local machine (Notice I have super cool ISE Steriods add-on...one post coming in future about that )


I have saved the Workflow as test.ps1 and now time to set this as my Runbook definition.

PS>Set-AzureAutomationRunbookDefinition -Name TestPS -Path 'C:\Users\Dexter\Documents\WindowsPowerShell\TestPS.ps1' -AutomationAccountName $Automation.AutomationAccountName -Verbose
Set-AzureAutomationRunbookDefinition : Runbook already has a draft. Specify the parameter to force an overwrite of this
draft.
At line:1 char:1
+ Set-AzureAutomationRunbookDefinition -Name TestPS -Path C:\Users\Dexter\Document ...
+ ~~~~~~~~~~~~~~~~~~~~~~~~~~~~~~~~~~~~~~~~~~~~~~~~~~~~~~~~~~~~~~~~~~~~~~~~~~~~~~~~
+ CategoryInfo : CloseError: (:) [Set-AzureAutomationRunbookDefinition], InvalidOperationException
+ FullyQualifiedErrorId : Microsoft.Azure.Commands.Automation.Cmdlet.SetAzureAutomationRunbookDefinition


PS>Set-AzureAutomationRunbookDefinition -Name TestPS-Path 'C:\Users\Dexter\Documents\WindowsPowerShell\TestPS.ps1' -AutomationAccountName $Automation.AutomationAccountName -Verbose -Overwrite

RunbookVersion Content
-------------- -------
Microsoft.Azure.Commands.Automation.Model.RunbookVersion workflow TestPS...


Note - If you want to log verbose messages for thisNow go ahead and check the same in the Azure portal the runbook definition would have updated but it will be still in draft.


With PowerShell cmdlet you can't start a runbook which is in draft (with portal there is an option to test it ) . So we will publish the runbook.


PS>Publish-AzureAutomationRunbook -Name TestPS -AutomationAccountName $Automation.AutomationAccountName -Verbose


AccountId : 8f25134f-1f75-476e-a364-cfcd5d785843
Id : a6d49243-3862-4a03-93e0-76907b6d6d26
Name : testPS
CreationTime : 10/10/2014 3:56:16 PM
LastModifiedTime : 10/10/2014 5:07:17 PM
LastModifiedBy : PowerShell
Description : RunBook created from PowerShell
IsApiOnly : False
IsGlobal : False
PublishedRunbookVersionId : 6eb4f038-a086-4585-892e-f82af9c95396
DraftRunbookVersionId :
Tags : {Automation}
LogDebug : False
LogVerbose : False
LogProgress : False
ScheduleNames : {}


Now Let's invoke the runbook :


PS>Start-AzureAutomationRunbook -Name TestPS -AutomationAccountName $Automation.AutomationAccountName
Start-AzureAutomationRunbook : The runbook parameter "AzureConnectionName" is mandatory.
At line:1 char:1
+ Start-AzureAutomationRunbook -Name TestPS -AutomationAccountName $Automation.Aut ...
+ ~~~~~~~~~~~~~~~~~~~~~~~~~~~~~~~~~~~~~~~~~~~~~~~~~~~~~~~~~~~~~~~~~~~~~~~~~~~~~~~~
+ CategoryInfo : CloseError: (:) [Start-AzureAutomationRunbook], ArgumentException
+ FullyQualifiedErrorId : Microsoft.Azure.Commands.Automation.Cmdlet.StartAzureAutomationRunbook


If you don't specify arguments to mandatory parameters then you will get the error as above.

Now let's run the Runbook supplying proper Parameters and Arguments to it.
Note that with parameter named -Parameters we specify a Hashtable with Keys being the Paramter names of the Runbook and values are the arguments to those params.


PS>Start-AzureAutomationRunbook -Name TestPS -AutomationAccountName $Automation.AutomationAccountName  -Parameters @{Azure
ConnectionName="Visual Studio Ultimate with MSDN";ServiceName="DexCloudService";VMName="DexWindows10"} -Verbose


Id : 662707b5-fa8a-4798-8e09-6e4df09dc333
AccountId : 8f25dadf-1f75-476e-a364-cfcd5d785843
Status : Activating
StatusDetails : None
StartTime :
EndTime :
CreationTime : 10/10/2014 5:53:09 PM
LastModifiedTime : 10/10/2014 5:53:18 PM
LastStatusModifiedTime : 10/10/2014 5:53:18 PM
Exception :
RunbookId : a6d49243-3862-4a03-93e0-76907b6d6d26
RunbookName : testPS
ScheduleName :
JobParameters : {AzureConnectionName, ServiceName, VMName}


We get back a Automation.Model.Job Object. We can probably script a loop which sleeps for few seconds and checks if the Status is Completed, something like below :
001
002
003
004
005
006
do
{
    Start-Sleep -Seconds 60 #sleep for 1 minute and query the Job
    Write-Verbose -Message 'Sleeping for 60 seconds' -Verbose
while((Get-AzureAutomationJob -RunbookName TestPS -AutomationAccountName $Automation.AutomationAccountName).Status -eq 'Completed')


Now let's see how much time the Runbook took to provision the VM ( this was asked by my fellow PowerShell MVPChendrayan ):


PS>$Job = Get-AzureAutomationJob -RunbookName TestPS -AutomationAccountName $Automation.AutomationAccountName
PS>$Job.EndTime - $Job.StartTime


Days : 0
Hours : 0
Minutes : 8
Seconds : 53
Milliseconds : 803
Ticks : 5338030000
TotalDays : 0.00617827546296296
TotalHours : 0.148278611111111
TotalMinutes : 8.89671666666667
TotalSeconds : 533.803
TotalMilliseconds : 533803


WoW, Just in around 9 minutes I have a VM running the latest Server Tech preview in my test domain ;) 

Take a look at the job output by using :
001
002

Get-AzureAutomationJobOutput -Id (Get-AzureAutomationJob -RunbookName TestPS -AutomationAccountName $Automation.AutomationAccountName).Id -Stream Any -AutomationAccountName $Automation.AutomationAccountName

It surely beats downloading ISO / VHD and creating a VM in my own lab..Ohh ! Wait my LAB laptop was stolen that's why am on Azure :D

As you would know you can open a PSSession to the remote machine and verify that it was added to domain by following below code:


001
002
003
004
$WinRMURi = (Get-AzureWinRMUri -ServiceName DexCloudService -Name DexWindows10).AbsoluteUri
$Session = New-PSSession -ConnectionUri $WinRMURi -Credential (Get-Credential-Name DexWindows10 -SessionOption (New-PSSessionOption -SkipCACheck )

Invoke-Command -Session $Session -ScriptBlock {"{0} is in domain {1}" -f $env:COMPUTERNAME, $env:USERDOMAIN}

Now below is how it looks on my Console:


That's it play with the Azure PowerShell Cmdlets + Azure Automation feature they should give you ideas on doing some really cool stuff like scheduling a Runbook to run at a given time. I will leave that to your imagination :)

Until next post

PowerShell + Azure + Exchange - Connect Remotely

$
0
0
My recent dive into the Mobile Device & Email Management space has presented me with an opportunity to learn Exchange & Office 365.

I have built up an Azure VM running Server 2008 R2 with Exchange 2010 Server on it. It didn't made a whole lot of sense to connect to the machine using RDP and then running cmdlets on Exchange Management Shell.


Well I must admit that I tried opening a normal PSSession and importing the Exchange cmdlets in there but that didn't work as the Microsoft.Exchange endpoint configuration is hosted on IIS.

So here are the steps I followed to get the Exchange cmldets via Implicit Remoting, this is very similar to what we do with Office 365. This is a beginner post as am still wrapping my head around Exchange ;)

Open the endpoint on the cloud service to allow the HTTPS traffic to your Exchange Server. Here is how the endpoints appear for my Exchange box.


Note that the Public and Private port are both 443 which means when I try reach my cloud service on port 443 it will essentially redirect the request to my Exchange Box.

If you don't have that endpoint open then you need to use the cmdlet Add-AzureEndpoint to do that.

Another thing we need to do is allow Basic authentication for the \PowerShell virtual directory on the Exchange Server. This is straight forward, open the IIS Manager and click on the Authentication for the Virtual Directory :


Now Right click on the Basic Authentication and "Enable" it.


We can even do this using PowerShell for IIS :)

We are using basic authentication because my machine from which I will try to use Remote PowerShell to connect to my Exchange Server is not part of the domain.

All done, now time to try opening a PSSession to the Exchange Server.

let's store the Credentials in a variable first:


001
$creds = Get-Credential -Message 'Enter the Exchange Admin Credentials'

Now let's use the New-PSSession cmdlet to connect to the PowerShell endpoint using the connection URI for the cloud service and the Configuration name to which we connect is Microsoft.Exchange.

Note : As already pointed out, we will be using the basic authentication. 


PS>New-PSSession -ConnectionUri 'https://dexterposhcloudservice.cloudapp.net/PowerShell' -ConfigurationName 'Microsoft.Exchange' -Authentication Basic -Credential $creds
New-PSSession : [dexcloudservice.cloudapp.net] Connecting to remote server dexterposhcloudservice.cloudapp.net failed with the
following error message : The server certificate on the destination computer (dexterposhcloudservice.cloudapp.net:443) has the
following errors:
The SSL certificate is signed by an unknown certificate authority.
The SSL certificate contains a common name (CN) that does not match the hostname. For more information, see the
about_Remote_Troubleshooting Help topic.


Take a look at the Error thrown it clearly tells that the Certificate which is used to connect over SSL (we are using https in the connection uri ) is signed by an unknown CA -- this is evident from the fact that on the Exchange Server the binding for the default site uses the Certificate issued by Exchange Server.

Below is the binding for port 443 on my Exchange Server (on IIS).


Look at the second error telling that the Common Name does not match the hostname of the cloud service used to connect to, makes sense as we are not using the certificate issued to our Cloud Service here but the cert issued by Exchange Server.

So let's use New-PSSessionOption cmdlet to skip the CA & CN check
PS>$PSSessionOption = New-PSSessionOption -SkipCNCheck -SkipCACheck 
PS>New-PSSession -ConnectionUri 'https://dexterposhcloudservice.cloudapp.net/PowerShell' -ConfigurationName 'Microsoft.Exchange' -Credential $creds -SessionOption $PSSessionOption -Authentication Basic

Id Name ComputerName State ConfigurationName Availability
-- ---- ------------ ----- ----------------- ------------
10 Session10 dexterposhcl... Opened Microsoft.Exchange Available


Voila ! I have the Remote PowerShell session established to Exchange. Now time to load the Exchange Module using the Implicit Remoting.


PS>Import-PSSession -Session (Get-PSSession)
WARNING: The names of some imported commands from the module 'tmp_h5mgeuko.1ux' include unapproved verbs that might make
them less discoverable. To find the commands with unapproved verbs, run the Import-Module command again with the Verbose
parameter. For a list of approved verbs, type Get-Verb.


ModuleType Version Name ExportedCommands
---------- ------- ---- ----------------
Script 1.0 tmp_h5mgeuko.1ux {Add-ADPermission, Add-AvailabilityAddressSpace, Add-Content...

It will take some time and once done you will get all the Exchange cmdlets available to you based on your Role.


One more thing if you don't wanna do all the above steps again and again then you can use Export-PSSession to dump the module locally and just import it next time.

Here is how you do it :


PS>Export-PSSession -Session (Get-PSSession) -OutputModule AzureExchange


Directory: C:\Users\DDhami\Documents\WindowsPowerShell\Modules\AzureExchange


Mode LastWriteTime Length Name
---- ------------- ------ ----
-a--- 11/1/2014 5:04 PM 252399 AzureExchange.format.ps1xml
-a--- 11/1/2014 5:04 PM 592 AzureExchange.psd1
-a--- 11/1/2014 5:04 PM 1534799 AzureExchange.psm1

This will put a Module name AzureExchange in your Modules directory and next time you Import the module it will prompt you for credentials to enter and then use those to open a PSSession


Thanks for reading fellas. If you have an Exchange Lab up on Azure then do use this tip :)

Now the gotcha with using Implicit Remoting is that I get de-serialized objects back. I remember this from one of the session on Exchange by Sahal Omar for PSBUG.

So on my local machine the below is seen:


While on the Exchange Management Shell , I see this :


I must say that after having worked to automate bits of ConfigMgr with PowerShell, working with Exchange is really Cool. The integration is superb !


PowerShell : Play Music until Sleep

$
0
0
A while back I had blogged about using PowerShell to create a playlist of random songs in VLC player& I had a rudimentary function based on that in my profile.


001
002
003
004
005
006
function play-song
{
    param([int]$count=5, [string]$Path="D:\Songs")
    Get-ChildItem $Path -recurse -filter *.mp3| Get-Random -Count $count |
        ForEach-Object -process { Start-Process $_.Fullname -verb 'AddtoPlaylistVLC'}
}

I know the name contains an unapproved verb but I was lazy to change it.


Few days back I thought of extending above function a little bit, so that my laptop Sleeps when the songs in the playlist end (hopefully I would have slept by that time )

I took a simple approach for this: 

  • Get the total duration of all the songs 
  • Create a Job Trigger with current time + duration of the songs + 1 minute
  • Create a PowerShell Scheduled job which will sleep the machine 

Below is the explanation of the code :

First let's take a look at the Function definition & the parameters declared.


001
002
003
004
005
006
007
008
009
010
011
012
013
014
015
016
017
018
function Start-VLCplaylist
 {
     [CmdletBinding()]
     Param
     (
         # Specify the folder path where Music files are stored
         [Parameter(ValueFromPipeline,
                    ValueFromPipelineByPropertyName)]
         $Path='D:\Songs', #Putting a default value here so that I don't have to specify it everytime

         # Specify the count of songs to play
         [Parameter()]
         [int]$count=5,

         #Specify this switch if you want your System to sleep after songs in the playlist get over
         [Switch]$SleepLater
     )


  • Name of the Function has approved Verb now.
  • Path parameter to tell where you have your all .mp3 files stored.
  • Count param to tell how many songs to add to playlist.
  • SleepLater Switch to tell the function to sleep the computer after all songs have played.
Now Let's proceed to the Begin {} block


001
002
003
004
005
006
007
008
009
010
011
012
013
014
015
016
017
Begin
     {
       Write-Verbose -Message '[Start-VLCplaylist] Begin : Starting the Function'
       if (Test-Path -Path 'C:\Program Files (x86)\VideoLAN\VLC\vlc.exe' -PathType Leaf)
       {
           #Associate the .MP3 files to be open with VLC
           $null = cmd /c 'assoc .mp3=VLC.mp3'
           $null = cmd /c 'ftype VLC.mp3="C:\Program Files (x86)\VideoLAN\VLC\vlc.exe" --started-from-file "%1"'
           Write-Verbose -Message '[Start-VLCplaylist] Begin : .MP3 files associated to be open with VLC player'
       }
       else
       {
            Throw 'VLC Player is not installed'
       }
       $shell = New-Object -COMObject Shell.Application
       $duration = [timespan]::Zero
     }


  • Check if VLC player is installed. If not throw an exception.
  • Use Assoc & Ftype to associate .mp3 files to VLC player.
  • Create a Shell.Application COM Object for later use.
  • Variable duration to store the total duration of the songs, initialized to Zero.

Time for the  Process {} Block.


001
002
003
004
005
006
007
008
009
010
011
012
013
014
015
016
017
018
019
020
021
022
023
024
025
026
027
028
029
030
031
032
033
034
035
036
037
038
039
040
041
042
043
Process
     {
        Write-Verbose -Message '[Start-VLCplaylist] Process : Randomly collecting the songs'
        $Songs = Get-ChildItem -Path $Path -recurse -Filter *.mp3| Get-Random -Count $count
       
        ForEach ($song in $Songs)
        {
       
            $shellfolder = $shell.Namespace($($song.directoryname))
            $shellfile = $shellfolder.ParseName($($Song.Name))
            $Duration = $duration +  [timespan]$($shellfolder.GetDetailsOf($shellfile, 27))
            Write-Verbose -Message "[Start-VLCplaylist] Process : Working with $($song.name) ; Totalduration : $($duration.TotalMinutes)"
            Start-Process $song.Fullname -verb 'AddtoPlaylistVLC'
       
        
        }
        If ($SleepLater)
        {
            Write-Verbose -Message '[Start-VLCplaylist] Process : Creating the Trigger for the Scheduled Job'
            $trigger = New-JobTrigger -Once -At $( (Get-Date).AddMinutes($duration.TotalMinutes + 2))
       
            $joboption = New-ScheduledJobOption -HideInTaskScheduler -ContinueIfGoingOnBattery

            if (Get-ScheduledJob -Name DexSleepAfterMusic)
            {
                Write-Verbose -Message '[Start-VLCplaylist] Process : The Scheduled Job DexSleepAfterMusic already exists. Setting the Trigger & job option'
                Get-ScheduledJob -Name DexSleepAfterMusic | Set-ScheduledJob  -Trigger $trigger
            }
            else
            {
                Write-Verbose -Message '[Start-VLCplaylist] Process : Creating the Scheduled Job DexSleepAfterMusic '
                Register-ScheduledJob -Name DexSleepAfterMusic -ScriptBlock {[System.Windows.Forms.Application]::SetSuspendState($([System.Windows.Forms.PowerState]::Suspend), $false, $false)} `
                    -Trigger $trigger -ScheduledJobOption $joboption
                #Schedule the system to sleep in
            }    
   
        }
     }
     End
     {
        Write-Verbose -Message '[Start-VLCplaylist] End : Ending the Function'
     }

  • Randomly select the songs.
  • Foreach Song - use the COM Object to get the duration (add it to $Duration) & add the song to the playlist
  • If Switch SleepLater is specified then Create a Job Trigger by adding the totalminutes of the duration + 1 minute to the current time.
  • Create a new job option which hides the Scheduled Job in Task Sched & run even if on battery.
  • Check if the Scheduled Job is already created if Yes then just set the Trigger & Job option (Just to be sure)
  • If the Scheduled Job was not created earlier go ahead and create it.
Note - The Scriptblock used will Sleep the machine once the total duration of the songs is over.

The Function right now only works with the .Mp3 files but you can very well make it work with Video files etc.

Below is a gif showing it in action :)


Listening to music and going to sleep now ;)
P.S - At the end I disabled the Scheduled Job so that my Machine doesn't sleep while I am working (after the Playlist gets over) :)


Resources :

MVP Trevor's response @ Stack Overflow to sleep or hibernate machine
http://stackoverflow.com/questions/20713782/suspend-or-hibernate-from-powershell

PowerShell.com - Organize Videos and Music 
http://powershell.com/cs/blogs/tobias/archive/2011/01/07/organizing-videos-and-music.aspx


PowerShell + Azure + Exchange : Connect Mobile devices

$
0
0
As already mentioned in my previous post , I now have a test Exchange 2010 Server running on Azure. Now working in Mobile Device & Email Management space, my mobile devices needed to eventually connect to my Email Infrastructure to try out few scenarios.

Initially I thought that opening the https endpoint and enabling ActiveSync (for the Mailbox User) would suffice, but I was wrong. Needed to make few changes to the SSL bindings on the IIS and trust the certificate used for the same.

Let's get to it then.

When we create a new VM on Azure it gets the Certificate for the cloud service added to the machine's personal Cert store.

Below is a screenshot showing the same :


Now as mentioned in my previous post Exchange by default will create a self signed Certificate and bind it to the CAS Server for https communication.

This was also the case with Exchange Server VM, as it was by default for the https binding using the Cert issued to the VM , see below :


Now when I head over to https://testconnectivity.microsoft.com/  to test the EAS connectivity to my Exchange box:


 it fails with the below Certificate error.


This is obvious as the hostname used is my Cloud Service public DNS name but the SSL binding is done with a Certificate issued to the machine name DEXEXCH.

Think of it like, I say to everyone my name is Dexter but when asked for proof of identity I show up a certificate which says my name is Deepak ;)


The fix is easy to bind the correct certificate (cloud service certificate) to the HTTPS traffic.
Let's do that using PowerShell.


001
002
003
004
005
006
007
008
#store the Certificate for the cloud service
$cert = Get-ChildItem -Path Cert:\LocalMachine\My | where {$_.Subject -like '*Cloudapp.net'}

#Import the WebAdministration Module to manage IIS
Import-Module webadministration

#set the binding by using the IIS PSdrive
Set-Item -Path IIS:\SSLBindings\0.0.0.0!443 -Value $cert

Now you can verify the changes do reflect in the InetMgr :


Testting EAS Connectivity again threw me an error telling Service unavailable :


The problem seems to be only with the EAS endpoint as I was able to connect to the OWA endpoint (with Certificate errors ofcourse, it is a self signed cert) and see my emails.

Now after banging my head for a while on this and few efforts to connect my mobile device over EAS, one of my friend at office quickly helped me troubleshoot it. 

It appears I forgot to add the Certificate issued to the cloud service (the one which I binded to the Exchange CAS server for https traffic ) to my Trusted Root CAs.

So let's do this using PowerShell too ;)

First let's get the cert from the Personal Store of the Machine and store it in a variable :
001
002
003
004
005
006
007
008
009
010
$SourceStoreScope = 'LocalMachine'
$SourceStorename = 'My'

$SourceStore = New-Object  -TypeName System.Security.Cryptography.X509Certificates.X509Store  -ArgumentList $SourceStorename, $SourceStoreScope
$SourceStore.Open([System.Security.Cryptography.X509Certificates.OpenFlags]::ReadOnly)

$cert = $SourceStore.Certificates | Where-Object  -FilterScript {
    $_.subject -like '*Cloudapp.net'
}

Now let's add this Certificate to the trusted root CA store :


001
002
003
004
005
006
007

$DestStoreScope = 'LocalMachine'
$DestStoreName = 'root'

$DestStore = New-Object  -TypeName System.Security.Cryptography.X509Certificates.X509Store  -ArgumentList $DestStoreName, $DestStoreScope
$DestStore.Open([System.Security.Cryptography.X509Certificates.OpenFlags]::ReadWrite)
$DestStore.Add($cert)


After you have done this time to close the Stores which were opened and stored in the variable.


001
002
003

$SourceStore.Close()
$DestStore.Close()

Let's head back to the Connectivity Analyzer and test our EAS connectivity.


Voila ! all done , now my Mobile devices can connect over EAS to my Email Infrastructure :)

PowerShell + Exchange : Checkbox of Doom

$
0
0
Many of the Exchange Admins might already be familiar with the dreaded checkbox of doom, which causes issues with move request and Mobile devices. Post by MVP Tony Redmond here explains this in detail.

Scenario & the Problem at hand :

When a User connects to the Exchange Server using his Mobile device, then after the authentication the Exchange Trusted Subsystem creates msExchActiveSyncDevices Objects for the User. This will be evident from the below screenshot for one of the User in ADSI edit.


Now what if the Exchange Trusted Subsystem doesn't have permissions on the AD User to create those Objects , all hell is let loose. This was the case I was tackling recently and searching each User in the Directory which had this checkbox of doom unchecked manually is not feasible (am lazy).


Exploration :

This lead me to try out various ways in which I could hunt for the User Accounts (not the protected ones) which had this check box of Doom unmarked. 

Using Active Directory PowerShell Module :


PS C:\> Get-ADUser -Identity dexterposh -Properties NTSecurityDescriptor,Admincount     


Admincount : 1
DistinguishedName : CN=DexterPOSH,OU=ExchangeUsers,DC=dex,DC=com
Enabled : True
GivenName : dexter
Name : DexterPOSH
NTSecurityDescriptor : System.DirectoryServices.ActiveDirectorySecurity
ObjectClass : user
ObjectGUID : e43a0d6a-52ae-4f3a-99f2-26668a5c4f5f
SamAccountName : DexterPOSH
SID : S-1-5-21-3807823927-4164601362-1794616738-500
Surname :
UserPrincipalName : DexterPOSH@dex.com

So the logic of searching for Non protected accounts having the CheckBox of Doom unchecked is below:


  • Property named AdminCount should be equal to 0 (zero) or should not be set on the ADUser.
  • AreAccessRulesProtected property should be set to False for the NTSecurityDescriptor on the ADUser
  • I have 2 accounts to demonstrate this scenario: DexterPOSH (Domain Admin) & another test account named test123
    PS C:\> 'dexterposh','test123'| Get-ADUser -Properties NTSecurityDescriptor,Admincount |           
    >>> Select-Object -Property Name,AdminCount,UserPrincipalName,@{L='AreAccessRulesProtected';E={$_.NTSecurityDescriptor.AreAccessRulesProtected} }

    Name AdminCount UserPrincipalName AreAccessRulesProtected
    ---- ---------- ----------------- ------------------------
    DexterPOSH 1 DexterPOSH@dex.com True
    test 123 test123@dex.com True


    Note that AreAccessRulesProtected property is set to True which means that the Inheritance is blocked for the User as seen in the below screenshot.


    Now let's write PowerShell code snippet which will again check this box for test123 user.


    One of they ways is already shown in the post here, but I tried a different way using the PSProvider for ActiveDirectory :) (many ways to skin the cat )

    Below it is in action :


    PS AD:\OU=AirWatchTest,OU=ExchangeUsers,DC=dex,DC=com> ls

    Name ObjectClass DistinguishedName
    ---- ----------- -----------------
    Abdul.Yanwube user CN=Abdul.Yanwube,OU=AirWatchTest,OU=ExchangeUsers,DC=dex,DC=com
    test 123 user CN=test 123,OU=AirWatchTest,OU=ExchangeUsers,DC=dex,DC=com
    xyz abc user CN=xyz abc,OU=AirWatchTest,OU=ExchangeUsers,DC=dex,DC=com


    PS AD:\OU=AirWatchTest,OU=ExchangeUsers,DC=dex,DC=com> $ACL = Get-Acl -Path '.\CN=test 123'
    PS AD:\OU=AirWatchTest,OU=ExchangeUsers,DC=dex,DC=com> $ACL.SetAccessRuleProtection


    MemberType : Method
    OverloadDefinitions : {System.Void SetAccessRuleProtection(bool isProtected, bool preserveInheritance)}
    TypeNameOfValue : System.Management.Automation.PSMethod
    Value : System.Void SetAccessRuleProtection(bool isProtected, bool preserveInheritance)
    Name : SetAccessRuleProtection
    IsInstance : True


    PS AD:\OU=AirWatchTest,OU=ExchangeUsers,DC=dex,DC=com> $ACL.SetAccessRuleProtection($False,$true)
    PS AD:\OU=AirWatchTest,OU=ExchangeUsers,DC=dex,DC=com> Set-Acl -AclObject $ACL -Path '.\CN=test 123' -ver
    VERBOSE: Performing operation "Set-Acl" on Target "AD:\CN=test 123,OU=AirWatchTest,OU=ExchangeUsers,DC=dex,DC=com".
    VERBOSE: Performing operation "Set" on Target "CN=test 123,OU=AirWatchTest,OU=ExchangeUsers,DC=dex,DC=com".

    PS AD:\OU=AirWatchTest,OU=ExchangeUsers,DC=dex,DC=com>

    Now one can verify the changes in the AD Users & Computers console.


    This can easily be scripted using either the AD PowerShell Module or using ADSI (check out the below links).

    Happy Scripting!
    Resources :


    Exchange 2010 problems due to insufficient access to Active Directory
    http://thoughtsofanidlemind.com/2010/10/08/ex2010-insufficient-access/

    CheckBox of Doom
    http://enterpriseit.co/microsoft-exchange/checkbox-of-doom/


    enable inheritance on all AD user accounts

    http://enterpriseit.co/microsoft-active-directory/enable-inheritance-ad-user-accounts/


    Checking For Protected ACLs In Active Directory (using ADSI )
    http://blogs.technet.com/b/bill_long/archive/2010/04/13/checking-for-protected-acls-in-active-directory.aspx

    PowerShell + REST API : Basic, CMS & CMSURL Authentication

    $
    0
    0
    While working with the REST API endpoints exposed by the leaders in MDM space (Hint - VMware acquired them) , I picked up few things on how to authenticate to the REST endpoints and would like to document those here.

    The post is generic about how to use the below Authentication schemes:
    • Basic Authentication
    • Certificate Based Authentication


    Basic Authentication

    In Basic authentication, we base 64 encode the UserName & Password and pass it in the header.

    Pretty straight forward on how to do it in PowerShell, Store the Credentials and then just encode them :


    $Credential = Get-Credential
    $EncodedUsernamePassword = [System.Convert]::ToBase64String([System.Text.Encoding]::UTF8.GetBytes($('{0}:{1}' -f $Credential.UserName, $Credential.GetNetworkCredential().Password)))

    Once done we need to create the authorization header along with the API Key which will be issued to you (for this you will have to refer to the API documentation of the vendor) and lastly I want the content type to be JSON, so we create the headers hashtable.

    Finally we pass this information to the Invoke-RestMethod cmdlet along with the REST API URL , HTTP method used (get, post etc) & the Headers.


    $Headers = @{'Authorization' = "Basic $($EncodedUsernamePassword)";'APIKey' = "$APIKey";'Content-type' = 'application/json'}
    Invoke-RestMethod -Method Get -Uri '<REST API URL>' -Headers $Headers


    Certificate Based Authentication

    Using the REST API with Cert based authentication is not much of a hassle if the vendor has it clearly documented. This is more applicable in scenarios where you want to Invoke APIs non-interactively (say from a Schedule task) and this is more secure way ,then storing user credentials to disk and using them.

    Usually you will be issued a Certificate for Client Authentication purpose and have to use this Certificate to authenticate against the API. I have worked with the below two signing schemes as of the moment:


    • Content Message Signing (CMS)
    • Content Message Signing URL (CMSURL)

    In CMS scheme - the "message content" is signed with the client certificate using PKCS9 and is then base 64 encoded. This method creates problem with the GET Requests as there is no message content.

    In CMSURL scheme - the canonical URI is signed with the client certificate using PKCS9 signing and is then base 64 encoded. This works with all the HTTP methods as we sign the URI not the message content.

    Note - Both CMS & CMSURL will be able to work if there is a proxy which SSL offloads, as the two Scheme puts the signature in the Authorization header.

    Had to research a bit on how to get the CMS & CMSURL authentication schemes to work for me. Got help from Pradeep who works with the API team to give me a walkthrough on how to generate the Signed content. They had an executable developed using C# which I was able to port to PowerShell code ;)
    Below is a function which generates the Authorization Header value for the CMSURL scheme: 


    001
    002
    003
    004
    005
    006
    007
    008
    009
    010
    011
    012
    013
    014
    015
    016
    017
    018
    019
    020
    021
    022
    023
    024
    025
    026
    027
    028
    029
    030
    031
    032
    033
    034
    035
    036
    037
    038
    039
    040
    041
    042
    043
    044
    045
    046
    047
    048
    049
    050
    051
    052
    053
    054
    055
    056
    057
    058
    059
    060
    061
    062

    function Get-CMSURLAuthorizationHeader
    {
        [CmdletBinding()]
        [OutputType([string])]
        Param
        (
            # Input the URL to be
            [Parameter(Mandatory=$true,
                       ValueFromPipelineByPropertyName=$true,
                       Position=0)]
            [uri]$URL,

            # Specify the Certificate to be used
            [Parameter(Mandatory=$true,
                        ValueFromPipeline)]
            [System.Security.Cryptography.X509Certificates.X509Certificate2]
            $Certificate
        )

        Begin
        {
            Write-Verbose -Message '[Get-CMSURLAuthorizationHeader] - Starting Function'
       
        }
        Process
        {
           TRY
           {
                #Get the Absolute Path of the URL encoded in UTF8
                $bytes = [System.Text.Encoding]::UTF8.GetBytes(($Url.AbsolutePath))

                #Open Memory Stream passing the encoded bytes
                $MemStream = New-Object -TypeName System.Security.Cryptography.Pkcs.ContentInfo -ArgumentList (,$bytes-ErrorAction Stop

                #Create the Signed CMS Object providing the ContentInfo (from Above) and True specifying that this is for a detached signature
                $SignedCMS = New-Object -TypeName System.Security.Cryptography.Pkcs.SignedCms -ArgumentList $MemStream,$true -ErrorAction Stop

                #Create an instance of the CMSigner class - this class object provide signing functionality
                $CMSigner = New-Object -TypeName System.Security.Cryptography.Pkcs.CmsSigner -ArgumentList $Certificate -Property @{IncludeOption = [System.Security.Cryptography.X509Certificates.X509IncludeOption]::EndCertOnly} -ErrorAction Stop

                #Add the current time as one of the signing attribute
                $null = $CMSigner.SignedAttributes.Add((New-Object -TypeName System.Security.Cryptography.Pkcs.Pkcs9SigningTime))

                #Compute the Signatur
                $SignedCMS.ComputeSignature($CMSigner)

                #As per the documentation the authorization header needs to be in the format 'CMSURL `1 <Signed Content>'
                #One can change this value as per the format the Vendor's REST API documentation wants.
                $CMSHeader = '{0}{1}{2}' -f 'CMSURL','`1 ',$([System.Convert]::ToBase64String(($SignedCMS.Encode())))
                Write-Output -InputObject $CMSHeader
            }
            Catch
            {
                Write-Error -Exception $_.exception -ErrorAction stop
            }
        }
        End
        {
            Write-Verbose -Message '[Get-CMSURLAuthorizationHeader] - Ending Function'
        }
    }

      How do you use it , you will follow steps which are similar to below :


      #Paste the REST API URL below For Ex: https://host/API/v1/system/admins/search?firstname=Deepak
      $Url = '<REST API Url>'

      #This is the Client Certificate issued to me and has been imported to the Certificate store on my Machine under Current User store
      $Certificate = Get-ChildItem -Path Cert:\CurrentUser\my | Where-Object Subject -eq 'CN=Deepak'

      #Prepare the headers before hand
      $Headers = @{
                      'Authorization' = "$(Get-CMSURLAuthorizationHeader -URL $Url -Certificate $Certificate)";
                      'APIKey' = "$APIKey";
                      'Content-type' = 'application/json'
                  }

      #Invoke the awesomeness now
      Invoke-RestMethod -Method Get -Uri $Url -Headers $Headers -ErrorAction Stop

      Now below is other function which generates the CMS header (haven't tested this out) , the process of using CMS Scheme is almost similar except the fact that the request body is signed in this case:

      001
      002
      003
      004
      005
      006
      007
      008
      009
      010
      011
      012
      013
      014
      015
      016
      017
      018
      019
      020
      021
      022
      023
      024
      025
      026
      027
      028
      029
      030
      031
      032
      033
      034
      035
      036
      037
      038
      039
      040
      041
      042
      043
      044
      045
      046
      047
      048
      049
      050
      051
      052
      053
      054
      055
      056
      057
      058
      059
      060
      061
      062
      function Get-CMSAuthorizationHeader
      {
          [CmdletBinding()]
          [OutputType([string])]
          Param
          (
              # Input the URL to be
              [Parameter(Mandatory=$true,
                         ValueFromPipelineByPropertyName=$true,
                         Position=0)]
              [string]$body,

              # Specify the Certificate to be used
              [Parameter(Mandatory=$true,
                          ValueFromPipeline)]
              [System.Security.Cryptography.X509Certificates.X509Certificate2]
              $Certificate
          )

          Begin
          {
              Write-Verbose -Message '[Get-CMSAuthorizationHeader] - Starting Function'
          
          }
          Process
          {
             TRY
             {
                  #Get the String UTF8 encoded at first
                  $bytes = [System.Text.Encoding]::UTF8.GetBytes($body)

                  #Open Memory Stream passing the encoded bytes
                  $MemStream = New-Object -TypeName System.Security.Cryptography.Pkcs.ContentInfo -ArgumentList (,$bytes-ErrorAction Stop

                  #Create the Signed CMS Object providing the ContentInfo (from Above) and True specifying that this is for a detached signature
                  $SignedCMS = New-Object -TypeName System.Security.Cryptography.Pkcs.SignedCms -ArgumentList $MemStream,$true -ErrorAction Stop

                  #Create an instance of the CMSigner class - this class object provide signing functionality
                  $CMSigner = New-Object -TypeName System.Security.Cryptography.Pkcs.CmsSigner -ArgumentList $Certificate -Property @{IncludeOption = [System.Security.Cryptography.X509Certificates.X509IncludeOption]::EndCertOnly} -ErrorAction Stop

                  #Add the current time as one of the signing attribute
                  $null = $CMSigner.SignedAttributes.Add((New-Object -TypeName System.Security.Cryptography.Pkcs.Pkcs9SigningTime))

                  #Compute the Signatur
                  $SignedCMS.ComputeSignature($CMSigner)

                  #As per the documentation the authorization header needs to be in the format 'CMSURL `1 <Signed Content>'
                  #One can change this value as per the format the Vendor's REST API documentation wants.
                  $CMSHeader = '{0}{1}{2}' -f 'CMS','`1 ',$([System.Convert]::ToBase64String(($SignedCMS.Encode())))
                  Write-Output -InputObject $CMSHeader
              }
              Catch
              {
                  Write-Error -Exception $_.exception -ErrorAction stop
              }
          }
          End
          {
              Write-Verbose -Message '[Get-CMSAuthorizationHeader] - Ending Function'
          }
      }


      Resources :


      System.Security.Cryptography.Pkcs Namespace
      http://msdn.microsoft.com/en-us/library/System.Security.Cryptography.Pkcs(v=vs.110).aspx

      PowerShell + EAS : Getting Started

      $
      0
      0
      This is the first post on a series of blog posts concentrated around understanding Exchange ActiveSync Protocol as this is the underlying protocol which Mobile devices use in order to connect to the Exchange Server.

      The whole idea is to be able to craft EAS requests and parse the Server responses using PowerShell in order to understand the protocol better. 

      Why I want to do this ?
      Because when you start poking around you learn the Product better :).

      This is a getting started post and I am following and porting most of the code already written in C# at MobilityDojo.net to PowerShell.

      This post is about giving you a hang of how to make Web Requests to an Exchange Server's EAS endpoint and parse them to get insight in the process.

      Now if you setup mail for a User in a Mobile device and use Fiddler as reverse proxy to analyze the communication , you will see the below :


      Skip Verification Checks


      Add the below line of code to your Script if you don't bother to perform the Server certificate validation, this is only for testing Environments.


      001
      002
      003

      [System.Net.ServicePointManager]::ServerCertificateValidationCallback = {$true}


      Create the Authorization header 


      Enter the credentials of a mail enabled User in (Domain\Username or UserPrincipalName format )


      001
      002
      003
      004
      $Credential = Get-Credential
      $EncodedUsernamePassword = [System.Convert]::ToBase64String([System.Text.Encoding]::UTF8.GetBytes($('{0}:{1}' -f $Credential.UserName, $Credential.GetNetworkCredential().Password)))
      $Headers = @{'Authorization' = "Basic $($EncodedUsernamePassword)"}


      Hit /Microsoft-Server-ActiveSync


      001
      002
      $URL = 'https://dexexch.dex.com/Microsoft-Server-ActiveSync'
      $response = Invoke-WebRequest -Uri $URL -Headers $Headers -Method Options

      Now take a look at the headers returned from the Exchange Server 


      PS>$response = Invoke-WebRequest -Uri $URL -Headers $Headers -Method Options                                                                
      PS>$response.Headers

      Key Value
      --- -----
      Allow OPTIONS,POST
      MS-Server-ActiveSync 14.2
      MS-ASProtocolVersions 2.0,2.1,2.5,12.0,12.1,14.0,14.1
      MS-ASProtocolCommands Sync,SendMail,SmartForward,SmartReply,GetAttachment,GetHierarchy,C...
      Public OPTIONS,POST
      Content-Length 0
      Cache-Control private
      Date Thu, 26 Feb 2015 14:59:11 GMT
      Server Microsoft-IIS/7.5
      X-AspNet-Version 2.0.50727
      X-Powered-By ASP.NET


      In a typical EAS communication after Autodiscovery takes place this is the first step as the Client determines the EAS commands & version supported by the remote Exchange Server. We will be using this code over when we start working through the EAS protocol.


      Resources:

      Original post using C# @MobilityDojo.net
      http://mobilitydojo.net/2011/08/16/exchange-activesync-building-blockswarming-up/


      Working with .NET call backs
      http://www.nivot.org/post/2009/07/18/PowerShell20RCWorkingWithNETCallbacksPart1Synchronous

      PowerShell + EAS + MSExchange : Autodiscovery

      $
      0
      0
      This post is going to be on how to use PowerShell to get an insight in the Autodiscovery process which the EAS Mail clients use.

      Second entry in my #PowerShell + #EAS posts:

      1. PowerShell + EAS : Getting Started


      Once you enter Email Address and Password in the Mail setup in the device, the Autodiscovery process kicks in. Remember there is no such thing as the mail account getting magically configured :)

      To explain the process is not my intent, Please refer to the MSDN blog post here.

      In short the Autodiscovery process tries to get a valid XML response from 4 sources (based on the workflow explained at the MSDN blog ). In this post we will be looking at a way to make those 4 requests and study the responses we get back using PowerShell. This is a more of a hands on approach here.

      I will be taking an account for the demo, for which we will see the discovery process in action :
      • TestUser Account on Office365  (testuser@dexterposh.in)

      The EAS client looks at your email address and then parses it to get the domain name, below is how to do it in PowerShell using the split operator and multiple assignment:


      $email = 'testuser@dexterposh.in'
      #Split the email address to get the Username and the domain name
      $username, $fqdn = $email -split '@'


      When I execute the code:


      PS>$email = 'testuser@dexterposh.in'
      PS>#Split the email address to get the Username and the domain name
      PS>$username, $fqdn = $email -split '@'
      PS>
      PS>$username
      testuser
      PS>$fqdn
      dexterposh.in
      Before we start hitting the various URLs to kick in autodiscovery it is important to understand that, Autodiscovery is the only step in the EAS communication process which uses XML format for the Request and Response.

      So when you make a call to the AutoDiscovery endpoint it expects a Request Body in a certain XML form. Notice that the email address needs to be passed in as Request.

      Thought of using Here-Strings but it failed , so going to use a very crude example like below (choose to split in 2 lines for better readability):


      $Body= '<?xml version="1.0" encoding="utf-8"?><Autodiscover xmlns="http://schemas.microsoft.com/exchange/autodiscover/mobilesync/requestschema/2006"><Request>'
      $Body = $Body + "<EMailAddress>$email</EMailAddress><AcceptableResponseSchema>http://schemas.microsoft.com/exchange/autodiscover/mobilesync/responseschema/2006</AcceptableResponseSchema></Request></Autodiscover>"

      So now we will go ahead and see actually the PowerShell code snippet for performing the below 4 tests:


      Let's gather the credential to create the Auth header and rest of the key pieces needed to make a WebRequest and which is common to first 3 tests:


      #Supply the Credential for the testuser
      $Credential = Get-Credential

      #need to encode the Username too make it a part of the authorization header
      $EncodedUsernamePassword = [System.Convert]::ToBase64String([System.Text.Encoding]::UTF8.GetBytes($('{0}:{1}' -f $Credential.UserName, $Credential.GetNetworkCredential().Password)))

      #Create a Hashtable for Authorization
      $Headers = @{'Authorization' = "Basic $($EncodedUsernamePassword)" }


      Test #1 


      For the first test the URL format is as below :


      #construct the URL from the FQDN
      $URL1 = "https://$fqdn/autodiscover/autodiscover.xml"

      Now Let's go ahead and hit the autodiscover endpoint
      The HTTP Method is POST , Content Type is XML and I don't want the page to redirect me at this point automatically so -MaximumRedirectionCount is given an argument 0 (zero).


      Invoke-WebRequest -Uri $URL1 -UserAgent DexterPSAgent -Headers $Headers -ContentType 'text/xml' -Body $body -Method Post -MaximumRedirection 0 

      Below is what I see when I run it :


      PS>Invoke-WebRequest -Uri $URL1 -UserAgent DexterPSAgent -Headers $Headers -ContentType 'text/xml' -Body $body -Method Post -MaximumRedirection 0                                                                                                                                
      Invoke-WebRequest : Unable to connect to the remote server
      At line:1 char:1
      + Invoke-WebRequest -Uri $URL1 -UserAgent DexterPSAgent -Headers $Headers -Content ...
      + ~~~~~~~~~~~~~~~~~~~~~~~~~~~~~~~~~~~~~~~~~~~~~~~~~~~~~~~~~~~~~~~~~~~~~~~~~~~~~~~~
      + CategoryInfo : NotSpecified: (:) [Invoke-WebRequest], WebException
      + FullyQualifiedErrorId : System.Net.WebException,Microsoft.PowerShell.Commands.InvokeWebRequestCommand


      Examining the $Error[0] shows below:


      PS>$Error[0].exception                                                                           
      Unable to connect to the remote server
      PS>$Error[0].exception.innerexception
      No connection could be made because the target machine actively refused it 50.63.67.387:443

      That is true because the Remote Server is not listening on port 443. So the First step fails in this case for me. Now as per the standard my Client should proceed to Test #2.


      Test #2


      As per the documentation the next URL the EAS Mail client tries to reach is  of below format:

      $URL2 = "https://autodiscover.$fqdn/autodiscover/autodiscover.xml"

      Let's make a WebRequest, rer-using most of the things like Headers, Body etc from the Test #1.


      Invoke-WebRequest -Uri $URL2 -UserAgent DexterPSAgent -Headers $Headers -ContentType 'text/xml' -Body $Body -Method Post -MaximumRedirection 0


      Again I get the same Error as in the Test #1 here in this case too (skipping the screenshot). See below telnet fails to the hostname on port 443.


      P.S. - Not using Test-NetConnection cmdlet as I am still on Windows 7.
      Also if you are on-premise Exchange Server and have Autodiscovery configured this is the most common scheme which Enterprises use.


      Test #3


      This is getting interesting now as still I have not been able to get valid XML Response from the Autodiscovery.

      Time to perform the Test #3 , Notice that in this URL scheme uses HTTP and the method GET (so no content)


      #Test 3 - Autodiscovery ; http://autodiscover.FQDN/autodiscovery/autodiscovery.xml -- HTTP GET

      $URL3 = "http://autodiscover.$fqdn/autodiscover/autodiscover.xml"

      # HTTP GET - Request to the URL
      Invoke-WebRequest -Uri $URL3 -UserAgent DexterPSAgent -Headers $Headers -Method GET -MaximumRedirection 0


      Now let's try this :


      Note - You have to use -MaximumRedirectionCount 0 here as the 302 status code is one of the expected value here and moreover when someone is redirecting , One needs to be aware of it !


      If you have not checked out the MSDN blog link then now is a good time to do that.

      It states that once we get a 302 response, we need to make a call to the Location HTTP Header. So If I we look at the HTTP headers of previous response we will see that there is a location this URL is redirecting us to:


      Let's make the HTTP POST call now to the URL mentioned in the Location header above and be done with this Test.


      I get a 401 unauthorized, which means there is some problem with the Authorization header. It appears the Username used for creating the Authorization header is 'testuser' but as this is one of the account in Office 365.

      Accounts in O365 use email address as the username...Note this will change if you are on-premise and have the Autodiscovery running.


      So let's re-create the Authorization header and make the Call.


      $Credential = Get-Credential -UserName 'testuser@dexterposh.in' -Message 'Enter credentials for TestUser'
      $EncodedUsernamePassword = [System.Convert]::ToBase64String([System.Text.Encoding]::UTF8.GetBytes($('{0}:{1}' -f $Credential.UserName, $Credential.GetNetworkCredential().Password)))
      $Headers = @{'Authorization' = "Basic $($EncodedUsernamePassword)" }
      Invoke-WebRequest -Uri $URL4 -UserAgent DexterPSAgent -Headers $Headers -ContentType 'text/xml' -Body $body -Method Post -MaximumRedirection 0


      Note - For Office 365 accounts this is how discovery works.


      Test #4

      Now we don't need to actually perform this step as we already have built neverthless, let me point out how to do this using PowerShell.


      Easy use Nslookup.exe in PowerShell and parse the output , I bet someone has already done it . Check out the Resources link below ;)


      PS>nslookup.exe -type=srv "_autodiscover._tcp.$fqdn"


      More poking around EAS using PowerShell is gonna follow, Stay tuned for more !
       

      Resources:


      Autodiscover for EAS Devs (Must Read!)
      http://blogs.msdn.com/b/exchangedev/archive/2011/07/08/autodiscover-for-exchange-activesync-developers.aspx


      Original article at MobilityDojo.net
      http://mobilitydojo.net/2011/08/18/exchange-activesync-building-blocks-autodiscover/ 

      Getting SRV Records with PowerShellhttp://blogs.msdn.com/b/timid/archive/2014/07/08/getting-srv-records-with-powershell.aspx

      PowerShell + EAS + MSExchange - FolderSync

      $
      0
      0
      This is the third post in series of poking around EAS protocol using PowerShell, find the first 2 posts below :

      1. PowerShell + EAS : Getting Started
      2. PowerShell + EAS + MSExchange : Autodiscovery

      If you are a interested in looking at the C# code samples then checkout posts  @MobilityDojo.net in the Resources section at the bottom.

      Once you have discovered the URL of the EAS endpoint to connect to, it is time to follow below 3 requests in order to establish an ActiveSync Partnership with Exchange Server:


      Step 1 : HTTP Get (optional)

      This is sort of a diagnostic step to ensure that the Exchange Server discovered using the Auto Discovery process is up and reachable, SSL Certificates are in place and the Authentication scheme (basic in our case) is working.


      #URL got from the Auto-Discovery - Refer my previous post
      $ExchangeURL = 'https://outlook.office365.com/Microsoft-Server-ActiveSync'

      #store the Credentials
      $cred = Get-Credential -UserName 'testuser@dexterposh.in' -Message 'Enter password for the User'

      #need to encode the Username too make it a part of the authorization header
      $EncodedUsernamePassword = [System.Convert]::ToBase64String([System.Text.Encoding]::UTF8.GetBytes($('{0}:{1}' -f $cred.UserName, $cred.GetNetworkCredential().Password)))

      #create the Authorization header
      $Headers = @{'Authorization' = "Basic $($EncodedUsernamePassword)" }


      #Step 1 - HTTP GET - Use Try Catch as the Server Error is expected, If Server throws error that means it is reachable ;)
      TRY
      {
          Invoke-WebRequest -Uri $ExchangeURL -Headers $Headers -Method GET -UserAgent 'DexterPSAgent' -MaximumRedirection 0
      }
      CATCH
      {
          $_.exception

      }


      Note the first few variables like $headers and $ExchangeURL will be re-used in the below steps.

      We will use Try Catch as the response from the Server Error will throw an error (expected behavior here as the DeviceID and other info is missing in our Request), If Server throws an error that means it is reachable ;)

      Below is what I get :


      Step 2 : HTTP Options (optional)

      In the second step after We know that the Server is up and processing requests on the EAS endpoint, it is a good idea to collect details like the Exchange server version running on the Remote Server so that the client adjusts its behavior.

      How to do this using PowerShell is already shown in the PowerShell + EAS :Getting Started post, but below is how you get that :


      #Step 2 - HTTP Options
      Invoke-WebRequest -Uri $ExchangeURL -Headers $Headers -Method Options -UserAgent 'DexterPSAgent' | Select-Object -ExpandProperty Headers

      Below is how it looks in the PowerShell console :


      Step 3 - HTTP Post


      Now after determining the Server availability (Step 1) and the version it is running (Step 2) , now it is time to finally work on performing the initial FolderSync. 


      This step is important as the response in this step tells us the Folder Structure of the Mailbox we are trying to sync too, but the Request and Response follow a standard known AS-WBXML (ActiveSync - Wireless Application Protocol Binary XML).

      From what I understand AS-WBXML converts the standard XML to WBXML code page and tokens (basically compresses XML) and transmits it to the ActiveSync Server.

      So in the below code we will use a hex byte array as the Request body in WBXML format, so don't be surprised.


      $bytes = [byte[]](0x03, 0x01, 0x6a, 0x00, 0x00, 0x07, 0x56, 0x52, 0x03, 0x30, 0x00, 0x01, 0x01)


      In XML terms the above hex byte array, means the below and in simple terms it is asking for the Folder Hierarchy from the Remote Server :


      <?xml version="1.0" encoding="utf-8"?>
      <FolderSync xmlns="FolderHierarchy:">
         <SyncKey>0</SyncKey>
      </FolderSync>

      We will get back to the AS-WBXML topic in upcoming post.
      Now before we do the initial Sync, let's take a look at the mobile devices for the testuser on Outlook @Office365.


      Now let's make the WebRequest for the FolderSync command and see the changes in the Mobile devices.

      Below is the PowerShell code, reusing the $Headers, $ExchangeURL & $cred below:


      #Have to create URL in a specific format, try missing the URL in this format and see the error
      $ExchangeURL = $ExchangeURL + "/Microsoft-Server-ActiveSync?Cmd=FolderSync&User=$($Cred.UserName)&DeviceID=123456789&DeviceType=DexPSDevice"

      #Setting the EAS protocol version to 14.1
      $Headers.Add("MS-ASProtocolVersion",'14.1')

      #Request body as hex byte array...this is done because EAS uses WBXML format for Request & Response
      $bytes = [byte[]](0x03, 0x01, 0x6a, 0x00, 0x00, 0x07, 0x56, 0x52, 0x03, 0x30, 0x00, 0x01, 0x01)

      #Finally make the WebRequest and be done with it ;)
      Invoke-WebRequest -Uri $ExchangeURL -Headers $Headers -Method Post -ContentType "application/vnd.ms-sync.wbxml" -Body $bytes -UserAgent DexPSAgent -MaximumRedirection 0

      Below is a screenshot :


      Don't worry about the Content you see in above, we will eventually get there ;)
      Let's go back and see if the DexPSAgent of ours reflects in the EAS devices in OWA.


      Heartfelt thanks to posts @MobilityDojo.net and @PowerShellMagazine for sharing some of the awesome content that helped me a lot to pick things up. 

      Cheers !


      Resources

      Exchange ActiveSync Building Blocks – First Sync

      http://mobilitydojo.net/2011/08/24/exchange-activesync-building-blocks-first-sync/


      #PSTip - Converting Numbers to Hex
      http://www.powershellmagazine.com/2012/10/12/pstip-converting-numbers-to-hex/

      PowerShell + SCCM : Get Resource Collection Membership

      $
      0
      0
      Recently at our PowerShell Bangalore User group, we had fun participating in a one day PowerShell + ConfigMgr Hackathon event. Where we had a bunch of ConfigMgr admins worked on using Azure to deploy a full fledged ConfigMgr Lab, also we had fun interacting with each other.

      Below pic was the theme for the event, says it all ;)


      My friend Harjit  suggested few ideas for the Hackathon. Below is one of the ideas:

      "Script that can tell me which collections a particular system or several Systems belong to"


      The Final Script is available @Technet for Download 


      Credits - There is a post by MVP David O'Brien (link in Resource section) which served as a base for my function. The final Function does the following :
      • Fetches the Collection the Resource (Device/User) is member of.
      • Uses WQL Queries to enhance the performance.
      • For the User resource type, it does a WildCard search  .
      Also I took my first shot at writing the Pester tests for the Function. Getting the hang of writing unit tests now.


      Usage : 

      After dot sourcing the Script, you can invoke the Function to either get the information about a Device or User. 
      Get-ResourceCollectionMemberhip -Name dexterposh -ComputerName dexsccm -ResourceType User 

      Name ResourceType CollectionName CollectionID
      ---- ------------ -------------- ------------
      dexterposh User TestUserCollection DEX00032
      dexterposh User All Users SMS00002
      dexterposh User All Users and User Groups SMS00004 


      If you want the Collection Membership (Name & CollectionID ) of the User Resource then invoke the function like below:


      Get-ResourceCollectionMemberhip -Name dexchef -ComputerName dexsccm  

      Name ResourceType CollectionName CollectionID
      ---- ------------ -------------- ------------
      dexchef Device Server2012 DEX00038
      dexchef Device Server2008 DEX00039
      dexchef Device All Systems SMS00001
      dexchef Device All Desktop and Server Clients SMSDM003


      Below is the GIF showing the above in action :


      Resources :


      How to find ConfigMgr Collection Membership of client using PowerShell

      http://www.david-obrien.net/2014/01/find-configmgr-collection-membership-client-via-powershell/

      How to enumerate members of a collection
      https://msdn.microsoft.com/en-us/library/hh949334.aspx

      PowerShell + Azure Automation : Add-DataDiskToVM

      $
      0
      0
      This will be a quick and short post on using Azure Automation Runbook to add a Data Disk to one of the Azure VMs already provisioned on Azure and then initialize-format the Disk added using the Storage cmdlets available on Server 2012 onwards.


      The Workflow is available @Technet >> Download
      [Blog-Ad] Please check two of my earlier posts revolving around Azure Automation, if you are trying to use this feature for first tim:


      Below is the explanation of the Workflow:


      First we define a workflow by the name Add-DataDisktoVM, which will take 6 arguments :

      1. AzureSubscriptionName - Name of the Azure Subscription to connect and automate against.
      2. ServiceName - Cloud Service name for the VM we are adding the data disk.
      3. StorageAccountName - storage account to be used.
      4. VMName - name of the Azure VM.
      5. VMCredentialName - Assuming you already have Automation Credential created for the Account to be used to Format, Initialize the Data Disk on the VM.
      6. AzureCredentialName - Name of the Automation Credential to be used to Connect to the Azure Subscription.
      7. SizeinGB - Size of the data disk to be added.
      8. DiskLabel - Label for the diisk that is going to be added (default: VMName).
      001
      002
      003
      004
      005
      006
      007
      008
      009
      010
      011
      012
      013
      014
      015
      016
      017
      018
      019
      020
      021
      022
      023
      024
      025
      026
      027
      028
      029
      030
      031
      032
      033
      034
      035
      036
      037
      038
      039
      040
      041
      042
      043
      Workflow Add-DataDisktoVM 
      { 
          Param 
          ( 
              #Specify the name of the Azure Subscription
              [parameter(Mandatory=$true)] 
              [String] 
              $AzureSubscriptionName, 
              
              #Specify the Cloud Service in which the Azure VM resides
              [parameter(Mandatory=$true)] 
              [String] 
              $ServiceName, 
              
              #Key in the Storage Account to be used
              [parameter(Mandatory=$true)] 
              [String]
              $StorageAccountName,
               
              #Supply the Azure VM name to which a Data Disk is to be added
              [parameter(Mandatory=$true)] 
              [String] 
              $VMName,   
              
              #Specify the name of Automation Credentials to be used to connect to the Azure VM
              [parameter(Mandatory=$true)] 
              [String] 
              $VMCredentialName, 
              
              #Specify the name of the Automation Creds to be used to authenticate against Azure
              [parameter(Mandatory=$true)] 
              [String] 
              $AzureCredentialName, 
               
              #Specify the Size in GB for the Data Disk to be added to the VM
              [parameter(Mandatory=$true)] 
              [int] 
              $sizeinGB,

              #Optional - Key in the Disk Label
              [parameter()]
              [string]$DiskLabel
          )


      After declaring all the params, time to step through the code logic.
      • Set the Verbosepreference to  'Continue' so that the Verbose Messages are written to the Job output Stream.
      • Store the respective Azure & VM Automation Credentials in the Variables.
      • Use the Azure Automation Credential to add Azure Account, select Subscription and set the storage account for the Azure Subscription in subsequent steps.

      044
      045
      046
      047
      048
      049
      050
      051
      052
      053
      054
      055
      056
      057
      058
      059
      060
      061
      062
      063

          $verbosepreference = 'continue'
              
          #Get the Credentials to authenticate against Azure
          Write-Verbose -Message "Getting the Credentials"
          $AzureCred = Get-AutomationPSCredential -Name $AzureCredentialName
          $VMCred = Get-AutomationPSCredential -Name $VMCredentialName
          
          #Add the Account to the Workflow
          Write-Verbose -Message "Adding the AuthAzure Account to Authenticate" 
          Add-AzureAccount -Credential $AzureCred
          
          #select the Subscription
          Write-Verbose -Message "Selecting the $AzureSubscriptionName Subscription"
          Select-AzureSubscription -SubscriptionName $AzureSubscriptionName
          
          #Set the Storage for the Subscrption
          Write-Verbose -Message "Setting the Storage Account for the Subscription" 
          Set-AzureSubscription -SubscriptionName $AzureSubscriptionName -CurrentStorageAccountName $StorageAccountName


      Now we have successfully connected to our Azure Subscription. It is time to move on to task at hand...adding Data Disk to the Azure VM.
      Below is what the below code does in subsequent steps :
      • Check if the DiskLabel is passed as an argument (If not then set the disk label to the VMname)
      • Get the WinRMURI - used later to open a PSSession to the Azure VM
      • Fetch the LUN numbers from already attached Data Disks to VM and calculate a unqiue LUN no to be used for the Data Disk we will add. If there are no Data Disks already added use a LUN value of 1.
      • Inside an Inline Script block Add the Data Disk to the VM and update the Azure VM configuration to reflect it.


      064
      065
      066
      067
      068
      069
      070
      071
      072
      073
      074
      075
      076
      077
      078
      079
      080
      081
      082
      083
      084
      085
      086
      087
      088
      089
      090
      091
      092
      093
      094
      095
      096
      097
      098
      099
      100
      101
              if (! $DiskLabel)
          {
              $DiskLabel = $VMName #set the DiskLabel as the VM name if not passed
          }
          
          #Get the WinRM URI , used later to open a PSSession
          Write-Verbose -Message "Getting the WinRM URI for the $VMname"
          $WinRMURi = Get-AzureWinRMUri -ServiceName $ServiceName -Name $VMName | Select-Object -ExpandProperty AbsoluteUri
         
          #Get the LUN details of any Data Disk associated to the Azure VM, Had to wrap this inside InlineScript
          Write-Verbose -Message "Getting details of the LUN added to the VMs"
          $Luns =  InlineScript {
                      Get-AzureVM -ServiceName $using:ServiceName -Name $using:VMName |
                          Get-AzureDataDisk | 
                          select -ExpandProperty LUN
                   }
          #Depending on whether the Azure VM already has DATA Disks attached, need to calculate a LUN
          if ($Luns)
          {
              
              Write-Verbose -Message "Generating a random LUN number to be used"
              $Lun = 1..100 | where {$Luns -notcontains $_} | select -First 1
          }
          else
          {
              Write-Verbose -Message "No Data Disks found attached to VM"
              $Lun = 1
          }

          #Finally add the Data Disk to Azure VM, again this needs to be put inside InlineScript block
          Write-Verbose -Message "Adding the Data Disk to the Azure VM using DiskLabel -> $DiskLabel ; LUN -> $Lun ; SizeinGB -> $sizeinGB"
          InlineScript {
              Get-AzureVM -ServiceName $using:ServiceName -Name $using:VMName | 
                  Add-AzureDataDisk -CreateNew -DiskSizeInGB $using:sizeinGB -DiskLabel $using:DiskLabel -LUN $using:Lun  | 
                  Update-AzureVM
              }


      After we have successfully added the Data disk to the VM, it is time to Intialize the disk, Create a new partition and Format it. Did I tell you we will be doing all of this using the PowerShell Remoting Session.
      Below is


      101
      102
      103
      104
      105
      106
      107
      108
      109
      110
      111
      112
      113
      114
      115
      116
      117
      118
      119
      120
      121
      122
      123
      124
      125
      126
      127

          # Open a PSSession to the Azure VM and then attach the Disk
          #using the Storage Cmdlets (Usually Server 2012 images are selected which have this module)
          InlineScript 
          {   
              do
              {
                  #open a PSSession to the VM
                  $Session = New-PSSession -ConnectionUri $Using:WinRMURi -Credential $Using:VMCred -Name $using:VMName -SessionOption (New-PSSessionOption -SkipCACheck ) -ErrorAction SilentlyContinue 
                  Write-Verbose -Message "PSSession opened to the VM $Using:VMName "
              } While (! $Session)
              
              Write-Verbose -Message "Invoking command to Initialize/ Create / Format the new Disk added to the Azure VM"     
              Invoke-command -session $session -argumentlist $using:DiskLabel -ScriptBlock { 
                  param($label)
                  Get-Disk |
                  where partitionstyle -eq 'raw' |
                  Initialize-Disk -PartitionStyle MBR -PassThru |
                  New-Partition -AssignDriveLetter -UseMaximumSize |
                  Format-Volume -FileSystem NTFS -NewFileSystemLabel $label -Confirm:$false
              } 
       
          } 
           
          
      }


      This is it. Time to invoke the workflow. You can either use the Web Portal or use PowerShell from your workstation itself (I prefer it that way). But before we do that below is a screenshot showing the current Disks & partitions on my Azure VM named 'DexChef'.


      If you use the Web portal to invoke the workflow then it prompts you to enter arguments to the parameters.


      Below is how I invoked the Workflow from my Local Workstation using Azure PowerShell Module.

      $automation = Get-AzureAutomationAccount
      $job = Start-AzureAutomationRunbook -Name Add-DataDisktoVM -AutomationAccountName $Automation.AutomationAccountName `
               -Parameters @{AzureSubscriptionName="Visual Studio Ultimate with MSDN";
                              ServiceName="DexterPOSHCloudService";
                              StorageAccountName="dexposhstorage";
                              VMName="DexChef";
                              VMCredentialName="DomainDexterPOSH";
                              AzureCredentialName="authAzure";
                              SizeinGB = 20;
                              DiskLabel = 'DexDisk'                        
                              } -Verbose


      Now one can monitor the job created from portal or PowerShell and once it is completed. We will see the changes reflecting :)

      Notice - a new Disk and partition showing up for the VM 'DexChef'


      Azure Automation does put using PowerShell Workflows in context and I enjoy using them :) .

      Thanks to the Azure team for rolling out such an awesome feature.


      PowerShell Tip : Comment/Uncomment Code

      $
      0
      0
      Many people who use plain Vanilla ISE are not familiar with this small trick which was added in PowerShell v3.

      In PowerShell v3 ISE you can comment/uncomment lines of code without installing any Add-Ons :

      Comment Code :

      • Press Alt + Shift + Up/Down arrow key to select lines
      • Once lines are selected, Press "#" to comment

      Uncomment Code :

      • Follow the same Key shortcut to select text [Alt + Shift + Up/Down].
      • Once selected , Press Delete.

      Below is a animated GIF showing this in Action :


      Resources :


      https://connect.microsoft.com/PowerShell/feedback/details/711231/ise-v3-need-to-be-able-to-comment-a-series-of-lines-in-a-block-of-code

      http://blog.danskingdom.com/powershell-ise-multiline-comment-and-uncomment-done-right-and-other-ise-gui-must-haves/


      Viewing all 97 articles
      Browse latest View live