Quantcast
Channel: DexterPOSH's Blog
Viewing all 97 articles
Browse latest View live

PowerShell : Use Case for MutEx

$
0
0
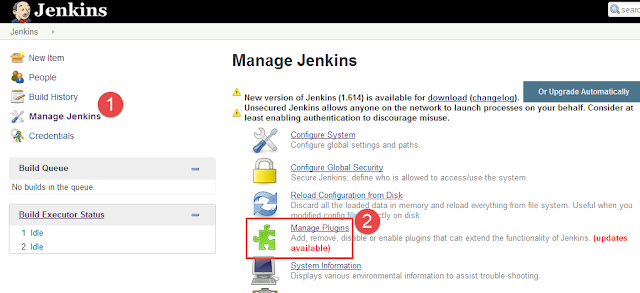
This post is to give you context on a practical use case of using MutEx in PowerShell.

From the MSDN documentation for the MutEx class , MutEx is :


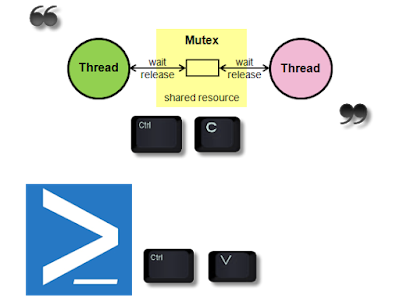
"A synchronization primitive that can also be used for interprocess synchronization."


Mut - Mutually 
Ex - Exclusive


Recently while deploying AzureStack, I saw multiple failed deployments, partly because of me not paying attention. 


But since it failed, I had to go and look at the code in an effort to see what went wrong.

AzureStack runs all the deployment tasks for creating a POC by using scheduled tasks (runs in System context) heavily.

Also the status of the deployment  is tracked by using XML files (these are placed under C:\ProgramData\Microsoft\AzureStack\), so they have to avoid conflicts in reading and writing of these XML files from these tasks which are separate PowerShell processes.

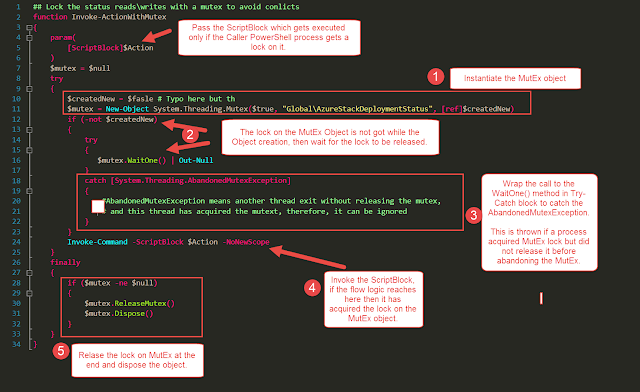
Now this is a simple but very important part of the whole process. So while going through the code being used,
I saw this little neat function in the AzureStakDeploymentStatus.psm1 file :


001
002
003
004
005
006
007
008
009
010
011
012
013
014
015
016
017
018
019
020
021
022
023
024
025
026
027
028
029
030
031
032
033
034
035
036
037
038
039
## Lock the status reads\writes with a mutex to avoid conlicts
function Invoke-ActionWithMutex
{
    param(
        [ScriptBlock]$Action
    )

    $mutex = $null

    try
    {
        $createdNew = $fasle # Typo here but this evaluates to False

        $mutex = New-Object System.Threading.Mutex($true, "Global\AzureStackDeploymentStatus", [ref]$createdNew)

        if (-not $createdNew)
        {
            try
            {
               $mutex.WaitOne() | Out-Null
            }
            catch [System.Threading.AbandonedMutexException]
            {
                #AbandonedMutexException means another thread exit without releasing the mutex, and this thread has acquired the mutext, therefore, it can be ignored
            }
        }

        Invoke-Command -ScriptBlock $Action -NoNewScope
    }
    finally
    {
        if ($mutex -ne $null)
        {
            $mutex.ReleaseMutex()
            $mutex.Dispose()
        }
    }

}

This function piqued my interest on the subject of MutEx. In the same .psm1 file this function is being used within the functions Get-AzureStackDeploymentStatus and Update-AzureStackDeploymentStatus.

Below is the Get-AzureStackDeploymentStatus defintion :


001
002
003
004
005
006
007
008
009
010
011
012
function Get-AzureStackDeploymentStatus
{
    [CmdletBinding()]
    param()
    if (-not (Test-Path $statusFilePath)) {
        Update-AzureStackDeploymentStatus $StatusTemplate | Out-Null
    }

    Invoke-ActionWithMutex -Action {
        [xml](Get-Content $statusFilePath)
    }
}

and the Update-AzureStackDeploymentStatus definition is below:


001
002
003
004
005
006
007
008
009
010
011
012
013
014
015
function Update-AzureStackDeploymentStatus
{
    [CmdletBinding()]
    param(
        [Xml]$Status
    )

    Invoke-ActionWithMutex -Action {
        if (-not (Test-Path $statusFileFolder))
        {
            New-Item -Path $statusFileFolder -ItemType Directory | Out-Null
        }
        $Status.Save($statusFilePath)
    }
}


Now this is powerful stuff and since my first exposure to it, I have been reading up a lot on this topic and how to use this in my Scripts.

This post will soon follow a series of post on this particular topic.

PowerShell : Getting started with MutEx

$
0
0
After setting up the context for the use case of the MutEx in previous post, it is time to do our homework on the topic.


Theory


MutEx as per the MSDN documentation is:
"A synchronization primitive that grants exclusive access to the shared resource to only one thread.If a thread acquires a mutex, the second thread that wants to acquire that mutex is suspended until the first thread releases the mutex."


Now there are two types of MutEx in .NET world:
  • Local mutexes (which are unnamed), can only be used by any thread in our process that has reference to the Mutex Object.
  • Named system mutexes, visible throughout the Operating system and hence can be used as an interprocess synchronization mechanism. Now on a sever which is running Terminal services and hence multiple terminal sessions, the named system mutex can have two levels of visibility.
    • If the mutex name begins with prefix "Local\", it is only visible in the Terminal session where it was created. (Default one, if no prefix specified).
    • If the mutex name begins with prefix "Global\", it is visible in all the Terminal sessions running on the server.


Practical


So we have cleared the theoretical aspects out, now let's take a look at how to create a MutEx (Named Local mutex) object and see it in action. Below are the step :
  1. First step is to create the Mutex Object using the constructor here. Note that the default visibility for the Named mutex is 'Local'.


    $createdNew = $False # Stores Boolean value if the current PowerShell Process gets a lock on the Mutex
    # Create the Mutex Object usin the constructuor -> Mutex Constructor (Boolean, String, Boolean)
    $mutex = New-Object -TypeName System.Threading.Mutex($true, "MutexName1", [ref]$createdNew)

  2. Now the variable $createdNew will have $True if the current PowerShell process ,where you ran this code got a lock on the MutEx object. You can open another PowerShell instance and verify that the only the first process has $CreateNew set to True


    $mutex will contain the MutEx object in it.
  3. So in your project which spans across multiple PowerShell scripts, the very first step will be try to acquire the lock during the creation of the Mutex Object. If you get the lock on the MutEx then very well, go ahead and use the shared resource say a config file. But if you don't get the lock on the MutEx then you have to call the WaitOne() method on the MutEx object.

    There are multiple method overloads but we can simply use the WaitOne() method, which blocks the current PowerShell process until it receives the lock.

    See below, if I release the MutEx from the first process the second one gets the lock post it.


  4. Now, In your code once you have the MutEx lock , you can go ahead and use the shared resource. But remember to release the MutEx by calling the ReleaseMutex() method.

    If you don't  release the mutex in your code (say your function) then when some other process tries to get a lock on the MutEx an AbandonedMutexException is thrown.


Note - If you plan to use MutEx in your code then PowerShell should be running in Single Threaded ApartmentState (STA). Explained by MVP Oisinhere.
PowerShell v3 onwards both the Console and ISE by default run in STA mode.

Summary


Now since we have the basics of working with a MutEx explained. Now it is time to summarize how the Invoke-ActionWithMutex& Get-AzureStackDeploymentStatus function work. (See this post if you don't know where this is coming from).

The Get-AzureStackDeploymentStatus function is straight enough, it calls for reading the XML file 'C:\ProgramData\Microsoft\AzureStackAzureStackDeploymentStatus.xml'. See below:


function Get-AzureStackDeploymentStatus
{
    [CmdletBinding()]
    param()
    if (-not (Test-Path $statusFilePath)) {
        Update-AzureStackDeploymentStatus $StatusTemplate | Out-Null
    }

    Invoke-ActionWithMutex -Action {
        [xml](Get-Content $statusFilePath)
    }
}

I have tried explaining how the Invoke-ActionWithMutex function works in below screenshot, it should be straight enough to understand.


Note - To invoke the Scriptblock in Line 24 , Invoke-Command is used to ensure that the ApartmentState for the runspace is STA.

I see MutEx as a powerful technique that can be used in our deployment workflows, I intend to do few more posts after I have explored them a bit more. Meanwhile take a look at some very good posts in the below section :)

Resources :


MutEx Class - Read up the MSDN documentation to grasp the details of this.
https://msdn.microsoft.com/en-us/library/system.threading.mutex%28v=vs.110%29.aspx

Excellent post by MVP Boe Prox on using MutEx to write data to same log file (uses runspaces with MutEx too).
http://learn-powershell.net/2014/09/30/using-mutexes-to-write-data-to-the-same-logfile-across-processes-with-powershell/

Lee Holmes post on enforcing single user access to custom PSRemoting endpoint using MutEx.
http://www.leeholmes.com/blog/2011/08/24/enforcing-single-user-access-to-powershell-remoting/

AzureStack : Few Install Gotchas

$
0
0
I started installing AzureStack by quickly skimming over the install instructions here.
This not paying attention to the detail resulted in multiple failed deployments.
The two very important aspects of the Azure Stack deployment that I screwed up are :

  • Entering the credentials for your Azure Active Directory Account. This user must be the Global Admin in the directory tenant
  • Timezone settings on the host where Azure Stack deployment is running must be same as the local time zone.

Credentials


After reading the first point in a hurry.
I ended up using the Microsoft account (Global-admin for my subscription), associated with my Azure subscription. Note that using Microsoft account is supported as per the documentation, below is a screenshot from here.


But this ended up miserably, as my Microsoft account email is of the format -> 'dexterrocks@yahoo.in' .

Now the problem with the above email address is that on Azure AD it registers a tenant with domain name -> 
dexterrocksyahoo.onmicrosoft.com  
So the Azure AD authentication will never go through, as the tenant ID is not resolvable using the above mentioned mail id.

Why this won't work is easy to see as the Azure tenant ID is not resolvable, see below :

001
002
003
$MSFTAccount = 'dexterrocks@yahoo.in'
$AADDomain = ($MSFTAccount -split '@')[-1]
(Invoke-WebRequest "https://login.windows.net/$($AADDomain)/.well-known/openid-configuration"|ConvertFrom-Json).token_endpoint.Split('/')[3]

If you have a custom domain and you have registered it in Azure AD then it should work and even Microsoft accounts which are of the below format will work :

<username>@Microsoft.com
<username>@outlook.com
<username>@live.com

Or any other domains which MSFT owns and are resolvable (the tenant ID).

The above similar technique to fetch the tenant ID was mentioned at the Azure stack documentation, which seems to have been removed now but thanks to GitHub you can find the commit here which made this change.

I had to create a new user in my default directory on Azure and then grant him service-admin access, his email was of the format -> 
"testuser@dexterrocksyahoo.onmicrosoft.com"
I supplied this user credentials to the AzureStack deployment later.


Timezone


I already had Server 2016 installed, so I never went to the process of doing the VHD boot and skipped the step where it says:
Configure the BIOS to use Local Time instead of UTC

To be on safer side configure the BIOS time and OS Time to match (also set the OS timezone to your local timzone).

After I fixed above two things, I am not sure on which one fixed my deployment but this did the trick and re-running the AzureStack install went through fine and the POC got deployed.


PowerShell : Nested Remoting (PSRemoting + PSDirect)

$
0
0
Well the title is interesting enough, right ?
I saw some interesting comments when I posted the below pic around the release of Server 2016 TP3 in our PowerShell FB group:


In this post, I try to tell how I use this simple trick in my everyday use.


Sometime while logging into work from Home over VPN with a really bad internet connection, I use this trick to remote into the Management VMs running on a Server 2016 to test things in my lab.


Connecting over RDP on a flaky network connection is a horrible experience, and most of my overnight explorations do not require a GUI ;)

There is this neat feature introduced in Server 2016 which you must have heard of PowerShell Direct. Before PSDirect, I would have to RDP to the Hyper-V host (not domain joined) and then connect to VM using VMConnect (sitting on internal network) and then run PS .


Below is a graphic on how I use PowerShell direct along with PowerShell remoting to manage my VMs now.

Note - The Hyper-V Host is not part of the domain, this is my Lab server. The VMs running inside are test VMs sitting on an internal network (can't remote into them from my Corporate network).


So below is the break down of the this really simple process:


  1. Connect to the my Hyper-V host running Server 2016 (TP4) using PowerShell remoting. I use IP address to connect to this host using PSRemoting (already added entry to Trusted hosts).


    Below is an animated gif showing this in action :


    No need for you to do it, if the machine is part of the domain (reachable using the Netbios name).
  2. Once I am dropped into an interactive PSRemoting session to my Hyper-V host, I use Enter-PSSession (using -VMName parameter) now to connect over PowerShell direct to my VM. This time I specify domain creds for my test domain to connect to the only DC running in my Lab.


  3.  The remote file editing feature of ISE can be used in this nested remoting (sort of) session too.


With this awesome new feature, now I save up my bandwidth while fooling around with PowerShell on my Lab server.

This brings me to the end of the post, check out the resources section for some awesome posts around PowerShell direct.


Resources :


MVP Adam Driscoll's post on the topic "Digging into PowerShell Direct".

http://csharpening.net/?p=1781

MVP Kristian Nese explains PSDirect (awesome post).

http://kristiannese.blogspot.in/2015/08/explaining-powershell-direct.html

MVP Mark Scholman's post on PSDirect.

https://markscholman.com/2015/05/imagine-what-you-could-do-with-powershell-direct/

Test connectivity via a specific network interface

$
0
0
Recently while working on a Private cloud implementation, I came across a scenario where I needed to test connectivity of a node to the AD/DNS via multiple network adapters. 

Many of us would know that having multiple network routes is usually done to take care of redundancy. So that if a network adapter goes down, one can use the other network interface to reach out to the node.

In order to make it easy for everyone to follow along, below is an analogy for the above scenario:

My laptop has multiple network adapters (say Wi-Fi and Ethernet) connected to the same network. Now how do I test connectivity to a Server on the network only over say Wi-Fi network adapter?


So let’s get to it and explore some options at hand.

Below are the network adapters that list out on my laptop:


Now I want to test connectivity to a Windows Server 2012R2 running in my network having IP address 10.94.214.9

Using ping.exe

I can specify the source address to ping.exe using –S switch and verify if the Server (IP 10.94.214.9) is responding to ping/ICMP requests on a specific network interface.
But there is a gotcha with the above approach, what if the server response to ping is disabled? Or the network firewall in place drops ICMP requests.

Using Test-NetConnection.


I initially thought of using Test-NetConnection cmdlet (available on Server 2012 & Windows 8 above with NetTCPIP module) to do a winrm port check to the server (port 5985), but the cmdlet doesn’t let you specify a source address for doing a port query. It will automatically select a network interface to perform the port query (based on the internal windows routing table). See below the output of the cmdlet, it selects the Ethernet interface to perform the port check.


See below the syntax of the cmdlet.

PS>gcm test-netconnection -syntax                                                                                                                                                                                                                           
Test-NetConnection [[-ComputerName] ] [-TraceRoute] [-Hops ] [-InformationLevel ] []
Test-NetConnection [[-ComputerName] ] [-CommonTCPPort] [-InformationLevel ] []
Test-NetConnection [[-ComputerName] ] -Port [-InformationLevel ] []


One could play with route.exe and change the network route to the network where the server lies and then do a Test-NetConnection on the winrm port, complicated way to handle such a small problem.

Or better as my friend Jaap Brasser told me on IM, disable the network adapter and then do the Test-NetConnection.

Using TCPClient


Now let’s talk about how we can do this in PowerShell.
I can create a TCP Client and connect to the server on winrm port but how do we make sure that it gets routed via a specific network interface.


The answer is really simple, we create a local endpoint (IP + port) and bind our TCP Client to it. All the communications then happen via the socket. 

Below is the code snippet and the explanation of it follows:


001
002
003
004
005
006
007
008
009
010
011
012
013
014
015
016
017
018
019
020
021
022
023
$SourceIP = [IPAddress]'10.94.8.102'; # My WiFi Adapter IP address
$Destination = [IPAddress]'10.94.214.9' # Destination Server address
$DestinationPort = 5985 # PSRemoting port to connect to over TCP

# get an unused local port, used in local IP endpoint creation
$UsedLocalPorts = ([System.Net.NetworkInformation.IPGlobalProperties]::GetIPGlobalProperties()).GetActiveTcpListeners() |
                        where -FilterScript {$PSitem.AddressFamily -eq 'Internetwork'} |
                        Select -ExpandProperty Port
do {
        $localport = $(Get-Random -Minimum 49152 -Maximum 65535 )
    } until ( $UsedLocalPorts -notcontains $localport)

# Create the local IP endpoint, this will bind to a specific N/W adapter for making the connection request
$LocalIPEndPoint = New-Object -TypeName System.Net.IPEndPoint -ArgumentList  $SourceIP,$localport

# Create the TCP client and specify the local IP endpoint to be used.
$TCPClient = New-Object -Typename System.Net.Sockets.TcpClient -ArgumentList $LocaIPEndPoint # by default the proto used is TCP to connect.

# Connect to the Destination on the required port.
$TCPClient.Connect($Destination, $DestinationPort)

# Check the Connected property to see if the TCP connection succeeded. You can see netstat.exe output to verify the connection too
$TCPClient.Connected

In the above code after assigning the source IP, destination IP & destination port, there is code which selects a local port to be used.

We have to be careful while selecting a random local port as it might be already be used in an active TCP connection. There is a clever .NET way of getting a list of already used ports on a local machine by using the GetActiveTcpListeners() method.

$UsedLocalPorts =([System.Net.NetworkInformation.IPGlobalProperties]::GetIPGlobalProperties()).GetActiveTcpListeners()|
                        where-FilterScript{$PSitem.AddressFamily-eq'Internetwork'}|
                        Select-ExpandProperty Port

Once I have a list of all the used local port, I can select a non-used ephemeral port (range) using the code snippet below:

do{
        $localport =$(Get-Random-Minimum49152-Maximum65535)
    }until( $UsedLocalPorts -notcontains $localport)
      

Now it is time to create the local endpoint using the source IP of the network interface and the local unused port.

$LocalIPEndPoint =New-Object-TypeNameSystem.Net.IPEndPoint -ArgumentList  $SourceIP,$localport

Once the Local endpoint is created, construct a TCP client passing the local endpoint as an argument to it. This will ensure that the TCP connection request flows via that specific N/W adapter.

Once that is done, call the Connect() Method on the TCPclient to connect to the destination. Now the TCP connection uses the SourceIP (on a specific network adapter) to reach out to the destination.


Note – One can try specifying a source address which is not assigned to the machine, it will let you create the local endpoint but when you try creating the TCPClient it will throw an error saying that the address is not valid in the context.

Using the above logic and creating an advanced function should be straight enough, that is an exercise left for the reader.

PowerShell + AzureRM : Automated login using Service Principal

$
0
0
Do you remember ?
In the older Azure Service Management model, we had an option to import the publish settings file and use the certificate for authenticating. It saved a lot of hassle.


That method is deprecating now but we have something better which we can use in the newer ARM model.

BTW for record I find it really annoying to enter credentials each time when I want to quickly try something out on Azure. So I have been using two techniques for automated login to the AzureRM portal.

  • Storing Service principal creds locally (encrypted at rest using Windows Data Protection API) and using that to login.
  • Using Certificate based automated login (another post).


This post is about the easier and a crude way (less secure) to setup the automated login using the Service Principal, in this way we store the service principal credentials (encrypted) in an XML file.
You would need the AzureRM PowerShell module installed. The whole code snippet is placed at the end of the post.

Below are the steps on creating an AzureAD App, tying it with a Service principal and using the service principal creds to do an automated login :

  1. Login to the Azure RM using the Login-AzureRMAccount cmdlet.


    # Login to the Azure Account first                                                            
    Login-AzureRMAccount


    Once done, the current context is displayed i.e. Account, TenantID, SubscriptionID etc.

  2. If you have multiple subscriptions then you need to select the Azure Subscription you want to create the Service principal account and automated login for. If you only have one subscription then, you can skip this step.


    # Select the right Subscription in which the Azure AD application and Service Principal are to be created
    Get-AzureRmSubscription | Out-GridView -OutputMode Single -Title 'Select the Azure Subscription!' | Set-AzureRmContext

  3. Now we need to create an Azure AD Application, this will create a directory services record that identifies an application to Azure AD.

    The homepage & identifier uri can be any valid url. 
    Note identifier uri or application id are used as a username while building credentials for the automated login later along with the password specified in this step.


    # Create the Azure AD App now, this is the directory services record which identifies an application to AAD
    $CMDistrictAADApp = New-AzureRmADApplication -DisplayName "AppForCMDistrict" `
                            -HomePage "http://www.dexterposh.com" `
                            -IdentifierUris "http://www.dexterposh.com/p/about-me.html" `
                            -Password "P@ssW0rd#1234"
  4. Create a Service Principal in Azure AD, this is an instance of an application in Azure AD which needs access to other resources. In plain words application manifests itself as a service principal in directory services in order to gain access to other resources.


    # Create a Service Principal in Azure AD                                                          
    New-AzureRmADServicePrincipal -ApplicationId $CMDistrictAADApp.ApplicationID
  5. Using RBAC grant access to Resource group (CMDistrict_RG in this case), you have to the above service principal.

    Note that since this is a less secured way, so you can be extra careful and give limited access to a Resource Group rather than the entire subscription for this.


    # Grant access to Service Prinicpal for accessing resources in my CMDistrict RG                   
    New-AzureRmRoleAssignment -RoleDefinitionName Contributor `
        -ServicePrincipalName $CMDistrictAADApp.ApplicationId `
        -ResourceGroupName CMDistrict_RG
  6. Now it is time to save the Service Principal credentials locally, easiest way to do is use Get-Credential and then pipe the object to Export-CliXML to save those locally.


    # Export creds to disk (encrypted using DAPI)
    Get-Credential -UserName $CMDistrictAADApp.ApplicationId -Message 'Enter App password' |   
        Export-CLixml -Path "$(Split-Path -path $profile -Parent)\CMDistrictAADApp.xml"

  7. Use the exported credentials next time you want to quickly do something on the resource group. For example - I use a function to on demand start/stop the VMs, so before I run the function I import the creds and authenticate.
    Check below that I create the creds using Import-Clixml and then use those with Add-AzureRMAccount , -ServicePrincipal switch marks that this is a service prinicipal account authenticating.
    Note - You can take the below lines and hard code your tenant-id (get it using Get-AzureRMContext or Get-AzureRMSubscription) below and put this in your profile or wrap it in a function.


    # Authenticate now using the new Service Principal
    $cred = Import-Clixml -Path "$(Split-Path -path $profile -Parent)\CMDistrictAADApp.xml" 

    # Authenticate using the Service Principal now
    Add-AzureRmAccount -ServicePrincipal -Credential $cred -TenantId '<Place your tenant id here>'


BTW if you are wondering why can't we simply create a credential object and pass it to Add-AzureRMAccount ( Login-AzureRMAccount is an alias for it) then read below from MSFT documentation that only organization accounts support that. 

Now one has to go and create a user in your AzureAD and use that account here (another way of doing this), but in the next post you will see that with service principals we can have certificate based logins too (more secure). 

Watch out upcoming article on that subject.


Below is the entire PowerShell code snippet :

001
002
003
004
005
006
007
008
009
010
011
012
013
014
015
016
017
018
019
020
021
022
023
024
025
026
027
028
029
030
031
032
033
034
035
036
#region Automated login using the Service Principal
# Login to the Azure Account first
Login-AzureRMAccount

# Select the right Subscription in which the Azure AD application and Service Principal are to be created
Get-AzureRmSubscription | Out-GridView -OutputMode Single -Title 'Select the Azure Subscription!' | Set-AzureRmContext

# Create the Azure AD App now, this is the directory services record which identifies an application to AAD
$CMDistrictAADApp = New-AzureRmADApplication -DisplayName "AppForCMDistrict" `
                        -HomePage "http://www.dexterposh.com" `
                        -IdentifierUris "http://www.dexterposh.com/p/about-me.html" `
                        -Password "Passw0rd#1234"

# store the applicationID for the above AD App created
$Appid = $CMDistrictAADApp | Select -ExpandProperty ApplicationID

#- Service Prinicipal is an instance of an application in a directory that needs to access other resources.
# Create a Service Principal in Azure AD
New-AzureRmADServicePrincipal -ApplicationId $CMDistrictAADApp.ApplicationID

# Grant access to Service Prinicpal for accessing resources in my CMDistrict RG
New-AzureRmRoleAssignment -RoleDefinitionName Contributor `
    -ServicePrincipalName $CMDistrictAADApp.ApplicationId `
    -ResourceGroupName CMDistrict_RG

# Export creds to disk (encrypted using DAPI)
Get-Credential -UserName $CMDistrictAADApp.ApplicationId -Message 'Enter App password' |
    Export-CLixml -Path "$(Split-Path -path $profile -Parent)\CMDistrictAADApp.xml"

# Authenticate now using the new Service Principal
$cred = Import-Clixml -Path "$(Split-Path -path $profile -Parent)\CMDistrictAADApp.xml"

# Authenticate using the Service Principal now
Add-AzureRmAccount -ServicePrincipal -Credential $cred -TenantId '<Place your tenant Id here>'

#endregion

PowerShell : check script running on nano

$
0
0
If you are authoring scripts targeting Nano server specifically then there are two checks which you can bake into (maybe add them to the default nano authoring snippet in ISE) them.


Check the Operating System SKU


Query the Win32_OperatingSystem CIM class and check if the property named 'OperatingSystemSKU' is 143 (Datacenter) or 144 (Standard). As per the MSFT documentation for the CIM class :


PRODUCT_DATACENTER_NANO_SERVER (143)
Windows Server Datacenter Edition (Nano Server installation)
PRODUCT_STANDARD_NANO_SERVER (144)
Windows Server Standard Edition (Nano Server installation)

Something like below, you can be more creative with it :

001
002
003
004
005
006
007
008
009
010
011
012
013
014
015
016
#region Nano server check
Switch -Exact ($(Get-CimInstance -ClassName Win32_OperatingSystem).OperatingSystemSKU) {
    143 {
        Write-Verbose -Message 'Script Running on Windows Server Datacenter Edition (Nano Server installation)'
        break;
    }
    144 {
        Write-Verbose -Message 'Windows Server Standard Edition (Nano Server installation)'
        break;
    }
    default {
        Write-Warning -Message 'OperatingSystem SKU does not match Nano server.'  
        throw
    }
}
#enderegion


Check the $PSVersionTable


With the newer WMF 5.1 release, the $PSVersion hash table now has a key named 'PSEdition' added to it. This key's value is 'Core' on Nano server or IoT devices.


PowerShell + Pester : counter based mocking

$
0
0
Recently, I have been writing/ reading a lot of Pester tests (both Unit and Integration) for infrastructure validation.

One of the classic limitation hit during mocking with Pester is that you can have different mocks based on different arguments to a parameter (e.g using parameterFilter with Mock ) but not based on a counter.

For Example - See below, I have two mocks for Get-Process cmdlet based on the name passed to it.


Mock -CommandName Get-Service -ParameterFilter {$Name -eq 'winrm'} -mockwith {[PSCustomObjet]@{Status='Running'}}
Mock -CommandName Get-Service -ParameterFilter {$Name -eq 'bits'} -mockwith {[PSCustomObjet]@{Status='Stopped'}


This is really helpful, but there is a case where we want different mocks to occur based on a an incremental counter (number of times) a function/Cmdlet etc. are called in our script.


A very basic function illustrating the point where this might be needed is below :


001
002
003
004
005
006
007
008
009
010
011
012
013
014
015
016
017
function EnsureServiceStarted {                                                                
param($Name)
    $Service = Get-Service -name $name
    if ($Service.Status -eq 'Running') {
        return $true
    } else {
        Start-Service -name $name
        # check if the service is started
        $Service = Get-Service -Name $name
        if($Service.Status -eq 'Running'){
            return $true
        } else {
            return $false
        }
    }
}

Note that the above function calls Get-Service twice (line 3 & line 9). 

  1. Line 3, the code fetches the current service controller object using Get-Service and then checks if the status is equal to 'Running'. If it is then returns true else it tries to start it.
  2. Line 9 , after trying to start the service, Get-Service cmdlet is used again to fetch the updated status property on it.
All simple and easy right!


But how do you mock Get-Service with pester for testing the logic of starting a stopped service.
It seems you can get a bit crafty, with Pester & PowerShell and do a counter based mocking.

You create a script scope counter and while mocking put the logic in scriptblock passed to the -MockWith parameter.

001
002
003
004
005
006
007
008
009
010
011
012
013
014
015
016
017
018
019
020
021
022
023
024
025
026
027
028
029
030
031
032
033

Describe 'EnsureServiceStarted' -Tags Counter {

    Context 'Starting a Stopped service' {
      
        # Arrange
        $Script:counterGetService = 1
        Mock -CommandName Get-Service -MockWith {
            if ($Script:counterGetService -eq 1){ # counter eq 1
                $Script:counterGetService++
                @{Status = 'Stopped'}
            }
            else {
                @{Status = 'Running'}
            }
        }
        Mock -CommandName Start-Service -MockWith {}

        # Act
        EnsureServiceStarted -Name WinRM
      
        # Assert
        It 'Should call the Get-Service twice' { # Get-Service called twice within the function
            $Script:counterGetService | Should be 2
            Assert-MockCalled -CommandName Get-Service -Times 2 -Exactly -Scope Context
        }

        It 'Should call Start-Service once' {
            Assert-MockCalled -CommandName Start-Service -Times 1 -Exactly -Scope Context
        }
    }

}


Now with this very crude counter based mocking, my unit tests pass.


Well it is really up to your creativity on how you want to push the code coverage ;)


PowerShell + EAS + MSExchange : Autodiscovery

$
0
0
This post is going to be on how to use PowerShell to get an insight in the Autodiscovery process which the EAS Mail clients use.

Second entry in my #PowerShell + #EAS posts:

  1. PowerShell + EAS : Getting Started


Once you enter Email Address and Password in the Mail setup in the device, the Autodiscovery process kicks in. Remember there is no such thing as the mail account getting magically configured :)

To explain the process is not my intent, Please refer to the MSDN blog post here.

In short the Autodiscovery process tries to get a valid XML response from 4 sources (based on the workflow explained at the MSDN blog ). In this post we will be looking at a way to make those 4 requests and study the responses we get back using PowerShell. This is a more of a hands on approach here.

I will be taking an account for the demo, for which we will see the discovery process in action :
  • TestUser Account on Office365  (testuser@dexterposh.in)

The EAS client looks at your email address and then parses it to get the domain name, below is how to do it in PowerShell using the split operator and multiple assignment:


$email = 'testuser@dexterposh.in'
#Split the email address to get the Username and the domain name
$username, $fqdn = $email -split '@'


When I execute the code:


PS>$email = 'testuser@dexterposh.in'
PS>#Split the email address to get the Username and the domain name
PS>$username, $fqdn = $email -split '@'
PS>
PS>$username
testuser
PS>$fqdn
dexterposh.in
Before we start hitting the various URLs to kick in autodiscovery it is important to understand that, Autodiscovery is the only step in the EAS communication process which uses XML format for the Request and Response.

So when you make a call to the AutoDiscovery endpoint it expects a Request Body in a certain XML form. Notice that the email address needs to be passed in as Request.

Thought of using Here-Strings but it failed , so going to use a very crude example like below (choose to split in 2 lines for better readability):


$Body= '<?xml version="1.0" encoding="utf-8"?><Autodiscover xmlns="http://schemas.microsoft.com/exchange/autodiscover/mobilesync/requestschema/2006"><Request>'
$Body = $Body + "<EMailAddress>$email</EMailAddress><AcceptableResponseSchema>http://schemas.microsoft.com/exchange/autodiscover/mobilesync/responseschema/2006</AcceptableResponseSchema></Request></Autodiscover>"

So now we will go ahead and see actually the PowerShell code snippet for performing the below 4 tests:


Let's gather the credential to create the Auth header and rest of the key pieces needed to make a WebRequest and which is common to first 3 tests:


#Supply the Credential for the testuser
$Credential = Get-Credential

#need to encode the Username too make it a part of the authorization header
$EncodedUsernamePassword = [System.Convert]::ToBase64String([System.Text.Encoding]::UTF8.GetBytes($('{0}:{1}' -f $Credential.UserName, $Credential.GetNetworkCredential().Password)))

#Create a Hashtable for Authorization
$Headers = @{'Authorization' = "Basic $($EncodedUsernamePassword)" }


Test #1 


For the first test the URL format is as below :


#construct the URL from the FQDN
$URL1 = "https://$fqdn/autodiscover/autodiscover.xml"

Now Let's go ahead and hit the autodiscover endpoint
The HTTP Method is POST , Content Type is XML and I don't want the page to redirect me at this point automatically so -MaximumRedirectionCount is given an argument 0 (zero).


Invoke-WebRequest -Uri $URL1 -UserAgent DexterPSAgent -Headers $Headers -ContentType 'text/xml' -Body $body -Method Post -MaximumRedirection 0 

Below is what I see when I run it :


PS>Invoke-WebRequest -Uri $URL1 -UserAgent DexterPSAgent -Headers $Headers -ContentType 'text/xml' -Body $body -Method Post -MaximumRedirection 0                                                                                                                                
Invoke-WebRequest : Unable to connect to the remote server
At line:1 char:1
+ Invoke-WebRequest -Uri $URL1 -UserAgent DexterPSAgent -Headers $Headers -Content ...
+ ~~~~~~~~~~~~~~~~~~~~~~~~~~~~~~~~~~~~~~~~~~~~~~~~~~~~~~~~~~~~~~~~~~~~~~~~~~~~~~~~
+ CategoryInfo : NotSpecified: (:) [Invoke-WebRequest], WebException
+ FullyQualifiedErrorId : System.Net.WebException,Microsoft.PowerShell.Commands.InvokeWebRequestCommand


Examining the $Error[0] shows below:


PS>$Error[0].exception                                                                           
Unable to connect to the remote server
PS>$Error[0].exception.innerexception
No connection could be made because the target machine actively refused it 50.63.67.387:443

That is true because the Remote Server is not listening on port 443. So the First step fails in this case for me. Now as per the standard my Client should proceed to Test #2.


Test #2


As per the documentation the next URL the EAS Mail client tries to reach is  of below format:

$URL2 = "https://autodiscover.$fqdn/autodiscover/autodiscover.xml"

Let's make a WebRequest, rer-using most of the things like Headers, Body etc from the Test #1.


Invoke-WebRequest -Uri $URL2 -UserAgent DexterPSAgent -Headers $Headers -ContentType 'text/xml' -Body $Body -Method Post -MaximumRedirection 0


Again I get the same Error as in the Test #1 here in this case too (skipping the screenshot). See below telnet fails to the hostname on port 443.


P.S. - Not using Test-NetConnection cmdlet as I am still on Windows 7.
Also if you are on-premise Exchange Server and have Autodiscovery configured this is the most common scheme which Enterprises use.


Test #3


This is getting interesting now as still I have not been able to get valid XML Response from the Autodiscovery.

Time to perform the Test #3 , Notice that in this URL scheme uses HTTP and the method GET (so no content)


#Test 3 - Autodiscovery ; http://autodiscover.FQDN/autodiscovery/autodiscovery.xml -- HTTP GET

$URL3 = "http://autodiscover.$fqdn/autodiscover/autodiscover.xml"

# HTTP GET - Request to the URL
Invoke-WebRequest -Uri $URL3 -UserAgent DexterPSAgent -Headers $Headers -Method GET -MaximumRedirection 0


Now let's try this :


Note - You have to use -MaximumRedirectionCount 0 here as the 302 status code is one of the expected value here and moreover when someone is redirecting , One needs to be aware of it !


If you have not checked out the MSDN blog link then now is a good time to do that.

It states that once we get a 302 response, we need to make a call to the Location HTTP Header. So If I we look at the HTTP headers of previous response we will see that there is a location this URL is redirecting us to:


Let's make the HTTP POST call now to the URL mentioned in the Location header above and be done with this Test.


I get a 401 unauthorized, which means there is some problem with the Authorization header. It appears the Username used for creating the Authorization header is 'testuser' but as this is one of the account in Office 365.

Accounts in O365 use email address as the username...Note this will change if you are on-premise and have the Autodiscovery running.


So let's re-create the Authorization header and make the Call.


$Credential = Get-Credential -UserName 'testuser@dexterposh.in' -Message 'Enter credentials for TestUser'
$EncodedUsernamePassword = [System.Convert]::ToBase64String([System.Text.Encoding]::UTF8.GetBytes($('{0}:{1}' -f $Credential.UserName, $Credential.GetNetworkCredential().Password)))
$Headers = @{'Authorization' = "Basic $($EncodedUsernamePassword)" }
Invoke-WebRequest -Uri $URL4 -UserAgent DexterPSAgent -Headers $Headers -ContentType 'text/xml' -Body $body -Method Post -MaximumRedirection 0


Note - For Office 365 accounts this is how discovery works.


Test #4

Now we don't need to actually perform this step as we already have built neverthless, let me point out how to do this using PowerShell.


Easy use Nslookup.exe in PowerShell and parse the output , I bet someone has already done it . Check out the Resources link below ;)


PS>nslookup.exe -type=srv "_autodiscover._tcp.$fqdn"


More poking around EAS using PowerShell is gonna follow, Stay tuned for more !
 

Resources:


Autodiscover for EAS Devs (Must Read!)
http://blogs.msdn.com/b/exchangedev/archive/2011/07/08/autodiscover-for-exchange-activesync-developers.aspx


Original article at MobilityDojo.net
http://mobilitydojo.net/2011/08/18/exchange-activesync-building-blocks-autodiscover/ 

Getting SRV Records with PowerShellhttp://blogs.msdn.com/b/timid/archive/2014/07/08/getting-srv-records-with-powershell.aspx

Vagrant using Hyper-V

$
0
0
I have been looking at learning puppet for a while now and to try it out, wanted to quickly deploy a puppet master & node (Ubuntu) on top of my Hyper-V host.

Below are the quick & easy steps I followed mostly for my own reference (n00b alert) :


  1. Enable Hyper-V on the node, this goes without saying :) (reboot after this step).
    001
    002
    003
    004
    #region enable Hyper-V                                                                        
    Add-WindowsFeature -Name Hyper-V -IncludeAllSubFeature -IncludeManagementTools
    #endregion
  2. Install Vagrant using chocolatey.
    001
    002
    003
    004
    005
    #region install vagrant
    Import-Module PackageManagement                                                               
    Install-Package -name vagrant -force -ForceBootstrap
    #endregion
  3. Now in order to use Hyper-V as the underlying hypervisor for Vagrant, earlier we had to install the Hyper-V provider...not anymore. Vagrant supports Hyper-V out of the box as one of the providers. One has to just create the below environment variable to set the default provider as Hyper-V.

    001
    002
    003
    #region set Hyper-V as the default provider for Vagrant
    [Environment]::SetEnvironmentVariable("VAGRANT_DEFAULT_PROVIDER", "hyperv", "Machine")        
    #endregion
  4. Now I created a folder named UbuntuPuppetMaster under VMs folder in my documents directory. I also created an empty file called 'vagrantfile'.

    001
    002
    003
    004
    #region create a directory & file for the Ubuntu (Puppet master) node.
    mkdir C:\Users\Administrator\Documents\VMs\UbuntuPuppetMaster
    New-Item -Path C:\Users\Administrator\Documents\VMs\UbuntuPuppetMaster\vagrantfile -ItemType File
    #endregion
  5. Here comes the power of vagrant to provision VMs, I have to just copy-paste the below content to the vagrantfile created in above step. The vagrantfile is the source of truth for the VM which will be provisioned in next step and you could do lots of stuff here while the VM is being provisioned. Read here more

    001
    002
    003
    004
    005
    006
    007
    008
    009
    010
    011
    012
    013
    VAGRANTFILE_API_VERSION = "2"
    Vagrant.configure(VAGRANTFILE_API_VERSION) do |config|
      config.vm.box = "ericmann/trusty64"
      config.vm.provider "hyperv" do |hv|
          hv.ip_address_timeout = 240
          hv.vmname = "Puppetmaster"
          hv.memory = 4096
      end
      config.vm.define "puppetmaster" do |puppetmaster|
        puppetmaster.vm.hostname = "puppetmaster"
        puppetmaster.vm.network "private_network", type: "dhcp"                                 
      end
    end
  6. Now this does not get any simpler, you have to drop into the directory where you have the vagrantfile located in PowerShell and just issue 'vagrant up', it will take care of downloading the vagrant box and provisioning the changes on top of the box.

Note- Vagrant at the moment can't configure networking for Hyper-V provider.

It does not get any simpler than this, now this is a very short post on how to use Vagrant with Hyper-V and there are lot many things you could do with Vagrant, and I would recommend exploring more of it.

Gotcha with Puppet Windows client

$
0
0
Making a quick note to document the version gotcha encountered while running puppet client on Windows.

I downloaded the latest and greatest available version of the puppet client on a Windows Server 2012 R2 box, but when running the puppet agent for the first time interactively to generate the certificate request to the puppet master server it blew up with below error message.


  1. Quickest way to get the puppet binaries all accessible is "Start Command Prompt with Puppet" shortcut.

  2. Once in the cmd prompt, run puppet_interactive. This will run the puppet agent on demand and when run for the first time issue a certificate request to the puppet master to sign. But this threw up the below error :

    Error: Could not request certificate: Error 400 on SERVER: The environment must be purely alphanumeric, not 'puppet-ca'


Wow! that is really descriptive about what went wrong. I was able to find a useful answer here.

It appears that, I was running incompatible versions of the puppet master (v3.8.7 ) and client(v4.7.0).


So I went to the puppet website and downloaded the puppet agent for v3.8.7,
removed the incompatible one and installed the v3.8.7. Once it was done, ran the puppet agent again and I could see the certificate request showing up for the node on the puppet master.


PowerShell : Trust network share to load modules & ps1

$
0
0
Problem

Do you have a central network share, where you store all the scripts or PowerShell modules ?
What happens if you try to run the script from a network share ? or if you have scripts (local) which invoke scripts or import PowerShell modules stored on this network share ?


Well you would see a security warning like below (Note - I have set execution policy as 'Unrestricted' not 'bypass' here):

Run a .ps1 from the network share


Well this is a similar warning, which you get when you download scripts from Internet.
As the message says run Unblock-File cmdlet to unblock the script and then run it, let's try it.


Using Unblock-File does not help, still invoking the script presents the same security warning.


Import a PowerShell module from the network share


You would even see a similar warning if you try to import a PowerShell module from the network share using Import-Module.


Use the network resources in your local scripts

So if you have scripts which try to import or reference a module/ script placed on this network share, then again it would display the security warning each time it is run. Not good for the unattended automation workflows you have.


Solution

So you get an idea about the problem at hand, now the solution to this problem is you can manually trust the network location for files, using the IE.

Old manual way using IE


Below is an animated gif showing this in action.


Trust network share using PowerShell

Well this is no rocket science, but the above method of using IE to trust network share actually writes to registry. So below is a quick function which adds the required registry entries :


Further Reading

https://blogs.msdn.microsoft.com/permanenttan/2008/06/05/giving-full-trust-to-a-network-share/

PowerShell + Azure Automation : Add-DataDiskToVM

$
0
0
This will be a quick and short post on using Azure Automation Runbook to add a Data Disk to one of the Azure VMs already provisioned on Azure and then initialize-format the Disk added using the Storage cmdlets available on Server 2012 onwards.


The Workflow is available @Technet >> Download
[Blog-Ad] Please check two of my earlier posts revolving around Azure Automation, if you are trying to use this feature for first tim:


Below is the explanation of the Workflow:


First we define a workflow by the name Add-DataDisktoVM, which will take 6 arguments :

  1. AzureSubscriptionName - Name of the Azure Subscription to connect and automate against.
  2. ServiceName - Cloud Service name for the VM we are adding the data disk.
  3. StorageAccountName - storage account to be used.
  4. VMName - name of the Azure VM.
  5. VMCredentialName - Assuming you already have Automation Credential created for the Account to be used to Format, Initialize the Data Disk on the VM.
  6. AzureCredentialName - Name of the Automation Credential to be used to Connect to the Azure Subscription.
  7. SizeinGB - Size of the data disk to be added.
  8. DiskLabel - Label for the diisk that is going to be added (default: VMName).

Workflow Add-DataDisktoVM 
{ 
    Param 
    ( 
        #Specify the name of the Azure Subscription
        [parameter(Mandatory=$true)] 
        [String] 
        $AzureSubscriptionName, 
        
        #Specify the Cloud Service in which the Azure VM resides
        [parameter(Mandatory=$true)] 
        [String] 
        $ServiceName, 
        
        #Key in the Storage Account to be used
        [parameter(Mandatory=$true)] 
        [String]
        $StorageAccountName,
         
        #Supply the Azure VM name to which a Data Disk is to be added
        [parameter(Mandatory=$true)] 
        [String] 
        $VMName,   
        
        #Specify the name of Automation Credentials to be used to connect to the Azure VM
        [parameter(Mandatory=$true)] 
        [String] 
        $VMCredentialName, 
        
        #Specify the name of the Automation Creds to be used to authenticate against Azure
        [parameter(Mandatory=$true)] 
        [String] 
        $AzureCredentialName, 
         
        #Specify the Size in GB for the Data Disk to be added to the VM
        [parameter(Mandatory=$true)] 
        [int] 
        $sizeinGB,

        #Optional - Key in the Disk Label
        [parameter()]
        [string]$DiskLabel
    )


After declaring all the params, time to step through the code logic.
  • Set the Verbosepreference to  'Continue' so that the Verbose Messages are written to the Job output Stream.
  • Store the respective Azure & VM Automation Credentials in the Variables.
  • Use the Azure Automation Credential to add Azure Account, select Subscription and set the storage account for the Azure Subscription in subsequent steps.


    $verbosepreference = 'continue'
        
    #Get the Credentials to authenticate against Azure
    Write-Verbose -Message "Getting the Credentials"
    $AzureCred = Get-AutomationPSCredential -Name $AzureCredentialName
    $VMCred = Get-AutomationPSCredential -Name $VMCredentialName
    
    #Add the Account to the Workflow
    Write-Verbose -Message "Adding the AuthAzure Account to Authenticate" 
    Add-AzureAccount -Credential $AzureCred
    
    #select the Subscription
    Write-Verbose -Message "Selecting the $AzureSubscriptionName Subscription"
    Select-AzureSubscription -SubscriptionName $AzureSubscriptionName
    
    #Set the Storage for the Subscrption
    Write-Verbose -Message "Setting the Storage Account for the Subscription" 
    Set-AzureSubscription -SubscriptionName $AzureSubscriptionName -CurrentStorageAccountName $StorageAccountName


Now we have successfully connected to our Azure Subscription. It is time to move on to task at hand...adding Data Disk to the Azure VM.
Below is what the below code does in subsequent steps :
  • Check if the DiskLabel is passed as an argument (If not then set the disk label to the VMname)
  • Get the WinRMURI - used later to open a PSSession to the Azure VM
  • Fetch the LUN numbers from already attached Data Disks to VM and calculate a unqiue LUN no to be used for the Data Disk we will add. If there are no Data Disks already added use a LUN value of 1.
  • Inside an Inline Script block Add the Data Disk to the VM and update the Azure VM configuration to reflect it.


        if (! $DiskLabel)
    {
        $DiskLabel = $VMName #set the DiskLabel as the VM name if not passed
    }
    
    #Get the WinRM URI , used later to open a PSSession
    Write-Verbose -Message "Getting the WinRM URI for the $VMname"
    $WinRMURi = Get-AzureWinRMUri -ServiceName $ServiceName -Name $VMName | Select-Object -ExpandProperty AbsoluteUri
   
    #Get the LUN details of any Data Disk associated to the Azure VM, Had to wrap this inside InlineScript
    Write-Verbose -Message "Getting details of the LUN added to the VMs"
    $Luns =  InlineScript {
                Get-AzureVM -ServiceName $using:ServiceName -Name $using:VMName |
                    Get-AzureDataDisk | 
                    select -ExpandProperty LUN
             }
    #Depending on whether the Azure VM already has DATA Disks attached, need to calculate a LUN
    if ($Luns)
    {
        
        Write-Verbose -Message "Generating a random LUN number to be used"
        $Lun = 1..100 | where {$Luns -notcontains $_} | select -First 1
    }
    else
    {
        Write-Verbose -Message "No Data Disks found attached to VM"
        $Lun = 1
    }

    #Finally add the Data Disk to Azure VM, again this needs to be put inside InlineScript block
    Write-Verbose -Message "Adding the Data Disk to the Azure VM using DiskLabel -> $DiskLabel ; LUN -> $Lun ; SizeinGB -> $sizeinGB"
    InlineScript {
        Get-AzureVM -ServiceName $using:ServiceName -Name $using:VMName | 
            Add-AzureDataDisk -CreateNew -DiskSizeInGB $using:sizeinGB -DiskLabel $using:DiskLabel -LUN $using:Lun  | 
            Update-AzureVM
        }


After we have successfully added the Data disk to the VM, it is time to Intialize the disk, Create a new partition and Format it. Did I tell you we will be doing all of this using the PowerShell Remoting Session.
Below is


    # Open a PSSession to the Azure VM and then attach the Disk
    #using the Storage Cmdlets (Usually Server 2012 images are selected which have this module)
    InlineScript 
    {   
        do
        {
            #open a PSSession to the VM
            $Session = New-PSSession -ConnectionUri $Using:WinRMURi -Credential $Using:VMCred -Name $using:VMName -SessionOption (New-PSSessionOption -SkipCACheck ) -ErrorAction SilentlyContinue 
            Write-Verbose -Message "PSSession opened to the VM $Using:VMName "
        } While (! $Session)
        
        Write-Verbose -Message "Invoking command to Initialize/ Create / Format the new Disk added to the Azure VM"     
        Invoke-command -session $session -argumentlist $using:DiskLabel -ScriptBlock { 
            param($label)
            Get-Disk |
            where partitionstyle -eq 'raw' |
            Initialize-Disk -PartitionStyle MBR -PassThru |
            New-Partition -AssignDriveLetter -UseMaximumSize |
            Format-Volume -FileSystem NTFS -NewFileSystemLabel $label -Confirm:$false
        } 

    } 
     
    
}


This is it. Time to invoke the workflow. You can either use the Web Portal or use PowerShell from your workstation itself (I prefer it that way). But before we do that below is a screenshot showing the current Disks & partitions on my Azure VM named 'DexChef'.


If you use the Web portal to invoke the workflow then it prompts you to enter arguments to the parameters.


Below is how I invoked the Workflow from my Local Workstation using Azure PowerShell Module.

$automation = Get-AzureAutomationAccount
$job = Start-AzureAutomationRunbook -Name Add-DataDisktoVM -AutomationAccountName $Automation.AutomationAccountName `
         -Parameters @{AzureSubscriptionName="Visual Studio Ultimate with MSDN";
                        ServiceName="DexterPOSHCloudService";
                        StorageAccountName="dexposhstorage";
                        VMName="DexChef";
                        VMCredentialName="DomainDexterPOSH";
                        AzureCredentialName="authAzure";
                        SizeinGB = 20;
                        DiskLabel = 'DexDisk'                        
                        } -Verbose


Now one can monitor the job created from portal or PowerShell and once it is completed. We will see the changes reflecting :)

Notice - a new Disk and partition showing up for the VM 'DexChef'


Azure Automation does put using PowerShell Workflows in context and I enjoy using them :) .

Thanks to the Azure team for rolling out such an awesome feature.


PowerShell Tip : Comment/Uncomment Code

$
0
0
Many people who use plain Vanilla ISE are not familiar with this small trick which was added in PowerShell v3.

In PowerShell v3 ISE you can comment/uncomment lines of code without installing any Add-Ons :

Comment Code :

  • Press Alt + Shift + Up/Down arrow key to select lines
  • Once lines are selected, Press "#" to comment

Uncomment Code :

  • Follow the same Key shortcut to select text [Alt + Shift + Up/Down].
  • Once selected , Press Delete.

Below is a animated GIF showing this in Action :


Resources :


https://connect.microsoft.com/PowerShell/feedback/details/711231/ise-v3-need-to-be-able-to-comment-a-series-of-lines-in-a-block-of-code

http://blog.danskingdom.com/powershell-ise-multiline-comment-and-uncomment-done-right-and-other-ise-gui-must-haves/


PowerShell : Hunt CheckBox of Doom

$
0
0
I had posted a while back about the dreaded Checkbox of Doom which is a real pain in the Migration Scenarios where few AD Users might be marked as protected (Admincount = 1) but we don't really know which Group membership (marked as protected) might be causing this. 

Shout out to MVP Ace Fekay for providing his insights on the topic :)


It becomes a pain when the Groups are nested multiple levels and to determine which Portected Groups membership the User have which might be causing the Inheritance disabled (checkbox of doom).


[Update]  Fellow friend andMVP Guido Oliveira highlighted that he had come across an issue where the AdminCount was once set to 1 when the User was part of a Protected Group. Once he was removed from the Group as per the Wiki Link shared at the end the AdminCount and the Inheritance will still be disabled so this Function can hunt those accounts too.

Function is up for download @Technet : Click Here

Read below on how to use the Script and the Scenario it tackles.

Scenario

I have 2 groups named NestedGroup1 & NestedGroup2 which are nested like below in the Server Operators (Protected Group) , also they have a User xyzabc& test123 added respectively to each as shown below :


Now after explaining the Nested Scenario, I am going to explicitly remove the Inheritance from one of the User named Abdul.Yanwube, see below :


Now I did this to actually show the 2 types of accounts which can have Inheritance disabled :

  1. Protected Accounts : AD Users which are part of a Protected Group (can be nested)
  2. Non Admin Users : AD Users which might have Inheritance disabled because of Manual Error or during Migration if something broke and disabled inheritance.


Running the Function :

Note - The Function leverages the ActiveDirectory PowerShell Module (prerequisite).

Dot Source the PS1 file (got from Technet). 

. C:\Users\Dexter\Downloads\Get-ADUserWithInheritanceDisabled.ps1 #Mark the first dot at beginning

Once done read the help for the function by issuing below :
help Get-ADUserWithInheritanceDisabled -Full 

The Function uses the AD PowerShell Module to fetch the ADUsers with needed attributes and then process them.  The Function has 3 parameter sets based on  how the Get-ADUser cmdlet from the AD PS Module is invoked to fetch the Users.


  1. Specifying SamAccountName(s)
  2. Using -Filter with SearchBase and SearchScope
  3. Using -LDAPFilter with SearchBase and SearchScope

Specifying SamAccountName(s)


If you have a list of SamAccountNames dumped in a CSV/ text file or any data source and you know how to fetch it using PowerShell, then you can pipe the string array of SamAccountName to the Function and it will process them.

For Example: a test.txt file has the samaccountnames - dexterposh,test123,xyz1abc & abdul.yanwube in it. We use Get-Content to get the content and pipe it to the Function like below :
PS>Get-Content C:\temp\test.txt | Get-ADUserWithInheritanceDisabled


SamAccountname : DexterPOSH
UserPrincipalname : DexterPOSH@dex.com
IsAdmin : True
InheritanceDisabled : True
ProtectedGroup1 : CN=Schema Admins,CN=Users,DC=dex,DC=com
ProtectedGroup2 : CN=Administrators,CN=Builtin,DC=dex,DC=com
ProtectedGroup3 : CN=Enterprise Admins,CN=Users,DC=dex,DC=com
ProtectedGroup4 : CN=Domain Admins,CN=Users,DC=dex,DC=com

SamAccountname : test123
UserPrincipalname : test123@dex.com
IsAdmin : True
InheritanceDisabled : True
ProtectedGroup1 : CN=NestedGroup2,CN=Users,DC=dex,DC=com

WARNING: [PROCESS] : SamAccountName : Cannot find an object with identity: 'xyz1abc' under: 'DC=dex,DC=com'..exception
SamAccountname : Abdul.Yanwube
UserPrincipalname : Abdul.Yanwube@dex.com
IsAdmin : False
InheritanceDisabled : True

Note - The Function throws a warning if it is not able to locate a User with the account name.

Also see the output for a while and see that it reports the Scenario we had discussed earlier.

Using -Filter with SearchBase and SearchScope

Now there might be times when you want to search a particular OU in AD recursively for Users with Inheritance disabled.As the function uses Get-ADUser to retrieve the User details the -Filter (Mandatory), -SearchBase, - SearchScope parameters are the same you would use with the Get-ADUser cmdlet.
 Note - Below how the use of Base & OneLevel argument to -SearchScope parameter changes the result.
PS>Get-ADUserWithInheritanceDisabled -Filter * -SearchBase 'OU=ExchangeUsers,DC=Dex,DC=Com' -SearchScope Base

PS>Get-ADUserWithInheritanceDisabled -Filter * -SearchBase 'OU=ExchangeUsers,DC=Dex,DC=Com' -SearchScope OneLevel


SamAccountname : DexterPOSH
UserPrincipalname : DexterPOSH@dex.com
IsAdmin : True
InheritanceDisabled : True
ProtectedGroup1 : CN=Schema Admins,CN=Users,DC=dex,DC=com
ProtectedGroup2 : CN=Administrators,CN=Builtin,DC=dex,DC=com
ProtectedGroup3 : CN=Enterprise Admins,CN=Users,DC=dex,DC=com
ProtectedGroup4 : CN=Domain Admins,CN=Users,DC=dex,DC=com


 Using -LDAPFilter with SearchBase and SearchScope

If you are more comfortable to using LDAPFilter then the Function let's you use them in order to search for Users matching the criteria and processes them.
PS>Get-ADUserWithInheritanceDisabled -LDAPFilter '(&(objectCategory=person)(objectClass=user)(name=test*))' -SearchBase 'OU=ExchangeUsers,Dc=Dex,Dc=Com'


SamAccountname : test123
UserPrincipalname : test123@dex.com
IsAdmin : True
InheritanceDisabled : True
ProtectedGroup1 : CN=NestedGroup2,CN=Users,DC=dex,DC
 
The Function spits out CustomObjects which have the relevant information for the Users and as discussed in the Scenario it is able to detect the corresponding protected Groups for a User with Inheritance disabled (if any) and report them.


Below is a gist showing this in action:


If you have any suggestions on how to improve the Script then please leave a comment or contact me :)

Resources : 

Technet Wiki Article on : AdminSDHolder, Protected Groups and Security Descriptor Propagator


PowerShell + Azure : Validate ResourceGroup Tags

$
0
0

Recently been working on some DevOps stuff in Azure using Python & PowerShell, so would be doing few posts revolving around that.

Why I have added the below pic ?
Python is what I have been picking from the Dev world (currently) and PowerShell is what I have picked from the Ops world.


In Azure Resource Manager, one can add tags to the Resource Groups (check out the new Azure Portal to explore ResourceGroups ). Last week had to script a way to check that there is a Tag on the resource group with a valid set of values. Python Azure SDK doesn't yet support Azure Resource Manager operations so had to turn to the Ops side (PowerShell way).

Don't worry if you have no idea what a tag is, the validation code is pretty neat.


For Example - the Resource Group should have a tag named "Environment" on it with the valid values of "Dev","QA"& "Prod" .


There can be other tags on it but we are looking only for the existence of this tag & values.

Let's get started.
  1. Since Azure Resource Manager cmdlets doesn't support Certificate based authentication. We have to use Azure AD here. First step is to use below cmdlet to add your account using which you login to the Azure Portal.
  2. Add-AzureAccount

  3. Once authenticated , Switch to using Azure resource manager cmdlets using the below cmdlet. So that we get the AzureResourceManager Module loaded.
  4. Switch-AzureMode-Name AzureResourceManager

  5. Now you can see in the PowerShell host that the AzureResourceManager Module is loaded:
  6. PS>Get-Module

    ModuleType Version Name ExportedCommands
    ---------- ------- ---- ----------------
    Manifest 0.9.1 AzureResourceManager {Add-AlertRule, Add-AutoscaleSetting, Add-AzureAccount, Ad...

  7.  Use the cmdlet Get-AzureResourceGroup to get Resource Groups and store them in a variable for later processing.
  8. PS>$ResourceGroups = Get-AzureResourceGroup
  9. Now we can filter Resource Groups which have tags property like below :
    PS>$ResourceGroups | where tags


    ResourceGroupName : DexterPOSHCloudService
    Location : southeastasia
    ProvisioningState : Succeeded
    Tags :
    Name Value
    =========== =========
    Environment QA
    TestKey TestValue

    ResourceId : /subscriptions/4359ee69-61ce-430c-b885-4083b2656de7/resourceGroups/DexterPOSHCloudService

    ResourceGroupName : dexterseg
    Location : southeastasia
    ProvisioningState : Succeeded
    Tags :
    Name Value
    =========== =======
    Environment Testing

    ResourceId : /subscriptions/4359ee69-61ce-430c-b885-4083b2656de7/resourceGroups/dexterseg


    Maybe those who don't have the Tags property we can throw a warning but I leave the Scripting logic for you to build upon.
  10. Now out of the 2 Resource groups above one has a valid Environment Tag of value "QA" (in green) but the other one has an invalid tag value of "Testing"  (in yellow).
    Before we start validating the Values we need to check if the Tag contains the desired Environment tag, for this we can use the contains() method.

    But if you look closely you will find something strange with the tags property :
    PS>$ResourceGroups[0].tags

    Name Value
    ---- -----
    Value LAB
    Name Environment
    Value TestValue
    Name TestKey

    Tags property is a hashtable but the keys are "Name"& "Value" literal. Not very intuitive as I thought I would be getting the Environment as one of the key for the hashtable returned, submitted a issue at the GitHub repo for this.
    Until it is fixed we can check if at all our Environment tag is present by using the ContainsValue method on the Hashtable, like below :
    PS>$ResourceGroups[0].tags[0].ContainsValue('Environment')
    True

    Now if the tag has the Environment as the value for 'Name' key then evidently the value for 'Value' key will be the one we are seeking.
    PS>$ResourceGroups[0].tags[0]['Name']
    Environment
    PS>$ResourceGroups[0].tags[0]['Value']
    QA

    Wow ! so much work am already dozing off :P
  11. It appears validating the value is one of our permitted values ('Dev','QA','Prod') is relatively easy using the validateset() parameter attribute, see the below:
    PS>[Validateset('DEV','QA','PROD')]$testme = $ResourceGroups[0].tags[0]['Value']
    PS>[Validateset('DEV','QA','PROD')]$testme = $ResourceGroups[1].tags[0]['Value']
    The attribute cannot be added because variable testme with value LAB would no longer be valid.
    At line:1 char:1
    + [Validateset('DEV','QA','PROD')]$testme = $ResourceGroups[0].tags[0]['Value']
    + ~~~~~~~~~~~~~~~~~~~~~~~~~~~~~~~~~~~~~~~~~~~~~~~~~~~~~~~~~~~~~~~~~~~~~~~~~~~~~
    + CategoryInfo : MetadataError: (:) [], ValidationMetadataException
    + FullyQualifiedErrorId : ValidateSetFailure


    When we decorate the $testme variable with the ValidateSet() attribute and perform the assignment it will throw an exception if the value is not in the set (note that the second resource group in step 5 doesn't have a valid Environment tag), which we can catch later and display a message saying that the Environment tag doesn't have a valid value.

[Update] - Forgot to mention a detail, which I got reminded when I saw a tweet by Stefan Strangermentioning that the ContainsValue() method on a hashtable is case-sensitive. Workaround to that by MVP Dave Wyatt is in below tweet :


Below is the sample code for one to build upon :
001
002
003
004
005
006
007
008
009
010
011
012
013
014
015
016
017
018
019
020
021
022
023
024
Add-AzureAccount
Switch-AzureMode -Name AzureResourceManager

$ResourceGroups = Get-AzureResourceGroup | where Tags

foreach ($ResourceGroup in $ResourceGroups) {  
  if ($ResourceGroup.tags.values.Contains('Environment')) {
    Write-Verbose -Message "$($ResourceGroup.ResourceGroupName) Environment tag not found" -Verbose
        foreach ($Tag in $ResourceGroup.Tags) {
        
            if ($Tag.ContainsValue('Environment')) {
                TRY {
                    [validateset('DEV','QA','PROD')]$testme = $Tag['Value']
                }
                CATCH [System.Management.Automation.ValidationMetadataException] {
                    Write-Error -Message "Environment tag doesn't contain a valid value -->('DEV','QA','PROD')"
                }
            }
        }
    }
    else {
        Write-Warning -Message "$($ResourceGroup.ResourceGroupName) Environment tag not found"
    }    
}


Thanks for reading and that is it for today's post.
~Dex~


PowerShell + Pester + Jenkins : Journey to Continuous Integration

$
0
0

Continuous Integration, huh ?

Simply put CI is running all the tests (against your code, system etc) frequently in order to perform code validation and see everything is integrating well with each other. For Example - If I check in Code then CI runs all the tests to see if the commit did break anything.

Why are we doing this CI stuff anyway ?

To check if something failed on regular basis, so that it is easy to fix it at the earlier stage.


Note
- I am a mere mortal and follower of DevOps (much broader term) but have started to appreciate the simplicity all these concepts bring in. Don't mistake me for an expert here ;)

A little background on why I explored using Jenkins as the CI solution, the Project recently I started working on requires me to code in Python/ PowerShell and the team already uses Jenkins for other projects in Python, Java, Ruby etc so we needed to integrate running of Pester tests from Jenkins for our PowerShell codebase.


With all the CI stuff cleared out, time to move on towards the task at hand for this post.
In this post, I have a Jenkins Server installed on an Azure VM. The installation is pretty straightforward and I was drafting a post from scratch on this but then stumbled across a tweet by Matthew Hodgkins and his posts are superb job , Check out Resources Section at the bottom for link to his posts.

Below is the tweet :


So moving on this post will only revolve around integrating Pester with Jenkins-

We need to perform few house keeping steps to make the Pester integration easier for us.

  1. Install PowerShell Plugin& Nunit Plugin. Click on Manage Jenkins> Manage Plugins > Under Available tab , search 'PowerShell' , 'Nunit' respectively and install them :

  2. Once done come back to the Home page and click 'New Item' and create a free style project.

  3.  Your new project should appear in the dashboard now, hover over it and click on 'Configure'. Notice that

  4. For this post I am gonna dump a PS1 file and associated Pester tests in a directory and add a build step which runs Pester tests. One can play and integrate their Version control tools like Git, Subversion etc too with Jenkins. So Let's configure our new Project to use a Folder say E:\PowerShell_Project now. Below is a gif to show that :

  5.  Now in the same page above scroll down to Build steps and add a simple build action to show you a possible gotcha.Note - We added the PowerShell Plugin to Jenkins to get the option to add build step using PowerShell natively.
    Let's add few test PS statments to it like :
    $env:UserName
    Get-Module Pester
    Get-Location


    Note - You can use $env:PSModulePath in above code (or normal PS console) snippet to see which all folders PowerShell looks for the Module disocvery.


  6.  Click on "Build Now"forthe project to see a possible pitfall.

  7.  Below is the console output of the above build run :
    Started by user anonymous
    Building in workspace E:\PowerShell_Project
    [PowerShell_Project] $ powershell.exe "& 'C:\Windows\TEMP\hudson3182214357221040941.ps1'"
    DEXCLIENT$

    Path
    ----
    E:\PowerShell_Project


    Finished: SUCCESS
    Few important things to note here are  :
    • When running PowerShell code as part of a build step be informed of which User account is being used. For my case I see it using the System Account (my .machine name is DexClient)
    • Based on above check if the Module is discoverable to PowerShell, notice that the Get-Module Pester in the build step return nothing. (Pester was placed in my User's Modules folder).
    • If you are using a Custom workspace (step 4) the default location for PowerShell host that runs our code (added in build step) is set to that Folder.
    • Check out how Jenkins runs the PowerShell code specified in the build step.
      powershell.exe
       
  8. Now one can definitely configure Jenkins to handle this in a better way but that would make my post lengthy. Quick fix here is to load the Pester Module explicitly with full path. For example : Import-Module 'Import-Module 'C:\Users\dexterposh\WindowsPowerShell\Modules\Pester\pester.psd1'
  9. Once you have taken care of how to load the Module, you can add another build step for modify the existing one to run Pester tests.I modified the existing build step to look like below :Import-Module 'C:\Users\dexterposh\WindowsPowerShell\Modules\Pester\pester.psd1'
    Invoke-Pester -EnableExit -OutputFile PSTestresults.xml -OutputFormat NUnitXml


    Take a note of the parameters used here -OutputFile , -OutputFormat and -EnableExit switch.
    Pester is really awesome as it supports integrating with almost all CI Solutions out there.
    Read morehere
  10.  As a last step , We will be adding a post-build step to consume our PSTestresults.xml by the Nunit Module. Below is the last gist showing the test run :


Resources :

Matthew Hodgkins - Post on installing Jenkins and Automation using PowerShell
https://www.hodgkins.net.au/powershell/automating-with-jenkins-and-powershell-on-windows-part-1/


https://github.com/pester/Pester#continuous-integration-with-pesterhttps://wiki.jenkins-ci.org/display/JENKINS/Installing+Jenkins

PowerShell MVP 2015

$
0
0
I received the official notification yesterday that my PowerShell MVP award has been renewed !!


In this post, I try to look back at my journey as a PowerShell MVP :)

This award is dedicated to PSBUG which feels like a family to me know.

Initially Overwhelmed

At first when I got the award I was overwhelmed, to be in the elite group in the World is something. I felt a tremendous pressure as now I was bestowed upon by such a huge responsibility. Initial few months I was under the MVP vibe, People recognized me wherever I went. I got a chance to introduce myself as a MVP.
Below is one of the pic from the User Group meet :

Troubles

But soon the dust settled and I realized that being a MVP at some point I stopped enjoying my work with PowerShell, it was more of a responsibility now.
After few weeks of pondering & meditating (I do, no kidding), I realized that the award is a recognition for the last year contributions and the very reason for it is that I enjoy learning and sharing it with the community.


MVP Open Day - Eye Opener

I went in for MVP Open Day at Bangalore and had time to hang out with MVPs from all over India, seeing really passionate people talking Tech all the time was an amazing experience and I understood that the secret to it all is to "Enjoy" and not be so hard on myself . Keep doing what I enjoy :)

The best part of the Open day was talking at lengths with Ravi Sir & Aman Sir.

From Left to Right : Ravikanth Sir, Aman Sir & me (#3 PS MVPs from India).

Inspiration Source - never runs dry

PSBUG community has been a great source of motivation and inspiration all along. Some of the amazing people in the Industry come together and talk Technology on a monthly basis, keeps the fire going.

Many people don't understand why to go and meet in person when you can watch tutorials online. Apart from the vast amount of knowledge you carry home , below are few which I can think of now :

  •  First you network with people who tackle real world problems and these interactions come in handy when needed.
  • Second is you can get ideas/ opinion on any Script/ Project you are working on from the Community. (Most of my last year posts came out of some cool ideas from the community)
  • Third, We don't do serious boring stuff at these meets. We crack jokes and share our IT stories often.

In my opinion, we all do the normal day to day work and get paid at month's end for it. Where is fun in that ? Once a month one can take some time off and get batteries charged.

PowerShell + Azure + Python : Use Project Custom Settings

$
0
0

Background

First to set up the background [bit reaching on the Dev side] on the post, quick introduction to what is an Azure Cloud service along with some terms Dev like to throw around:

Cloud Service :
PaaS offering , running VMs on Microsoft Azure. You have control over these VMs as you can remote into them and customize them to run your apps. A typical cloud service contains:

  • Web Role - Windows Server running IIS on top of it.
  • Worker Role - Windows Server.
Now using Visual Studio one can configure the Cloud Service as per ones need (Check Resources at the bottom). There are typically 2 files in your project definition which need tweaking (source : MSDN - link in Resources section) :


  • ServiceDefinition.csdef  : The service definition file defines the runtime settings for your cloud service including what roles are required, endpoints, and virtual machine size. None of the data stored in this file can be changed when your role is running.
  • ServiceConfiguration.cscfg : The service configuration file configures how many instances of a role are run and the values of the settings defined for a role. The data stored in this file can be changed while your role is running.


A full post on how to use Visual Studio to deploy a cloud service is out of scope for this post and me ;)

Task at hand

We were working on a Python projectwhich will run on top of Azure utilizing cloud services (web and worker role). We had to customize our worker role a bit using the custom settings that could be defined for a Cloud project in Visual Studio. 

The customization needed us to read the custom settings defined in the Service Configuration file for the Azure Worker role and then consume it as per some logic.

The link at MSDN shows how to do it in C#, so I tried to port it to PowerShell.
It is relatively easy if you have been working with PS for a while.


Steps:


  1. Create a new Project in Visual Studio.

  2. Select Python Azure Cloud Service template to start with (need Python Azure SDK installed).

  3. After you create the Project from the template, it will ask you to select roles for your Cloud Service. I have added a Web & Worker role, this depends on your project. After that it asks you to select a Python environment, I chose a virtual environment for my Python app again this depends on your project.


  4. Now let's add a custom setting to our Worker role. Right click the Worker role > Properties. It will open up a configuration page like below:

  5. Now go to 'Settings' and click on 'Add Settings' button; go ahead and add the custom setting.


    Note - Adding a custom setting above will make an entry in the ServiceConfiguration.*.csfg files , see below :

  6. Before moving further and showing you how to access the custom setting in your code, it is important to understand the role PowerShell plays in configuring a Role.

    If you notice there is a bin directory under your each Role which contains PS scripts which configure your role e.g installing webpi, windows features etc and also take notice of a ps.cmd file which invokes these PowerShell script as a startup task.


    Take a look at the ServiceDefinition.csdef (which contains the runtime settings for my cloud service) and notice that it creates a startup task for the role.


    Below is the gist showing the ps.cmd batch file which calls our PowerShell Script, you can always modify it to fit the custom requirements you have, leaving up to you to direct Verbose stream to a log file (verbose stream used later):
  7. Now to the final piece in the puzzle , How to access the custom setting value and use it while configuring the Worker Role ?
    Well the example is already provided at the MSDN, Click here

    PowerShell to the rescue. Since PowerShell Script is already being used to configure a cloud service. One can put the extra few lines of code into the Script named ConfigureCloudService.ps1 to access the custom setting and make decisions or perform any action based on the value. You could also add another script and get it called from the ps.cmd of configurecloudservice.ps1 (you know how it works already).

    Easiest way is to load the DLL and then simply call the static method named GetConfigurationSettingValue on the RoleEnvironment Class.

I think it doesn't get easier than this, PowerShell gives us the capability to tap into the .NET framework, as a System Admin working on Microsoft realm it makes me more productive. Have you boarded the PS bandwagon yet ?

Resources:

Configuring an Azure Project
https://msdn.microsoft.com/en-us/library/azure/ee405486.aspx

How to: Configure the Roles for an Azure Cloud Service with Visual Studio
https://msdn.microsoft.com/en-us/library/azure/hh369931.aspx

PowerShell + SCCM 2012 : Create Packages & Programs

$
0
0

It has been a while, since I chartered the waters of WMI and Configuration Manager, so pardon any silly mistakes made. One of my friend from PSBUG asked me few questions revolving around creating packages & programs in ConfigMgr using PowerShell.

Every ConfigMgr admin knows that new Application model has been introduced in ConfigMgr 12 but the Packages are here to stay for a while. Packages and Programs are ideal for deploying Scripts (one time or reoccurring ones) and better suited for deploying apps during OSD (heard this one).

ConfigMgr ideally has 3 ways of working with it and below is the pic which says it all :


The post is broken up in 3 parts (based on how you use ConfigMgr):

  1. GUI Way - Doing this to show background on how we do it manually.
  2. Cmdlet Way - using the CM cmdlets to create the package and program
  3. WMI Way - exploring WMI to do the same.


GUI Way :

I believe that doing things for few first times the GUI way helps understand and grasp the process but moving on we should try to automate repetitive tasks. Below is an animated gif showing how to create a minimalist Package & Program (for 7-zip) in ConfigMgr Console :


Cmdlet Way :

Using the cmdlets is straight forward but for sake of people who are starting new with PowerShell way of managing ConfigMgr. Below are the detailed steps.

Import the ConfigMgr Module. You should have ConfigMgr cmdlet library installed on your box now
PS>Import-Module -Name ConfigurationManager

Once done, the next step is discover the cmdlets. How you ask 
PS>Get-Command -Noun CMPackage -Module ConfigurationManager

CommandType Name ModuleName
----------- ---- ----------
Cmdlet Export-CMPackage ConfigurationManager
Cmdlet Get-CMPackage ConfigurationManager
Cmdlet Import-CMPackage ConfigurationManager
Cmdlet New-CMPackage ConfigurationManager
Cmdlet Remove-CMPackage ConfigurationManager
Cmdlet Set-CMPackage ConfigurationManager

Now go ahead and read the help for the cmdlet New-CMPackage to understand what I will be doing next. Create a new Package:
PS>New-CMPackage –Name “7Zip – PS Way” –Path "\\dexsccm\Packages\7-zip\v9.20"

If one looks closely at the syntax of the New-CMPackage file they will immediately notice that the cmdlet doesn't let you set whole lot of options in the package you just created. See below the different parameter sets for the cmdlet:
PS>Get-Command New-CMPackage -Syntax

New-CMPackage -Name [-Description ] [-Manufacturer ] [-Language ] [-Version ] [-Path ] [-DisableWildcardHandling] [-ForceWildcardHandling] [-WhatIf] [-Confirm] [commonparameters]

New-CMPackage -FromDefinition -PackageDefinitionName -SourceFileType -SourceFolderPathType -SourceFolderPath [-DisableWildcardHandling] [-ForceWildcardHandling] [-WhatIf] [-Confirm] commonparameters]

New-CMPackage -FromDefinition -PackagePath -PackageNoSourceFile [-DisableWildcardHandling] [-ForceWildcardHandling] [-WhatIf] [-Confirm] [commonparameters]

New-CMPackage -FromDefinition -PackagePath -SourceFileType -SourceFolderPathType -SourceFolderPath [-DisableWildcardHandling] [-ForceWildcardHandling] [-WhatIf]
[-Confirm] [commonparameters]

New-CMPackage -FromDefinition -PackageDefinitionName -PackageNoSourceFile [-DisableWildcardHandling] [-ForceWildcardHandling] [-WhatIf] [-Confirm] [commonparameters]

So how does one Set all those properties for a Package via PowerShell ??
Go ahead and read the help for Set-CMPackage cmdle and you will know this is the cmdlet which will do the rest customization needed for the Package created. Suppose I want to enable binary differential replication for this package along with setting the distribution priority to high for this package, use below :
PS>Set-CMPackage -Name “7Zip – PS Way” -EnableBinaryDeltaReplication
PS>Set-CMPackage -Name “7Zip – PS Way” -DistributionPriority High

Did you notice above, I had to use the Set-CMPackage cmdlet twice, Why ?
Hint - Check what are Parameter sets for a cmdlet in PowerShell.

Moving on, Now time to create the Program (standard) for the package which will install the 7zip package for us. The cmdlet is New-CMProgram, if you still don't know how to figure that out read the help for Get-Command ;)

Let's create the Program:

PS>New-CMProgram -PackageName “7Zip – PS Way” -StandardProgramName "7zip PS Install - Program" -CommandLine "msiexec.exe /I 7z920-x64.msi /quiet /norestart"

Now you can configure a lot of options for the program while creating it or you can also use Set-CMProgram to configure them later, for example I am setting the run type for the above standard program created as hidden type :

Set-CMProgram -PackageName “7Zip – PS Way” -StandardProgramName "7zip PS Install - Program" -StandardProgram -RunType Hidden

One can play with the Set-CMProgram to tweak the program settings as per need, there are a whole lot of the Parameters and switches to play with this cmdlet.

Once the Package and Program have been created it is time to distribute them to the DP Groups or DP. The cmdlet is Start-CMContentDistribution.
Start-CMContentDistribution -PackageName “7Zip – PS Way” -DistributionPointGroupName DexLabDPGroup 


WMI Way :

Let's get to the more adventurous way of creating the Packages & Programs using WMI.
Fair Warning that this is a more complex way and if you don't understand how WMI works then my advice would be to stick to the cmdlet way.

Start with creating a WMI Instance of SMS_Package class, supply the Package name and the PkgSourcePath while creating the instance.
New-CimInstance -ClassName SMS_Package -Property @{'Name'='7zip - WMI Way';'PkgSourcePath'="\\dexsccm\Pa
ages\7-zip\v9.20"} -Namespace Root/SMS/site_DEX


ActionInProgress : 1
AlternateContentProviders :
Description :
ExtendedData :
ExtendedDataSize : 0
ForcedDisconnectDelay : 5
ForcedDisconnectEnabled : False
ForcedDisconnectNumRetries : 2
Icon :
IconSize : 0
IgnoreAddressSchedule : False
ISVData :
ISVDataSize : 0
IsVersionCompatible :
Language :
LastRefreshTime : 4/10/1970 6:35:00 AM
LocalizedCategoryInstanceNames : {}
Manufacturer :
MIFFilename :
MIFName :
MIFPublisher :
MIFVersion :
Name : 7zip - WMI Way
NumOfPrograms : 0
PackageID : DEX00017
PackageSize : 0
PackageType : 0
PkgFlags : 0
PkgSourceFlag : 1
PkgSourcePath : \\dexsccm\Packages\7-zip\v9.20
PreferredAddressType :
------ Snipped -------

There are attributes or properties which you can set on a WMI Instance later after creation, but you need to read the Class documentation for properties with Read/Write access type.

Now, if we look at the Package created, we will soon notice that the PkgSourceFlag is set to 1 (default value - 
STORAGE_NO_SOURCE. The program does not use source files.), Check the  documentation  and you will realize you need to set it to 2 (STORAGE_DIRECT). With the value of 1 set for PkgSourceFlag you will see the below in the properties for the Package.


So let's get to it now. First get the CIMInstance stored in a variable and then use Set-CIMInstance to set the property PkgSourceFlag on it and verify the changes. Below is the code and gif in action (it shows green screen for the code executed)  :
# get the CIM Instance stored in a variable
$package = Get-CimInstance -ClassName SMS_Package -Filter "Name='7zip - WMI Way'" -Namespace root/SMS/site_DEX

# set the PkgSourceFlag on the CIM Instance
Set-CimInstance -InputObject $Package -Property @{'PkgSourceFlag'=[uint32]2}


Let's move ahead and create a new Program to install the Package using WMI. The WMI class tp focus on is SMS_Program. Before creating the WMI/CIM Instance reading the documentation of the classes is must to avoid any surprises.

The doc for the SMS_Program in Remarks lists below :

A program is always associated with a parent package and typically represents the installation program for the package. Note that more than one program can be associated with the same package. The application uses the PackageID property to make this association. Your application cannot change this property after the SMS_Program object is created. To associate the program with a different package, the application must delete the object and create a new object with a new PackageID value.

As mentioned above, we need PackageID for our Package in order to associate a Program t o it. If you are following this post then the variable $Package already has the PackageID property which we can dot reference and use.

Below is the code snippet which I used to create a new Program for the Package :

$ProgramHash3 = @{
PackageID=$($package.PackageID);
ProgramName='7zip WMI Install - Program';
CommandLine='msiexec.exe /I 7z920-x64.msi /quiet /norestart'

}
New-CimInstance -ClassName SMS_Program -Namespace Root/SMS/site_DEX -Property $ProgramHash3


Note - Found a bug at the MSDN SMS_Program documentation which says that the CommandLine property is not a Key Qualifier. Below is what the doc says :

CommandLine

Data type: String
Access type: Read/Write
Qualifiers: [ResID(904), ResDLL("SMS_RSTT.dll")]
The command line that runs when the program is started. The default value is "".

But while trying to create a new SMS_Program instance, I realized that one has to explicitly pass this while creating the Object and moreover this can't be an empty string too. See the below GIF :

Voila, Now you can read the documentation of the SMS_Program class and try using the Set-CIMInstance to set some of the writable attributes on the Object. As an exercise leaving the Content distribution using WMI here, if I remember correctly I did cover it in one of the earlier posts (not sure which one though).

Resources:

My PowerShell + ConfigMgr Posts collection (quite a few):
http://www.dexterposh.com/p/collection-of-all-my-configmgr.html

Configuration Manager PowerShell Tuesdays: Creating and Distributing a Package / Program
http://blogs.technet.com/b/neilp/archive/2013/01/15/configuration-manager-sp1-powershell-tuesday-creating-and-distribution-a-package-program.aspx


SMS_Package Class:
https://msdn.microsoft.com/en-us/library/cc144361.aspx
Viewing all 97 articles
Browse latest View live